Excerpt
Table of Contents
1 Introduction
2 Hydraulic Structures
2.1 Introduction
2.2 Construction Methods
2.2.1 Conventional (In-the-dry cofferdam construction)
2.2.2 Filled Cellular Sheet Pile Cell Construction
2.2.3 Roller Compacted Concrete Method
2.3 Float-In Construction
2.4 Construction Methods Selection Criteria
2.5 Case Studies
2.5.1 Case 1: Three Gorges Dam, China
2.5.1.1 Applied Method
2.5.1.2 Construction Method Evaluation
2.5.2 Case 2: Braddock Dam, Pittsburgh, PA, USA
2.5.3 Applied Method
2.5.3.1 Construction Method Evaluation
2.6 Conclusions and Recommendations
2.7 Acknowledgements
3 Caissons
3.1 Introduction
3.2 Construction Methods
3.2.1 Box Caissons
3.2.2 Opened Caissons
3.2.3 Pneumatic Caissons
3.3 Construction Methods Selection Criteria
3.4 Case studies
3.4.1 Case 1: The Brooklyn Bridge Caisson, NY, USA
3.4.1.1 Applied Method
3.4.1.2 Construction Method Evaluation
3.4.2 Case 2: New Tacoma Narrows Bridge, Tacoma, USA
3.4.2.1 Applied Method
3.4.2.2 Construction Method Evaluation
3.5 Conclusions and Recommendations
3.6 Acknowledgements
4 Short-span Bridges
4.1 Introduction
4.2 Segmental Concrete Bridges
4.2.1 Casting Methods
4.2.1.1 Pre-Cast Segments
4.2.1.2 Cast-in-place Segments
4.2.2 Erection Methods
4.2.2.1 Span-by-Span Method
4.2.2.2 Balanced Cantilever Method
4.2.2.3 Unidirectional Cantilever Method
4.2.2.4 Incremental Launch Method
4.3 Arch Bridge Construction
4.3.1 Cast-in-place
4.3.2 Precast Construction
4.4 Steel Bridge Construction
4.4.1 On-site Assembly by Cranes
4.4.2 Segmental Erection Alternatives
4.5 Construction Methods Selection Criteria
4.6 Case Studies
4.6.1 Case 1: Ravensbosch Viaduct, Netherlands
4.6.1.1 Applied Method
4.6.1.2 Construction Method Evaluation
4.6.2 Case 2: King Fahd Causeway, Saudi Arabia – Bahrain
4.6.2.1 Applied Method
4.6.2.2 Construction Method Evaluation
4.7 Conclusions and Recommendations
4.8 Acknowledgements
5 Long-span Bridges
5.1 Introduction
5.2 Construction Methods
5.2.1 Conventional Method
5.2.2 Balanced Cantilever Method
5.2.3 Unidirectional Cantilever Method
5.2.4 Mid-span Suspension Bridge Construction
5.2.5 Incremental Launch Method
5.3 Construction Methods Selection Criteria
5.4 Case Studies
5.4.1 Case 1: Russky Island Cable-Stayed Bridge, Russia
5.4.1.1 Applied Method
5.4.1.2 Construction Method Evaluation
5.4.2 Case 2: Humber Suspension Bridge, UK
5.4.2.1 Applied Method
5.4.2.2 Construction Method Evaluation
5.5 Conclusions and Recommendations
5.6 Acknowledgements
6 Tunnels
6.1 Introduction
6.2 Construction Methods
6.2.1 Trenched Methods
6.2.2 Immersed Tunneling
6.2.3 Tunnel Boring
6.2.3.1 Soft Ground Tunnel Boring
6.2.3.2 Hard Rock Tunnel Boring
6.2.4 Jacked Box Tunneling
6.2.5 Drill-and-Blast Method
6.2.6 Sequential Excavation Method (SEM)
6.3 Construction Methods Selection Criteria
6.4 Case Studies
6.4.1 Case 1: The Boston Big Dig, Boston, USA
6.4.1.1 Applied Method
6.4.1.2 Construction Method Evaluation
6.4.2 Case 2: The Channel Tunnel, France – UK
6.4.2.1 Applied Method
6.4.2.2 Construction Method Evaluation
6.5 Conclusions and Recommendations
6.6 Acknowledgements
7 Pipelines
7.1 Introduction
7.2 Construction Methods
7.2.1 Trenched Method
7.2.2 Pipe Jacking
7.2.2.1 Conventional Pipe Jacking (CPJ)
7.2.2.2 Micro-Tunnel Boring
7.2.3 Utility Tunneling (UT)
7.2.4 Horizontal Earth Boring Methods
7.2.4.1 Horizontal Auger Boring (HAB)
7.2.4.2 Pipe Ramming (PR)
7.2.4.3 Horizontal Directional Drilling (HDD)
7.2.4.4 Pilot-Tube Micro-Tunneling (PTMT)
7.3 Construction Methods Selection Criteria
7.4 Case Studies
7.4.1 Case 1: PEPSI Bottling Plant, Newport News, VA, USA
7.4.1.1 Applied Method
7.4.1.2 Construction Method Evaluation
7.4.2 Case 2: The Santa Ana River Interceptor Relocation Project, Yorba Linda, CA, USA
7.4.2.1 Applied Method
7.4.2.2 Construction Method Evaluation
7.5 Conclusions and Recommendations
7.6 Acknowledgements
8 Multi-Storey Underground Buildings
8.1 Introduction
8.2 Construction Methods
8.2.1 Open-Cut Construction
8.2.2 Bottom-Up Construction
8.2.3 Top-Down Construction
8.3 Side Support Systems
8.3.1 Sheet Piles
8.3.2 Soldier Piles (Berlin Walls)
8.3.3 Bored Pile Walls
8.3.3.1 Contiguous Piles
8.3.3.2 Secant Piles
8.3.4 Diaphragm Walls
8.4 Controlling Water Level
8.4.1 Dewatering Techniques
8.4.2 Seepage Cut-Off
8.5 Construction Methods Selection Criteria
8.6 Case Studies
8.6.1 Case 1: Tahrir Square Garage, Cairo, Egypt
8.6.1.1 Applied Method
8.6.1.2 Construction Method Evaluation
8.6.2 Case 2: Basement Car Park, Staines, UK
8.6.2.1 Applied Method
8.6.2.2 Construction Method Evaluation
8.7 Conclusions and Recommendations
8.8 Acknowledgements
9 Elevated RC Tanks
9.1 Introduction
9.2 Supporting System Construction Methods
9.2.1 Conventional Formwork
9.2.2 Jump (Climbing) Formwork
9.2.2.1 Types of Jump Forms
9.2.2.2 Method Sequence and Components
9.2.3 Slip-forms
9.3 Tank Vessel Construction Methods
9.3.1 Conventional Massive Structured False Work
9.3.2 Suspended False Work Method
9.3.3 False Work Lift (Pushed) Method
9.3.4 Liftslab Method
9.4 Construction Methods Selection Criteria
9.5 Case Studies
9.5.1 Case 1: Frankfort – Kentucky Elevated Water Storage Tank
9.5.2 Case 2: Disney Road Elevated Water Storage Tank
9.5.3 Construction Method Evaluation
9.6 Conclusions and Recommendations
9.7 Acknowledgements
10 Conclusions
10.1 Introduction
10.2 DETRIMENTAL FACTORS
10.2.1 Site Conditions
10.2.1.1 Subsurface Conditions
10.2.1.2 Crossings
10.2.1.3 Neighboring Structures
10.2.2 Size and Structural Systems
10.2.2.1 Bridge Structural Systems
10.2.2.2 Underground Structural Systems
10.2.2.3 Pipeline Cross-Section and Material
10.2.3 Legal Factors
10.2.4 Contractual Factors
10.3 Non-Detrimental Factors
10.4 The Decision Making Process
10.5 Conclusions
10.6 Acknowledgements
References
1 Introduction
The term infrastructure typically refers to “Structures, systems, and facilities serving a country, city, or area, including the services and facilities necessary for its economy to function.” It usually describes engineering structures such as roads, bridges, tunnels, water supply, sewers, electrical grids, telecommunications, etc. (Wikimedia Foundation, Inc., 2016). From here comes the link between infrastructure and engineering in general and civil engineering in specific as it is our job as engineering teams to design and construct these different types of infrastructures.
The growth in infrastructures has been tremendous as a reflection to the increase in population worldwide coupled with an increase in the standard of living and urbanisation. One example could be seen in the increase in the percentage of people having access to potable water worldwide which increased from 86% in 2006 to 91% in 2015 (World Bank Group, 2016) which reflects a significant increase in the construction of hydraulic structures, potable water stations, elevated potable water tanks and potable water pipelines within the past decade. Another example is the worldwide electric power consumption which increased from 2724.4 kWh per capita in 2006 to 3104.7 kWh per capita in 2015 (World Bank Group, 2016) hence reflecting a tremendous increase in the construction of new power stations and transmission lines within the last decade. This significant growth in infrastructure construction forced researchers in various fields of civil engineering to perform more research that targets constructing various types of infrastructures in a safe, cost-effective and timely fashion with the utmost level of quality and environmental friendliness.
On the other hand, the construction of infrastructures like bridges, tunnels, pipelines, elevated tanks, underground structures, hydraulic structures and caissons involves heavy construction activities. Each type of these structures involves activities categorized as heavy construction activities that involve capital intensiveness, non-conventional equipment and non-typical construction technology. Hence, constructing such infrastructures requires certain level of know-how that may not be easily available within average engineers and contractors. The choice between the different construction methods within projects of such large scale should be performed on solid scientific basis.
The selection criteria of different construction methods vary from one type of structures to the other. The current study is the fruit of a series of studies in which the selection criteria for different types of infrastructure were studied. The different types of factors governing the choice of the different construction methods applicable to infrastructure projects involving heavy construction activities have been studied and categorized based on its level of importance when it comes to the choice between different methods. Different cases for existing projects all over the globe are examined as case studies to prove the validity of this categorization of governing factors.
Although this area is apparently extremely important in terms of research, there is no single source of information covering different types of construction methods used to construct the different types of infrastructures. This book covers this gap as the study performed within this book has included the eight types of infrastructures involving the most non-conventional heavy construction technologies; simpler infrastructures were not included here. One type of infrastructures would be examined within each of the following eight chapters from a construction methods perspective. Within each chapter, a literature review for the different construction methods that could be used to construct each infrastructure is performed. Based on that, a set of selection criteria is prepared to facilitate selecting between the different methods based on the different factors that govern the choice between different methods. Two case studies are presented within each chapter in order to examine the validity of the selection criteria set within the chapter.
2 Hydraulic Structures
Summary:
Hydraulic structures are one of the very important infrastructures for countries to control and benefit from its resources. These types of projects are considered mega projects for various types of characteristics like cost, constructability, resources and time. When it comes to construction methods, there is the conventional method and innovative methods. This chapter covers different construction methods covering the construction of hydraulic structures in general and dams in specific. The selection criteria used to determine the best method to be used for each specific construction conditions is set. Two dams with different sizes and project conditions were studied and examined against the selection criteria in order to evaluate the validity of the applied construction method in each case. A previous version of this chapter was published as a conference paper by (Darwish, et al., Selection Criteria for Dam Construction Methods, 2015) titled “Selection Criteria for Dam Construction Methods”.
2.1 Introduction
The term “Dam” is a general term that generally refers to a hydraulic structure that has the primary function of impounding water by retaining it. This type of hydraulic structures can be naturally implemented or manmade. From the construction perspective the only difference between constructing a dam and constructing a barrage is the size of the job, resulting in some changes in the construction techniques (Limburg, 2006). Also, it is worth mentioning that man-made dams don’t represent a modern idea, as some of the dams have been dated to B.C dates up to 3000 BC. There are many criteria used to classify the man made dams; some of them are: by referring to the size of the dam, the structure of the dam, the use of the dam or the material of the dam. Accordingly, using the classifying criterion based on the structure of the dam, dams can be classified into Arch dams, Gravity dams, Arch-gravity dams, Barrages, Buttress dams and Embankment dams (British Dam Society, 2013).
Gravity dams are given their name as gravity holds the structure to the ground stopping the water behind it from pushing it over. A cross-section through a gravity dam will usually look triangular or trapezoidal. Such structures are typically made of concrete and/or masonry, constructed across wide or narrow valleys and need to be built on sound rock to support its own weight and the large lateral hydraulic load.
From its name, an arch dam has a shape of an arch with the top of the arch pointing back into the water. An arch is a strong shape used to resist all the pushing forces coming from the water behind it. It is typically made of concrete and located in narrow, steep sided valleys. Arch dams need good rock for their foundations, and for the sides of the valleys, to resist the forces on the dam (British Dam Society, 2012).
On the other hand, Arch-Gravity dams constitute a combination for both the arch dam and gravity dam. It is constructed in areas with huge water flow, but with limited materials available for purely constructing a gravity dam. The lateral force that the dam is subjected to is mainly resisted by the “arch-effect” hence; the gravitation force required by the dam is lessened decreasing the need for a massive dam. This shall allow for building a thinner dam, which result in saving resources. An example of the arch gravity dam is the Hoover dam located on the borders of Nevada and Arizona (British Dam Society, 2012).
Buttress Dams are supported by triangular shaped walls, called buttresses. The buttresses are aligned apart from each other at the downstream side. Buttresses dams are developed from the idea of gravity dams; however, it uses less material due to the clear spaces between the buttresses. Such dams are also made of concrete and/or masonry, constructed across wide or narrow valleys and need to be built on sound rock to support its own weight and the large lateral hydraulic load (British Dam Society, 2012).
Embankment Dams are either earth fill or rock fill dams. Rock fill dams are mainly made from compacted rock fill, while earth fill dams are principally made of compacted earth. The materials used to construct the dams are typically excavated or quarried from nearby locations. A bank or hill is a typical cross-section for the embankment dams. Such dams have central section’s called cores that are made from impermeable materials to stop the water leaking through the dam. They could be made out of soils, concrete or asphaltic concrete. Such massive dams are typically constructed in sites with wide valleys and could be built on hard rock or softer soils, as they do not exert too much pressure on their foundation (British Dam Society, 2012).
A barrage is a special kind of a dam consisting of a line of gates that can be opened or closed, according to preference in order to manage the amount of water passing the dam. According to the British dam society, “The gates are set between flanking piers which are responsible for supporting the water load, and are often used to control and stabilize water flow for irrigation systems” (British Dam Society, 2012).
Concerning dam construction methods, the different methods could be classified into “Dry methods”, in which the construction site must be dry for construction to take place and “Wet methods”, in which de-watering of the whole site is not needed, and construction takes place in a wet site. The four dam construction methods are the conventional in-the-dry method and three innovative methods. The three innovative alternative construction methods the Concrete-Filled Cellular Sheet Pile Cell Construction (wet method), Roller Compacted Concrete Dams (dry method) and the Float-In Method (wet method) (Spanish National Commission on Large Dams, 2012).
2.2 Construction Methods
2.2.1 Conventional (In-the-dry cofferdam construction)
In order to construct the dam in a dry environment the first step is usually done by diverting the water stream into a temporary alternative route for the water stream, this could be done by having one or more tunnel constructed using the “drill and blast” technique in which holes are drilled and explosives are put in the holes, and the broken rock is then removed after the explosion occurs. This is done until the tunnel is finished. A usual recommendation is lining the tunnels with concrete (Gerwick B. C., 1996).
The second and third steps involve constructing two cofferdams (upstream and downstream). A cofferdam is a temporary or permanent structure constructed to maintain water out of the excavation for a permanent structure by enclosing the area around the dam. Cofferdams are usually set up so as to allow construction of the actual dam to occur in-the-dry which will create a more familiar working environment to on-land structures. The upstream one is built first in order to force the water to take the alternative route, and then the downstream one is built in order to prevent water from flowing back to the site area. Also, pumps are usually used in order to dewater any remaining or seeping water (Gerwick B. C., 1996).
Cofferdams could be structurally classified into five different types; Braced, Earth-type, Timber crib, Double-walled sheet pile and Cellular cofferdams. The contractor usually carries out the design of cofferdams. In doing so, several factors are considered such as the sequence of construction, height, scour protection, sediment transportation, passage and stream flows, navigation (if applicable). The most commonly used material in the cofferdam construction is the sheet piles that are used within the braced, double-walled and cellular cofferdams types (Wordpress, 2012) (Gerwick B. C., 1996).
After removing the loose rock and rubble from the site area (step four). The plinth is made, usually from concrete, and used as a foundation or connection between the dam and the valley walls and floor. Also, it offers further prevention of the leakage of water by drilling holes and pumping cement grout into cracks in the rock in the area under the plinth. The thin concrete face on the upstream side of the dam is connected to the plinth by using water stops. Finally the dam body itself is constructed in-the-dry like any typical structure (Gerwick B. C., 1996). However, due to its massive nature (which will vary with its type and size) pouring concrete in such a project couldn’t be done in one stage due to the exothermic cement hydration reactions that could delay concrete curing. Hence, concrete blocks are poured in a manner that provides interlockage and provides a mode of heat dissipation in the same time as shown in Figure 1. Utilizing the use of chilled water pipes within the blocks is a common practice in this field.
illustration not visible in this excerpt
Figure 1: A cellular sheet pile cofferdam used to construct a lock in-the-dry in Nashville, Kentucky, USA, photo taken and authorized for reuse by (Tucker, 2012).
Although driving sheet piles is a time-consuming and effort-consuming process, using sheet pile cofferdams involves several merits. The highest benefit is the ease of construction of actual dam due to creating an easier working environment which is even safer than most of the wet techniques as the working environment is similar to on-land projects. In addition to that, no intense design considerations are required leading to faster rate of work and sheet piles are relatively easy to install and could be removed and used multiple times, hence the recycling nature of cofferdams makes them relatively more economic than other techniques (Peurifoy, Schexneydar, & Shapira, Construction Planning Equipment and Methods, 2006).
2.2.2 Filled Cellular Sheet Pile Cell Construction
This is an alternative innovative wet method that doesn’t require dewatering of the whole site. It is usually used to construct a big permanent cofferdam, or a small regular dam, as its advantages prevail on its limitation in such circumstances (Wordpress, 2012). The main two differences between this method and the previously discussed method is that this method is wet and the cofferdams constructed are a major part of the body of the newly constructed dam hence they could never be temporary as the conventional method (Gerwick B. C., 1996). There are two types or shapes of cellular pile cells; circular and diaphragm (Wordpress, 2012). The cellular shape is the most common type used nowadays.
The circular type is formed of a series of circular cells (main cells) which are connected by an arrangement of piles forming a semicircle (arc cells) as shown in Figure 2. The connection between the main and arc cell is welded in the form of a Y or T junctions. The part where the main is shared with the arc cell is called the common wall (Gerwick B. C., 1996). It consists of two main components: Main Cells or simply cells (circle-shaped) and Arc Cells or simply arcs (peanut Shaped) (Wordpress, 2012). The joint between the cell and the arc is a very tricky part that needs skilled labor and good quality control. It is usually welded using either T-junction or Y-junction (Gerwick B. C., 1996).
illustration not visible in this excerpt
Figure 2: Circular Sheet Pile Cofferdams.
The construction sequence of such structures involves initial pre-dredging then cells that will be built simultaneously across the river are constructed using multiple reusable templates. The cells (that could be filled by concrete or sand) are constructed individually by placing the template in the preferred position in the river. The interconnecting, steel sheet piles are driven to the bedrock using vibratory hammers (Peurifoy, Schexneydar, & Shapira, Construction Planning Equipment and Methods, 2006). In order to prepare the proper foundation for the concrete, each cell is excavated down to the rock. Then the bedrock foundation is cleaned and prepared and tremie concrete is poured through tremie pipes/tubes under water, from the bedrock up, to within 1 – 2 m of the targeted crest elevation. A concrete cell cap topping is poured on the tremie concrete. Finally, arc cells are installed to ensure the gap is filled between the main cells and the same procedures performed within the main cells are repeated for the arc cells (Gerwick B. C., 1996).
illustration not visible in this excerpt
Figure 3: Diaphragm Sheet Pile Cofferdams.
On the other hand the diaphragm type is formed from a succession of diaphragm of steel sheet piles connected as shown in Figure 3. The diaphragm walls are connected together with steel piles forming arches on both sides. Cells are filled with sand, gravel or concrete after being driven to required depth. In this type, the diaphragm separating the two cells is a straight wall (Wordpress, 2012). Therefore, it is required to fill adjacent cells at roughly the same rate. If this is not performed, unbalanced pressure from the fill could disfigure the diaphragm if not designed to carry this pressure. This can result in the failure of the interlocks (Gerwick B. C., 1996). Thus, in this case, the circular type has the upper hand above the diaphragm since in the former; it is not required to fill adjacent cells at the same time.
In general cellular cofferdams have several merits, one of them is the fact that the cells could be built simultaneously (and in any order) across the river (if sufficient resources are available), in order to reduce construction time. And as the case for sheet pile cofferdams, multiple re-usable templates can be used, resulting in cost reduction. The construction methodology results in a massive self-sustaining efficient structure which saves time as it could be the main part of the permanent dam body (depending on the dam design). Only standard marine construction equipment are needed, hence the abundance of contractors owning such equipment results in a decrease in the overall cost in addition to the fact that the materials needed are readily available. The time saving reduces the risk for the contractor, as it reduces the amount of time the section of work is exposed to the river environment. Furthermore, the overall environmental footprint during construction is reduced; accordingly, construction can be implemented without having to navigate the river during construction. However, all these merits prevail only when the right circumstances are available as such method is limited to small to medium sized dams and good quality control is needed regarding the welding procedures especially at the joints between the cells.
2.2.3 Roller Compacted Concrete Method
The roller compacted concrete (RCC) was developed in the 1960s mainly for applications involving high-volume concrete structures. RCC concrete mixtures differ from conventional concretes by its high percentage of the aggregates compared to the conventional concrete mixtures since RCC mixtures mainly consists of 90% aggregates and the other 10% consists simply of the Portland cement and a very low percentage of water in addition to that, pozolanic admixtures like silica fumes and fly ash are added to the mixture. The addition of pozolanic admixtures to the concrete is in order to increase the cohesiveness, lessen the permeability of the concrete and most important reduce the heat emissions produced from the cement hydration reaction. Hence, there is no need to divide the dam into inter-locking concrete blocks during forming and pouring anymore, in the matter of fact the concrete pour is done in vertical layers and compacted by compactors (ACI 207.5R-11, 2011) .
illustration not visible in this excerpt
Figure 4: RCC dam construction in Ghana, photo taken and authorized for reuse by (Schiffler, 2014).
This method is a typical in-the-dry method in terms of needing to re-route the river, construct two cofferdams upstream and downstream of the dam location and dewater the site. What is different here from the conventional method is the method of constructing the dam body itself. The dam construction is done in layers; the methodology in general is mainly placing lifts, ranges between 0.3m to 0.7m, of RCC concrete above each other but in a sloped manner. The downstream side is the sloped side while the upstream is kept vertical as shown in Figure 4. Concrete is transported to site in large dump trucks or conveyor belts and spread using dozers to evenly spread the freshly dumped concrete to fill the formwork marked zone. Vibratory compacting rollers – commonly used in pavements – are driven over the poured layer to compact it (ACI 207.5R-11, 2011). Due to the very short setting time, the climbing formwork (typically 1m in height) should be raised up quickly and the process is repeated for the next lift. As an alternative, slip-forms could be used in order to avoid wasting time in dismantling formwork and re-assembling it again. The fact that RCC has a very low slump eases the fast removal of formwork in addition to the fact that as the RCC isn’t poured in blocks like in the conventional method the amount of forms is less and the time to form and dismantle them is reduced. In between successive lifts, grout is injected in the connections to ensure no seepage or leakage would occur that potentially have disastrous consequences. Then, and when all layers have been poured and compacted, a smooth layer is added to give the dam a smooth facade and better distribute forces. Finally the cofferdams could be removed and the dam is flooded (Spanish National Commission on Large Dams, 2012).
This method saves significant costs specially in the formwork cost as it is lowered because the layer method allows for reuse of the same set of forms. In addition to that the cost of pipe cooling used in the conventional method is saved as no pipe cooling is required due to pozolanic admixtures reducing the heat of hydration. The sequence of forming, pouring and dismantling forms is significantly faster than that of the conventional method as the total project duration is almost 1-2 years less than conventional concrete dams. However, RCC could only be applied in limited types of soils as alkaline soils could induce unnecessary reactions with the pozolanic admixtures. Also producing RCC requires availability of large quantities of aggregates. In addition to that, the layer method allows for little room for error when compared to the conventional method as each layer depends structurally on the layers beneath. Hence, the compaction must be as perfect as possible especially in the lower and intermediate layers (Spanish National Commission on Large Dams, 2012).
2.3 Float-In Construction
The float-in method is a type of wet construction that allows the dam to be built in “wet” conditions. As the name suggests, segments of the dam float to the desired location and are placed alongside each other without the process of dewatering. These segments could be made of either precast concrete or prefabricated steel. In mega-projects, the float-in method could actually save huge amount of time and money as opposed to other methods (Butler, 2011).
The float-in method needs extensive planning and detailed designs. It is a difficult method to implement and only specific contractors will be able to construct a dam using the float-in method. First, the segments of either steel or concrete are assembled offshore and sent to the site. Then a launching facility is constructed at the same time dredging is carried out using dredgers or clamshells. The segments are launched to the casting basin, and then the casting basin is flooded. The segments are then towed using barges and placed in the specific locations and attached to the foundations. Lastly, the voids between the segments are filled with concrete by tremie concreting (Butler, 2011).
This method is ideal for large sized dams as it saves the cost and time of cofferdam construction. The fact that it doesn’t need the river to be rerouted during the dam construction reduces disturbance in the river trafic and also causes less environmental impacts when compared to other methods. Also, the fact that the segments are prepared in land then transported to the location allows for flexible customized dams design and allows time for terrain adjustments and leveling during foundation assembly as these operations could be done simultaneously while the segments are prepared elsewhere. However, only few contractors have the experience, special equipment and skilled labor resources enabling them to take such a job. In addition to that such a method needs extensive planning and site preparation (Ben C. Gerwick Inc., 2013) (US Army Corps of Engineers, 2013). The fact that tremie concreting is implemented forces the authorities to plan for more regular inspection, monitoring and maintenance programs to assure the structural soundness of the dam. The fact that construction and tremie concreting take place in the wet river environment is a source of risk by itself as it should be done during times/seasons of low river speed. In addition to all of that as the foundations are not constructed in a dry area, such a method is limited in use in case of soils having sufficient bearing capacities to support the dam own weight (Butler, 2011) (US Army Corps of Engineers, 2013).
2.4 Construction Methods Selection Criteria
Based on the discussion of the different dam construction methods presented in the previous section, a selection criteria could be developed to aid the decision making process concerning the dam construction methods. The project size, time frame, resources (whether material, labor or equipment), cost, level of risk and soil type are the main factors governing the method choice. From a project schedule perspective the float-in technique is the fastest (especially for large-scale projects) followed by the RCC method while the conventional and cellular methods are the slowest. However, this speed could be on the account of something else as the level of risk is highest in the float-in technique followed by the RCC method while the conventional and cellular methods are the least risky. From a material perspective the RCC is limited to a certain type of concrete with certain mix designs while the float-in method depends on the use of prefabricated concrete (or sometimes steel) with the aid of tremie concrete while typical conventional materials (whether concrete, sand, masonry or soils) are used when applying the conventional and cellular methods. The non-conventionality of the float-in and RCC methods is also attributed to the non-conventionality of the equipment associated with these methods in comparison with the relatively conventional equipment utilized in the other two methods. Hence, for most of cases, due to this capital intensiveness of the float-in and RCC methods, if properly designed and managed, these methods are cost saving when constructing larger dams while the other two are cost effective for small to moderate dams if properly designed and managed. Finally, the soil comes into effect due to its bearing capacity and chemical composition as for the float-in method having deep foundation is difficult to apply in wet conditions making this technique limited to soils of high bearing capacities (e.g. rock and firm clay) while the pozolanic admixtures used in the RCC could react with alkaline soils, hence it is not recommended for such soils while the other two types could be used for any soil provided the foundation system (shallow or deep) is designed properly. A summary of the selection criteria could be found in Table 1.
Table 1: Selection criteria for dam construction methods.
illustration not visible in this excerpt
2.5 Case Studies
2.5.1 Case 1: Three Gorges Dam, China
The Three Gorges Dam - built across the Yangtze River in China – is one of the largest dams in the world and the largest hydroelectric power plant built till today. It took fifteen years to build the dam and operate the hydropower station, as the construction started back in 1994 and by 2009 the construction was complete and all the equipment were being fitted and the generators started operating. This gravity dam is 2300 m long, 185 m high and its base is 115 m wide and at the top it is 40 m wide (Zhou, 2014).
2.5.1.1 Applied Method
This $ 22.5 billion project was divided into three main phases. However, due to the permeability and low bearing capacity of the soil beneath the river, grout was injected in the soil all over the location before the beginning of phase I. The three phases are shown in Figure 5, Figure 5a illustrates the construction of phase I in which a rock fill cofferdam (covering the upstream, side and downstream) was built on the left side of the river then water was sucked out of the river through pumps, following that, the pit was excavated to a deeper depth to sustain the flow of the river as the river was diverted to this side (left) during the next phase while the construction of the main dam was ongoing on the right side. After that a concrete cofferdam was constructed along the side of the excavated pit and then the rock fill cofferdams were destroyed allowing water to flood the pit in order to re-route the river. After the river is re-routed, phase II of construction takes place as shown in Figure 5b. Within this phase another two rock fill cofferdams were built on the right side of the river, upstream and downstream of the area where the dam was to be constructed. After dewatering, the construction of this part of the main dam commenced. Finally, within phase III, and after demolishing the cofferdams constructed in phase II, two more cofferdams are built, again on both the upstream and downstream and water is pumped out of the river to create a pit where the last part of the dam will be executed as shown in Figure 5c. Then, the last two cofferdams were demolished as the dam is ready to control the water flow (British Dam Society, 2010) (Cimino, 2013).
illustration not visible in this excerpt
Figure 5: The Three Gorges dam construction phases, produced and authorized for reuse by (British Dam Society, 2010).
Concrete was poured in sections as described previously as for a typical conventional dam construction method. Climbing/jump formwork were used in this project, where the whole dam was divided into sections and each section has its own formwork. This eased the process of pouring concrete as dividing the total area into smaller sections will result in less volume of concrete to be poured at a time (the same time). Also in case of problems when using this method, only the affected section will get delayed instead of delaying the whole project if it was a bulk formwork in which concrete gets poured at once. Also, as the case for any dam constructed using the conventional method, the high temperature due to the cement hydration reactions was a major issue. Thus there were certain measures that were taken to insure that the concrete temperature stays within the allowable temperatures. Ice was used in the mixing water of the concrete to cool the concrete mix temperature down. Also sprinklers were used to create a sort of virtual barrier between the temperature at which the concrete is being poured and the atmospheric temperature especially during summer seasons. The concrete temperature was continuously recorded and controlled during the production and the pouring processes either through automated systems to do so or even through quality control personnel (engineers) who measured the concrete temperature with conventional thermometers (Cimino, 2013).
2.5.1.2 Construction Method Evaluation
Concerning a megaproject of that size and importance, a major question could be raised about the reasons behind using the conventional method instead of using the float-in or the RCC methods that would have been expected to save a lot of time and cost for such a large scale project. The answer lies in the soil nature as the soil had a bearing capacity that wasn’t sufficient enough to support the dam sections installed using the float-in technique. In addition to that, the currents within the Yangtze river are high which could cause high risks during installing prefabricated segments using the float-in technique and even if the segments would have been installed safely and properly, another problem would have occurred during pouring the tremie concrete in between the different segments due to the high water currents. Hence, the float-in technique could have never been used in this case.
On the other hand, the RCC would have been very efficient in such a project. However, another issue comes into the picture which is the chemical sensitivity of the RCC mix due to the nature of its components and whether it may react with the soil beneath or not. The available information doesn’t provide sufficient data about the chemical reactivity of the soil at site or its pH. Hence, if the soil was known to be inactive it would have been a more appropriate option to use RCC in order to save time and save the cost on formwork and the hassle of cooling down the concrete and monitoring its temperature.
2.5.2 Case 2: Braddock Dam, Pittsburgh, PA, USA
This dam that is owned by the Pittsburgh District of the U.S. Army Corps of Engineers and constructed by Ben C. Gerwick, Inc involved the application of off-site prefabrication and float-in installation of large precast concrete elements of this dam and its lock. The dam was located on the Monongahela River at Braddock, Pennsylvania, eleven miles upstream from Pittsburgh. This project had a budget of $ 107 million and took five years to complete. The dam weighed 20600 tons and measures 182 m by 32 m divided into two prefabricated segments (Ben C. Gerwick Inc., 2013).
illustration not visible in this excerpt
Figure 6: Floating the dam segments, photo taken and authorized for reuse by (Bittner-Shen Inc., 2013).
2.5.3 Applied Method
The two dam segments were casted in a casting basin off-shore, in the meantime, foundations were installed in the site. The foundations were short piles (7.6 m deep) as a layer of hard sandstone was located at this depth. Then, the segments were launched and dragged to the fitting area as shown in Figure 6. Then the segments were placed in their exact locations on the foundations and grout was injected between the segments and the foundations and the bottom segments compartments were in-filled with concrete and while the pile tops were grouted to the segments (Ben C. Gerwick Inc., 2013) (US Army Corps of Engineers, 2013).
2.5.3.1 Construction Method Evaluation
This project was a typical case for a “float-in” dam construction method as all the circumstances were in favor for using such method. The fact that the sandstone layer existed at a depth that was attainable by short piles eased the use of this method as if this sandstone existed at deeper locations maybe the float-in technique wouldn’t have been the best choice to be used. Also, the presence of an old dam (that went out of service after constructing this newer one) near the location helped in controlling the water currents hence easing the process of moving the dam segments to location, the concreting and grouting process at the joints with the foundations. In addition to all of that, applying such a technique could have been very difficult if the contractor didn’t have the “know-how”, skilled personnel and proper equipment to do the job right.
2.6 Conclusions and Recommendations
When examining the methods applied in the two cases discussed in this chapter against the developed selection criteria, the selection criteria proved that it covered the different aspects governing the selection of the most suitable methods for different dam construction cases. However, it is highly recommended when using the selection criteria matrix to take all the factors governing the method selection into account as neglecting some of them could cause real problems.
2.7 Acknowledgements
The author would like to acknowledge the British Dam Society and Bittner and Shen Inc. for their cooperation and the Department of Construction Engineering in the American University in Cairo for its continuous support. The author would also like to acknowledge the efforts of his dear students: Michael Thomas, Karim Wadeih, Nour Eldeeb, Mohamed Assy, Amr Eweida, Shady Wadie, Michael William and Amr Ali as this chapter would have not come to existence without their efforts.
3 Caissons
Summary:
Caissons are necessary for the construction of structures in complicated deep foundation conditions. Construction of caissons involves unique construction methods due to various characteristics like cost, constructability, resources and time. This chapter covers different methods of construction of caissons and provides a comparative analysis to show when to use every method of construction according to the conditions available. Two projects in which caissons were constructed with different sizes, from two different construction eras and project conditions were studied and examined against the developed selection criteria in order to evaluate the validity of the applied construction methods in each case. A previous version of this chapter was published as a conference paper by (Darwish, et al., Selection Criteria for Large Caissons, 2015) titled “Selection Criteria for Large Caissons”.
3.1 Introduction
Deep foundations are used when there is a massive load coming from the building and the nearby soil is not strong enough to carry the load of the building. In such a case deep foundations will transfer the loads to deeper soils either using piles or caissons. The word caisson is originally French as it roots to the word "caissee" which means a chest or case. A caisson is used as a retaining watertight space which keeps out water, and it can be used in permanent purposes. Its main use is when a high ground water table is encountered and dewatering become costly and also when shoring is very difficult to be done or when the construction area is confined and the water is present. Also, caissons can be considered as a second deep foundation alternative instead of having a large number of piles due to heavy loads (Murthy, 2007) (Isaacson, 2001).
Caissons vary in size, smaller caissons are either socketed, suction or bell shaped. The bell-shaped type (which is the most ancient) is constructed by drilling or hand-digging using large auger drills. This type is mainly used in cases of cohesive soils where the soil can maintain the bell shape until the concrete is poured. Hand excavation is used only when the soil is too full of boulders for the drill. A temporary steel casing is usually lowered. A bell is created at the bottom of the shaft by hand excavation or a special belling bucket. On the other hand, the socketed and suction types are simply composed of hollow steel cylinders gradually immersed in the soil till reaching the supporting strata and imbedding into it for at least 2 m. In case of groundwater, the steel casing can prevent flooding during construction, but if water is able to penetrate from below, caisson construction may not be practical (Murthy, 2007). Accordingly, and as these smaller caissons (whether socketed, suction or bell-shaped) are limited in size when compared to the larger caissons they are not considered within the scope of this paper.
Caissons have been used since the era of the Roman Empire, in 250 years BC, in Alexandria; they have been used in constructing quarry walls. However, the modern shape and size of caissons started to emerge in the nineteenth century. In the twentieth century, it started to be used in different applications including (but not limited to), bridges, ports and harbors. Standard caissons were used for upgrading of old quarries. This is applied by installing them on the top of old piles. Afterwards reinforced concrete caissons were used as a permanent structure element by placing them directly on the sand bed. Caissons were used in the Second World War during the Allied invasion of Normandy, France. They were appropriate solution for the rapid assemblage of break waters as a part of temporary harbors (Gerwick B. C., 2007).
Caissons vary also in material type. The ancient Greek/Roman caissons were mainly made of rocks and/or blocks while the first caisson used to construct a bridge pier in North America in the second half of the nineteenth century was actually made out of timber (Prentzas, 2009). Modernly steel is typically used for socketed caissons while concrete is the most common material in modern caisson construction (Murthy, 2007). However, from a construction method perspective, the large sized caissons that could be used in land (in special cases) or under water are classified into opened caissons, boxed caissons and pneumatic caissons. Each of these three types will be discussed within the next section of this paper and the selection criteria governing the choice of each of them.
3.2 Construction Methods
3.2.1 Box Caissons
These caissons are opened from one side only as they are opened at the top and closed at the bottom. Usually constructed on land and so it is considered as a prefabricated concrete box. After that, they are floated to the required position as shown in Figure 7a. Then the caisson is lowered down by adding weights to it by either using slipform or climbing form technique to pour the upper segments of the concrete caisson hence adding weight to it and causing it to gradually sink down or by adding prefabricated concrete segments and connecting each segment to the segment beneath using wet joint connections and hence the caisson will gradually sink down, however the cast in place technology is more common because having joints is not preferred in the middle of a sea or a river. As the cross-section of most of caissons doesn’t significantly vary with the depth and due to the repetitive nature of the work, and because caissons are mostly constructed in batches, the concreting process is most commonly performed using the slipform construction technique. Generally, the concreting and slip-forming process comprises three phases, the first is the assembling of slip-forms, then the slip-forming activity itself (involving pouring concrete followed by the form slipping upwards using a system of hydraulic jacks), and last is the slipform dismantling phase (Peurifoy & Oberlender, Formwork for Concrete Structures, 2011). However, the slip-forming activity could be changed in a more complex way if the floating dock cannot support the construction of the whole caisson in one stage due to limitations on its bearing capacity. This condition is frequently encountered in real-life construction projects because the existing floating dry docks in a given time period may not match the demands of the caissons’ design characteristics. Hence, and in most of cases, slip-forming is conducted in two stages. The first stage takes place in the floating dock where concreting takes place and is terminated when slip-forming is stopped after reaching at a certain height, which is specified so as not to exceed the dock’s bearing capacity. Then the caisson is floated to position where concreting begins again, and slip-forming of the floating caisson continues while the caisson is sinking in position until reaching the sand layer it will rest on (Panas & Pantouvakis, 2014). However, if the depth is not significantly large the caisson could be floated in as one prefabricated box and then filled with concrete or sand, and immersed deep onto a previously prepared layer of soil, with its upper edge above water level as shown in Figure 7b.
illustration not visible in this excerpt
Figure 7: Locating and fully constructing a box caisson.
This type of caissons serves as a suitable shell for a pier, or similar work. They remain permanently in place on the sea bottom. As this type of caissons is permanent and directly supported on the sea bed, it is not preferable for sites where high water currents can erode the foundation, it is only suitable when it can be set upon a soil having a sufficient bearing capacity. Because of that, in some cases in which the first 1 – 3 m of the sea bed have a low bearing capacity, this layer of weak soil is dredged (using dredgers or clamshells) and replaced by stronger soil on which the box caisson will rest. This bed preparation process is really sensitive as the preparation method can influence the behavior significantly as different methods (involving also different aggregate gradations) may produce the same vertical stress but different lateral stress levels in the sand (Leung, Lee, & Khoo, 1997). The other limitation of this technique is that because it is closed from the bottom it couldn’t be used in cases in which the construction location itself is in the land as it couldn’t cut through the soil like the opened caissons that could do so as described in the following subsection (Murthy, 2007) (Gerwick B. C., 2007).
3.2.2 Opened Caissons
The open caisson is a reinforced concrete structure, having dimensions corresponding to the needed foundation area. As it is clear from the name, unlike the box caissons, these caissons are opened from both ends; from the top and the bottom. They have the ability to sink through soft material during excavation inside the caisson. This is because they are fitted with a cutting bottom edge usually strengthened with steel. This is why, unlike the box caissons, these caissons could be used for construction of foundations on the land or in the waters (Nonveiller, 1987) (Abdrabbo & Gaaver, 2012).
illustration not visible in this excerpt
Figure 8: The process of gradual simultaneous excavation, produced and authorized for reuse by (Nonveiller, 1987).
The first stage of the caisson walls is cast on the ground, if the location of the future foundation is in the sea/river as this first section is prefabricated on the land and then transported using barges to the location however if the foundation is in the middle of the land, then this first section is constructed at the same location as the future foundation. After curing, soil excavation begins inside the caisson until a state of plastic equilibrium is reached along the whole length of the cutting edge, and the first phase of the caisson is progressively sunk into the ground (Abdrabbo & Gaaver, 2012) (Nonveiller, 1987). This excavation phase should be done in a pattern that is constant all over the perimeter of the caisson as if one side of the caisson had more soil excavated near to it than the opposite side the caisson may tilt and solving such a problem could be really time-consuming and cost-consuming (Abdrabbo & Gaaver, 2012). In order to do that, an even number of radial trenches, always in opposite pairs, are successively excavated to the cutting edge. These trenches are widened (again in opposite pairs) as shown in the plan view and section shown in Figure 8. While each phase of excavation brings the caisson down by 0.5 – 1 m, a succeeding phase of the concrete wall is cast on the upper part of the sinking walls, and the process continues until the cutting edge penetrates the bearing layer to the targeted depth (Nonveiller, 1987). Again, this concrete pouring phase should be done in a rate that is constant all over the perimeter of the caisson as if one side of the caisson had more concrete poured above it than the opposite side, the caisson may tilt and solving such a problem could be really time-consuming and cost-consuming. Due to that, the use of slip-forms in this application is recommended as on using these forms, the concrete will be poured at a constant rate and the probability of tilting due to difference in weight along the perimeter will be very low (Panas & Pantouvakis, 2014) (Nonveiller, 1987). The caisson will go down into the soil as the soil inside is dug and as new parts add to the load until the desired depth is reached. When it reaches the required depth concrete is placed using tremie tubes through water to make a bottom sealing by applying a floor, usually of tremie concrete, that fulfills this purpose (Basha, Gab-Allah, & Amer, 1995). After that, water is pumped out after the hardening of the concrete. Finally, and depending on the design requirements, the caisson is partially or entirely filled with concrete (Nonveiller, 1987).
This method is less risky than the box caisson in terms of not having to depend on replacing the first layer of the sea bed and depend on its bearing capacity and the bearing capacity of the soil beneath. However, the fact that the sequence of construction could carry high probabilities of tilting the opened caisson due to any mismanagement during excavation or wall concreting introduces another source of risk present when using this method and not present when using the box caisson method (Basha, Gab-Allah, & Amer, 1995) (Abdrabbo & Gaaver, 2012). However, the major advantage of this method is that it could be used in the middle of the water or on the land which makes it more flexible in application than the box caisson method. Finally, the fact that the cutting shoe is the main contact between the soil and the structure makes it a very sensitive component as it could be subject to structural failure in case of cutting into firm soils, hence it should be structurally and geotechnically analyzed and designed taking the soil properties into account (Nonveiller, 1987) (Abdrabbo & Gaaver, 2012).
3.2.3 Pneumatic Caissons
This type of caissons is similar to the open caissons except that they are provided with airtight bulkheads above the cutting edge. The space between the bulkhead and cutting edge, called the working chamber, is under pressure to the extent necessary to control the inflow of soil and water. Thus, the excavation can be performed by workmen operating in the working chamber at the bottom of the caisson (Murthy, 2007). The first pneumatic caisson was constructed to construct the Pedee Bridge pier in 1852 however the most famous of the earlier pneumatic caissons were the two caissons constructed to support the Brooklyn Bridge in New York few years after (Isaacson, 2001).
illustration not visible in this excerpt
Figure 9: Schematic of a pneumatic caisson.
This type of caissons is placed directly on the surface (whether dry land or sea bed) and the excavation workspace a pressurized air-tight chamber as shown in Figure 9. The caisson goes downward as the excavation is performed within the workspace including the areas beneath the caisson walls. Due to that gradual increase in depth, the hydrostatic pressure outside the bottom of the caisson gradually increases. Hence, the chamber pressures are gradually increased as the caisson goes down in order to exceed (or at least match) the outside hydrostatic pressure outside the caisson. In order to maintain a constant high pressure within the chamber, workers and materials are moved in and out of the chamber through air locks as shown in Figure 9. As the excavation proceeds, the caisson walls slip against the excavation sides. Once the final grade of excavation is achieved, all or part of the chamber is filled with concrete, the structural design and the chamber dimensions shall determine whether this concrete should fill all or part of the chamber (Isaacson, 2001).
The major advantage of this technology is that all of the excavation work is done in the dry which gives a higher level of control on the quality of the work and the preparation of the foundation than the other types discussed previously. This in-the-dry working environment also facilitates the placement of the concrete seal after the excavation to be placed in a dry environment producing concrete of much higher quality than tremie concreting under water. Even the risk of facing dilemmas due to unexpected soils like boulders is reduced as it is much easier to remove such boulders in-the-dry than in wet conditions (Gerwick B. C., 2007) (Isaacson, 2001). However, all of that is on the account of cost which is significantly high due to the high mechanization of the technique and the high level of skill and fitness required by workers working in the highly pressurized chamber which will reflect in high wages. Another limitation arises in the penetration depth which is limited by American laws to approximately 35 m below the water surface due to the fact that higher pressures below such depth are higher than what the human body could endure (Murthy, 2007). However, this issue has been subject to extensive research in order to develop technologies enabling automatic removal of excavated materials in the pneumatic caisson method with minimum human interference hence enabling deeper excavations, however due to its automation, the size of this application is still limited to few projects in Japan (Kodaki, Nakano, & Maeda, 1997) (Gerwick B. C., 2007).
3.3 Construction Methods Selection Criteria
Based on the discussion of the different caisson construction methods presented in the previous section, a selection criteria could be developed to aid the decision making process concerning the caisson construction methods. The time frame, resources (especially labor or equipment), cost, level of risk, attainable depth, constructability, quality and soil type are the main factors governing the method choice. From a project schedule perspective, due to its in-the-dry excavation, the pneumatic type is the fastest (especially if the excavation is automated) followed by the box caisson (its speed is also a function of its size and the amount of soil replacement) while the opened type is the slowest. However, this speed could be on the account of something else as the level of worker safety is lowest in the pneumatic type. The non-conventionality of the pneumatic caissons is also attributed to the non-conventionality of the equipment associated with this method in comparison with the relatively conventional equipment utilized in the other two methods. Hence, for most of cases, due to this capital intensiveness of pneumatic caissons, it is the most expensive type. Finally, the effect of the soil type comes into the picture due to its bearing capacity, stiffness and the load transfer mechanism associated with the caisson type as due to the fact that boxed caissons are directly supported on the soils, they need to rest on strong/stiff soil to carry the load.
On the other hand, the situation is different for the opened type that depends mainly on the excavation and the increase in load to sink with the cutting edge directly cutting through the soil which makes its optimum performance (with least risk of cutting edge failure) is within non-cohesive soils as there is a high risk of the cutting edge failure if it cuts in hard/stiff cohesive soils. On the other hand, the pneumatic type has a high flexibility from that perspective due to the dryness of its working chamber that enables the removal of any undesired layers of soil or even boulders in a much easier manner than in the case of opened caissons. A summary of the selection criteria could be found in Table 2.
Table 2: Selection criteria for caisson construction methods.
illustration not visible in this excerpt
3.4 Case studies
3.4.1 Case 1: The Brooklyn Bridge Caisson, NY, USA
The construction of a bridge connecting Brooklyn and Manhattan so as to provide a more time and cost effective route rather than the ferry service aroused in the seventh decade of the nineteenth century. The Brooklyn Bridge became the first bridge incorporating suspension cables in its structural system. In 1869 the design of the bridge was accepted and construction of the bridge started in 1870. At that time, there were various challenges during construction as this bridge was the first of its kind, and the first to utilize huge pneumatic caissons (each weighing 3000 tons) were used to construct the foundations for the towers. Funded by the New York Bridge Company, Brooklyn Bridge was finished and opened in 1883 (McCullough, 1972) (Prentzas, 2009).
3.4.1.1 Applied Method
Two wooden yellow pine caissons where constructed within this project. The caisson near the New York side was 172 ft x 102 ft (52.4 m x 31 m) in cross section with a height of 14.5 ft (4.41 m) when launched and a height of 31.5 ft (9.6 m) on completion while the caisson on the Brooklyn side was 168 ft x 102 ft (51.2 m x 31 m) in cross section with a height of 14.5 ft (4.41 m) when launched and a height of 21.5 ft (6.55 m) on completion. This difference in depth due to the variation in the soil profile caused the New York caisson to be more difficult to construct (McCullough, 1972). Figure 10 shows a vertical section in the New York caisson showing the two entrance shafts and the two water shafts and the working chamber at the bottom of the caisson where the excavation took place.
When these caissons were constructed in the shipyard, the upper ceiling of the chamber (the bottom of the caisson) was closed hence it had a boxed shape. Then the caissons where shipped to the site and lowered down the river by putting stones on top of them. After that, compressed air was pumped into the caissons allowing water to escape outside. Then workers started excavating the bedrock. As it was really difficult to guarantee water tightness by the technologies available at that era, water used to leak in the chamber during the excavation and pumps where pumping out any water reached during the excavation and transferring them out of the caisson through the water shafts shown in Figure 10. Due to the lack of suitable excavation equipment in that century, the excavation was performed manually and hence, extensive labor power was needed throughout the construction of Brooklyn Bridge (McCullough, 1972) (Prentzas, 2009). There was a total of 264 laborers in a crew in each caisson working underground (referred to as sandhogs), in addition to 100 laborers working above the ground. Working hours were three 8-hour shifts for six days per week. The site and working conditions were very harsh; it was reported that an average of 100 laborer per week leaving the site due to the unsafe and unhygienic working conditions. The use of candles, explosives within a pressurized air environment created frequent risk of fire and explosions in addition to the first records of the “Caisson disease” (Prentzas, 2009). This newly discovered disease had some symptoms like giddiness, ear pains and sometimes breaking of ear drums and/or bursting of blood vessels in the nose or ears of workers which could escalate to severe joint pains which can lead to bending.
illustration not visible in this excerpt
Figure 10: The New York caisson of the Brooklyn bridge foundation, produced and authorized for reuse by (Wikimedia, 2014)
3.4.1.2 Construction Method Evaluation
Concerning the engineer decision of using a pneumatic caisson in this project, it was a daring decision but a correct one. On referring to the developed selection criteria, using an opened caisson in such a project would have carried high risks of the cutting edge destruction during the process of cutting into the soil as it contained significant amount of boulders that could have broken the cutting edge and stopped the construction from its early stages. On the other hand, the use of a box caisson in such a case was nearly impossible by that era as it involves replacing the first layer of organic soil in the river bed by a layer of sand and the suitable dredgers or clamshells that could do such a job weren’t readily available by that time. Hence, using box caissons instead of the pneumatic ones wasn’t an option by that time. However, and due to the difference in technologies and know-how between the era of that first generation of pneumatic caissons and nowadays, if this project was done nowadays it would have been done with lower risks, higher safety standards, higher quality standards and higher level of mechanization which would have led to less human losses and a faster construction process.
3.4.2 Case 2: New Tacoma Narrows Bridge, Tacoma, USA
This project was initiated to make another bridge parallel to the old one that was initially built in the 1950s to satisfy more purposes for transportation crossing the Tacoma Narrows near Seattle. The new bridge has four 3.3 m wide lanes of eastbound traffic going towards Tacoma. The bridge has a 3 m right shoulder and a 3 m barrier-separated bicycle/pedestrian lane. The New Narrows Bridge opened to traffic on July 16, 2007, which was surprisingly ahead of schedule by four weeks and also under the previously estimated budget at the beginning of the project. The caissons in this project are ones of the largest caissons ever built in the world. They are equivalent to a 20-story building underwater that is carrying the 155 m high towers. The construction was performed under extreme environmental conditions as the water depth ranged between 39 m and 45 m, currents up to 7 knots, 50 oF waters and 50-mph winds (Krishna, Chakrabarti, Chakrabati, Mukkamala, & Anavekar, 2004).
3.4.2.1 Applied Method
Each of the two bridge pier caissons was about 24.4 m wide and 39.6 m long in plan. The bridge caissons were cast in vertical layers starting with a 5.5 m deep cutting edge, followed by a 3.7 m deep layer of reinforced concrete (with 16.7 m high exterior steel skin) and then followed by several more layers of reinforced concrete each of which was 3 m deep. The cutting edge at the bottom was used to facilitate initial penetration of the caisson once touchdown occurred. At the top of the cutting edge section, 5 transverse inverted steel half cylinders were welded to the cutting edge as shown in Figure 11. The bottom of the caisson was sealed by these five inverted half-cylinders (called domes) creating a false bottom running in the transverse direction. These cylinders trapped air underneath, which could be controlled to guarantee caisson stability. The caissons were towed to the site from the harbor after the assembly of the steel cutting edge, and casting of the first full lift, and the second and third exterior lifts. After that the transportation process took place in which the caisson was towed to the site (Chakrabarti, Chakrabarti, & Krishna, 2006).
illustration not visible in this excerpt
Figure 11: The sinking process of the caisson.
Once the caisson is held in place using barges with the aid of pre-tensioned cables (mooring lines), the caisson construction began. Installation of reinforcements was followed by slip forming and concreting. Due to the use of slip forms, the concreting process had to be continuous. Hence, the concrete was made on the Narrows bank and pumped through a piping system to a placing barge. On pouring, the concrete placing barge was aligned next to the caisson and concrete pumps were used to pump concrete. Here emerges the main benefit of the inverted half-cylinders as after each pour the air pressure under the half-cylinders was adjusted to control the desired draft and any minor inclination of the caisson. As construction progressed, the depth of the caisson increased continuously until the cutting edge cuts through the soil as shown in Figure 11.
As the caisson reached each of the main drafts, the main barge was used to tension up the mooring lines to obtain the targeted pretension at that draft (Chakrabarti, Chakrabarti, & Krishna, 2006). The pretensions had to be maintained close to the set values, to guarantee safety of the mooring system and the caisson. The pretensions were monitored using installed load cells in each line. After the desired depth was reached the concrete cap was constructed after the removal of the half-cylinders (Gerwick B. C., 2007).
3.4.2.2 Construction Method Evaluation
These two caissons were very unique, not only due to their size but also due to their unique construction method. The uniqueness of the construction method is apparent in the fact that in terms of the mechanism of its cutting edge penetration into the soil it is considered as an opened caisson however the presence of the half-cylinders at the transition between the caisson and its cutting edge makes it transported and sunk as a floating box caisson. Hence, these caissons had the merits of both types avoiding the drawbacks of each of them. If the developed selection criteria was to be used to choose the type of caissons to be used it would have been a tough decision as the sandy soil had a high bearing capacity however it was not high enough to carry this gigantic weight while using an opened caisson and depending totally on the skin friction of the portion in contact with the soil would have also been insufficient. However, combining both systems was the best option in order to have several load transfer mechanisms and also facilitates floating the first sections of the caisson to the site.
3.5 Conclusions and Recommendations
When examining the methods applied in the two cases discussed in this chapter against the developed selection criteria, the selection criteria proved that it covered the different aspects governing the selection of the most suitable methods for different caisson construction cases. The most governing factor of choice is the soil conditions and following that comes the safety, level of risk, constructability, speed and cost. Hence, it is highly recommended when using the selection criteria matrix to take all the factors governing the method selection into account as neglecting some of them could cause serious problems that are difficult in fixing.
3.6 Acknowledgements
The author would like to acknowledge the Department of Construction Engineering in the American University in Cairo for its continuous support. The author would also like to acknowledge the efforts of his dear students: Ramez Henen, Sarah Saleh, Marina Rostom, Omar Abdelhamid, Khaled Taha, Gasser Ali, Abdelrahman Ahmed, Hassan El Kassas and Mohamed El Ghandour as this chapter would have not come to existence without their efforts.
4 Short-span Bridges
Summary:
Short-span bridges crossing water ways, roads and varying topographies are necessary for transportation all over the world. Construction of such structures involves utilizing unique construction methods due to various characteristics like structural system, cost, constructability, resources and time. This chapter covers different methods of short-span bridge construction by concentrating on different construction methods of every type of short-span bridges. Moreover, a comparative analysis is provided to show when to use every method of construction according to the conditions available. Two projects involving short-span bridges with different sizes and project conditions were studied and examined against the developed selection criteria in order to evaluate the validity of the applied construction methods in each case. A previous version of this chapter was published as a conference paper by (Darwish, Almahallawi, Akroush, Kasbar, Amin, & Helmy, 2015) titled “Selection Criteria of Short-span Bridges Construction Methods”.
4.1 Introduction
A bridge is a type of structure that carries a road, path or railway across a certain gap or obstacle such as roads or rivers. Bridges appeared with the rise of ancient civilizations. In its earliest forms, the bridge was pieces of wood cut out of logs to cross a gap. The design and construction of bridges was revolutionized in Ancient Rome upon the discovery of the use of mortar, which allowed for the execution of stronger and longer bridges. Today the design and construction of bridges has improved and evolved to be safer, more economic, easier to construct, more durable and esthetically more pleasing.
A short span bridge is a structure with a relatively short clear span that transports roadways or pathways across a certain barrier such as water or other roads. The different types of short span bridges studied include segmental concrete bridges, arched bridges, steel bridges and timber bridges. The different systems, materials and construction methods of short span bridges that are discussed in this paper, and analyzed in terms of suitability to certain applications, economical factors and ease of construction method (Khan, 2015).
Segmental concrete bridges are made of repetitive structural concrete elements that are repeatedly joined together to form the complete bridge structure. This method is the most traditional bridge construction method, as it was used in history in many bridges. Builders have always found it easier and more efficient to create a larger durable bridge structure from smaller segments (Barker, 1981).
An arch bridge has an aesthetical appearance. The shape determines how the bridge behaves structurally. Live loads & Dead Loads are transformed horizontally to the supports at each side, also known as abutments. Abutments then form reaction forces to these thrusts.
On the other hand, steel offers higher yield strength, better ductility and better ability to be welded, that sets steel above all the other alternatives for short span bridges. This is due to the benefits that the steel has over the other types of materials. Modular Bridge Technology is used meanwhile to allow for faster construction of the bridges, improve safety on site, reduce the disruption of traffic during construction, reduce the environmental impacts and costs, and improve the quality of construction. Currently, this technology is applied to all sectors of the bridge; substructure, superstructure, systems, and secondary elements (Durkee, 2003).
4.2 Segmental Concrete Bridges
This type of bridges is the most traditional bridge construction alternative. Builders have always found it easier and more efficient to create a larger durable bridge structure from smaller segments. Segmental bridges today are used in several applications, such as the construction of highway projects in areas of already existing streets and urban density, or the construction of bridges across sites that are environmentally fragile and require specific care. Also due to their repetitive nature, segmental bridges are used in applications that are repetitive over a large scale, specifically if the site below the bridge is inaccessible for construction purposes. The different construction methods of segmental concrete bridges can be distinguished based on casting methods and erection methods. This section discusses both variations and their execution methods (Barker, 1981).
4.2.1 Casting Methods
There are two different casting options for segmental concrete bridges. These are pre-cast or cast-in-place. In both alternatives, a concept of “match casting” is used. Within this concept the segment of the bridge casted should be done in a way so that its relative casting position reflects the position it will be erected in in reference to the other segments. This means that any segment is cast following preceding segments in the same order they will be erected (Blank, Blank, & Luberas, 2003).
4.2.1.1 Pre-Cast Segments
In this method the different segments of the bridge are prefabricated away from the site, and then installed there after transportation to the site. When placing the segments in their place in the bridge structure the connections between the different segments need special care. There is a need to ensure that the different segments fit together well and that the final superstructure is protected against moisture, and that the segments are joined well to withstand compressive and shear forces at the joining point between them. To achieve all that, cement-based or epoxy grouts are used at the joining of the different precast elements. Epoxy on its own is not sufficient to transfer the shear forces at joining points of the segments. Therefore, shear keys are placed between the joining faces of the segments to ensure perfect lock between them, and to guarantee they are exactly aligned (Blank, Blank, & Luberas, 2003).
Within this method, finishing of any member can be done on the ground, before installation, which increases accessibility. Casting conditions are controlled in a plant allowing better quality control. The hydration reactions occurred before assembly which means that no cracks due to shrinkage or hydration temperatures occur while the member is loaded in its permanent location. In addition to that it is time-saving as several activities could take place simultaneously as the substructure could be constructed while at the same time pre-casting the segments if the bridge. This is not possible with cast-in-place segments. This method is more economic when the segments are smaller in size since forms of precast elements can be re-used while it is uneconomic to use this method for larger segments due to the uneconomic nature of transporting and installing prefabricated members having large or heavy segments. In addition to that, the high cost of pre-casting plant, the transportation, storage and installation, in some applications is higher than the cost of cast in place formwork and execution process (Khan, 2015).
4.2.1.2 Cast-in-place Segments
In this method the segments of the bridge are cast in their place in the superstructure of the bridge. This could be done using shoring members (whether wood or steel shores) to support formwork (conventional, ply-form or steel) or using travelling forms which is very common in use specially if the topography or the traffic conditions beneath do not allow shoring. Travelling forms are supported by a steel truss system with rails to allow the forms to be movable along the line of the bridge deck. Once a segment is cast in the forms, a time is allowed for the cast element to gain sufficient strength to be able to hold the self-weight of the element, so that the form could be moved to the cast the next segment (Dunn, 1996).
Cast-in-place process involves preassembling the reinforcement in cages then lifting the reinforcement cages using cranes to their intended positions. After that, if the concrete is to be post-stressed, the post-tensioning tendons are placed in their ducts before the pouring of the concrete. Then concrete is poured either using a crane hoisting concrete bucket or a concrete pump. Sufficient time is given for curing and for the segment to gain enough strength then the tendons in the segment are post-tensioned. The cycle is then repeated to cast the subsequent segment (Blank, Blank, & Luberas, 2003).
This method is most suitable for large heavy segments, where precast segments cannot be used since the segments are too large and/or too heavy to be transported. It is more economic if typical shoring methods are used however it loses this merit if the traveling forms are used due to their capital intensiveness unless there is a necessity for that due to the site conditions beneath the bridge under construction (Barker, 1981). Hence, this method is limited to cases where the lower conditions allow for false work erection and it is valid for spans reaching 80 m, using it in larger spans would be a waste of time and money due to the large amount of false work used (BBR, 2014).
4.2.2 Erection Methods
4.2.2.1 Span-by-Span Method
Span-by-span erection uses a steel truss assembly that spans between the piers of the bridge in order to carry and assemble the precast segments to be placed in the superstructure. This erection method starts by lifting the segments beneath the truss assembly using a gantry crane in their approximate positions. After that, the segments are aligned and their geometry is fixed and the connections between the segments are grouted (usually with epoxy-based grouts) (Dunn, 1996). Then the post-tensioning tendons that are stressed and the truss assembly are advanced to the next span and the cycle is repeated (VSL Inc., 2013). This method offers rapid assembly however the high level of mechanization makes it highly capital intensive and makes it more suitable when used in large scale projects having a large number of spans (VSL Inc., 2013). However, this large number of spans is of a limited length due to the time and effort consumed in connecting large number of successive segments within a span exceeding 45 m (BBR, 2014).
4.2.2.2 Balanced Cantilever Method
Within this method of construction the deck segments are placed and attached as cantilevers supported on the piers of the bridge, after constructing the bridge piers. The pre-cast segments are placed equally at both sides of the pier to ensure stability of the structure. The high moment that is initiated in the deck during the addition of more segments is resisted by post-tensioning the segment near and on the top of the pier, and extending this post-tensioning to the body of the pier itself, in order to stabilize the structure such that the connection between the deck and pier will be a moment-resisting connection. The segments added to the cantilever are most commonly placed using cranes. A launching gantry crane is very useful in situations where the land below the superstructure of the bridge is not accessible (VSL Inc., 2013).
If cast-in-place concrete is poured instead of pre-cast segments then there will be a need to use two traveler forms (one from each side of the pier) as shown in Figure 12. However, careful care should be taken as the traveler forms are advanced due to the fact that the full strength of the concrete is not achieved yet (Dunn, 1996). Hence, unless early strength concrete mixtures and curing procedures are used, striking and advancing the forms should take at least three days (as 50% of the strength would be achieved by that time). The major merit of this method is that there is minimal disturbance for the area beneath the bridge deck hence it could be used when the bridge is crossing major roads, water ways, forests or difficult topographies. However, bridges constructed using such method should be designed carefully taking into consideration the different cantilever load cases (Blank, Blank, & Luberas, 2003).
illustration not visible in this excerpt
Figure 12: Construction of the Pierre Pflimlin bridge using the balanced cantilever method, photo taken and authorized for reuse by (Leonard, 2007).
4.2.2.3 Unidirectional Cantilever Method
This method (also called progressive placing construction method) is similar to the balanced cantilever method but instead of moving in both directions from a pier with cantilevering segments, the segments are instead added to the pier in a unidirectional manner (in one direction). In this method since the casting is done in one direction only, the moment is significantly high on the segment at the pier which should be taken into consideration on designing the deck, the pier and the pier-deck connection. Additionally, a temporary support system is typically used at the mid-span to reduce this moment (Barker, 1981).
This construction process is less complicated than the balanced cantilever method since work is done in one direction only as shown in Figure 13. Also, completing one span of the bridge gives better accessibility to construct subsequent spans; this is not possible when the construction is done in both directions from the pier. Accordingly, this method needs temporary supports; it is slower and could be applied for shorter spans when compared to the balanced cantilever method (Barker, 1981).
illustration not visible in this excerpt
Figure 13: The construction of the new SF-Oakland Bay Bridge using the unidirectional cantilever construction method, photo taken and authorized for reuse by (Katz, 2011).
In both cantilever construction methods the cantilevering segments from each pier will reach to a point where they meet at mid-span between the two piers and these segments need to be joined. Joining the segments is either done using a hinged connection which is a simple connection but could lower the load-bearing of the bridge structure or the segments could be kept suspended and allowed to rest on bearings between the cantilevers. This might be more structurally complex, but is more structurally sound. Due to all of that, both cantilever methods could be used for various lengths of bridge spans ranging from short spans to long spans although the balanced cantilever method is capable for constructing longer spans than the unidirectional cantilever method (BBR, 2014).
4.2.2.4 Incremental Launch Method
This method involves the casting of continuous segments at a specific location of the site, then pushing this continuous chain using hydraulic rams to be placed in position. Casting beds in this method have formwork that is adjustable and movable. After constructing the piers the segments (which are usually pre-stressed concrete) are cast in continuous chains on site. Typically, on constructing bridges using this method, three types of pre-stressing are usually utilized: the central, the eccentric and the transverse pre-stressing each increasing the section strength in a certain direction. After that, the chains are pushed into position using hydraulic jacks that act in both vertical and horizontal directions, these lift and push the segments into place. The segments are supported with temporary supports as they advance from the casting yard to the pier (if the chains of segments are of long spans). The first segment is attached to a launching nose (usually steel) as shown in Figure 14. This nose will rest on the temporary supports (in longer spans) and then rest on the permanent supports providing more stability which is the main difference between this method and the unidirectional cantilever method (VSL Inc., 1977).
This method is very suitable when the site below needs to remain unobstructed. Due to its higher stability, temporary supports are not needed for short spans. It is economically sound as the transportation of the segments for long distances is avoided and the use of large amount of formwork is reduced. However, this method could only be used if the bridge has a constant cross section and a straight alignment (Barker, 1981). Due to the need to launch a significant weight using a set of jacks this method is limited to bridge spans less than 60 m (BBR, 2014).
illustration not visible in this excerpt
Figure 14: A launching nose of the bridge over the Itz in Germany, photo taken and authorized for reuse by (Storfix, 2005).
4.3 Arch Bridge Construction
In addition to having a good aesthetical appearance, the shape of an arch bridge determines how the bridge behaves structurally. The vertical (gravity) loads are transformed horizontally to the supports at each of the sides, also known as abutments. Abutments then form reaction forces to these thrusts. As it was the case for segmentally constructed bridges, arch bridges are either cast-in-place or precast. Each of these two alternatives is discussed in the following subsections. Span distance and height clearance are the major factors of choosing arch bridges. If the span distance is short, it is reasonable to choose an arch bridge design.
4.3.1 Cast-in-place
This method could be applied using either wooden formwork supported by false work or by using inflated forms. If wooden or steel formwork and false work are used the dismantling of these temporary structures should start from the middle of the arch (the crown) not from the supports sides (FHWA, 2003). Inflatable forms are typically made of polymer materials that are inflated by pressurized air to take the required arch shape. If the inflated forms are used, the closed-end cylindrical balloon is inflated and the shape is controlled by placing steel strapping. Then divider forms are placed at intervals to produce short segments that can be handled by a crane on site. After that the reinforcements are placed and concrete is poured by layers of shot-creting with each layer having a thickness of 150 mm to 250 mm. Then the forms are removed when concrete starts to set. These inflatable forms are inexpensive and can be used 40-50 times. Each form can be used to build many sizes of bridge arches. However, wooden forms and wooden or metal false work are more known to engineers and contractors, could cover larger spans and do not require concreting in layers (Ruhl, 1997).
4.3.2 Precast Construction
Within this alternative precast concrete sections are placed in position after transportation to site and the joints between the sections are connected either using grouts (wet joints) or using dry joints. If one is choosing which type of arch bridge to construct (forms vs. precast), then the span distances and heights will not be the critical factor however the segment size comes into the picture as the larger and/or heavier segments could not be easily transported and assembled on site. Additionally, one will need to consider availability of precast plants near the site and transportation costs. However, the major merit of this alternative is the accelerated construction speed (Khan, 2015).
4.4 Steel Bridge Construction
Steel bridges have an advantage over concrete bridges as for the same span a lighter steel bridge could carry the load, however from a material cost perspective concrete is more cost-saving. Typically, the designer is the one who decides on the method of construction as this must be accounted for in the design of steelwork. Also, it is up to the designer to indicate the sequence assumed in the design both for erection of the steelwork and for the decking system. The alternatives of the bridge erection are either erection by crane, launching, sliding, rolling or lifting large preassembled sections (Durkee, 2003).
4.4.1 On-site Assembly by Cranes
The higher ability of steel bridges to cover large spans with lighter dead loads makes it easier to transport and assemble a steel section than to transport and assemble a prefabricated concrete section. Due to that, the most common method of erection for short-span steel bridges is by assembly using mobile cranes. Typically for short span bridges, girders or trusses are erected on the side or in workshops and lifted by two mobile cranes (one from each side) and placed directly on the piers/columns either singly or braced in pairs spanning the full length between two supports. As for multiple spans, the girders are erected either singly or braced in pairs in a span and cantilever sequence involving erecting members that cantilever over the supports to the point of contra-flexure in the next span. After placing the main girders or truss in locations, the secondary beams and the bracing members are mechanically connected to the main girder/truss placed (Alberta Transportation, 2013).
4.4.2 Segmental Erection Alternatives
The erection methods described previously could be used to erect steel bridges in a manner very similar to erecting pre-cast concrete bridges. However, the difference in the material properties affects the application of such methods in terms of several issues. First of all, a typical steel member would be able to carry the same load that a heavier concrete member could carry. This fact reduces the overturning moments at the deck – pier connection hence reducing the moment loads on the pier itself hence reducing the dimensions of the piers and reducing the material cost. Also, the capacities of the lifting equipment needed to perform the job is reduced which will reflect in a reduction in the equipment cost (Durkee, 2003). Secondly, the nature of the connections between the successively erected members (whether truss members of girders) will be different as due to the higher strength of steel when compared to concrete the need for using post-tensioning technologies at the connections on site is reduced reflecting a significant reduction in the equipment, labor and material costs. On the other hand the connections between the erected members are usually bolted or riveted as welded connections are not preferred due to structural design considerations (related to their fatigue strength) and quality control concerns as the quality of welding is highly dependent on the qualifications of the welder while the quality of bolted and riveted connections is less dependent on the level of skill of the labors (CISC, 2008).
4.5 Construction Methods Selection Criteria
Based on the discussion of the different methods presented in the previous sections, a selection criteria could be developed to aid the decision making process concerning the short-span bridge construction methods. Typically, the conventional methods whether involving simple installation of steel or precast concrete girders or involving cast-in-place concrete using conventional false work carrying formwork is more economical than erection methods however, if the bridge is planned to pass over a busy road, a river or a valley that could not allow false work to be placed the segmental erection methods are the only remaining alternative. The bridge length and location are the most important factors governing the choice between the different methods. The need for special design considerations, temporary mid-span supports, level of risk, time frame, resources (especially equipment), costs and constructability also affect the method selection. A summary of the selection criteria between different segmental erection methods could be found in Table 3.
Table 3: Selection criteria for short-span bridge segmental erection methods.
illustration not visible in this excerpt
4.6 Case Studies
4.6.1 Case 1: Ravensbosch Viaduct, Netherlands
The Ravensbosch Viaduct is a part of the highway connecting Maastricht and Heerlen in Netherlands. It spans the valley of the Strabekervloedgraaf near Valkenburg at an approximate height of 25 m. The bridge superstructure is composed of two parallel box girders on which a 37.77 m wide common deck slab rests. The total bridge length is 420 m and divided into eight spans. The two outer spans are of a length of 42 m while each of the six inner spans had a length of 56 m (VSL Inc., 1977).
4.6.1.1 Applied Method
Three different design alternatives were prepared for tender. The first was the basic design with eight spans of 42, 6 x 56 and 42 m to be constructed using the Incremental Launching technique. The second option was to have seven spans of 45, 5 x 66 and 45 m to be carried out with prefabricated segments. The third was having nine spans of 35, 7 x 50 and 35 m to be constructed of conventionally poured reinforced concrete. The joint venture of Internationale Gewapend Betonbouw (IGB) and Societe Belge des Betons (SBB) offered the lowest bid with its price using the first design. Consequently this joint venture was awarded the job which was within the order of 7.5 million Dutch Florins. The time frame for the viaduct construction which was the first incrementally launched Dutch bridge was only 26 months (VSL Inc., 1977).
The depth of the section was specifically suited in order to accommodate the use of the Incremental Launching Method as the depth of the box girder was sized to be about 1/17th of the main spans while for other boxed bridges this ratio is typically 1/20th. That was done to decrease the quantity of post-tensioning cables to be placed by increasing the moment of inertia of the superstructure. As it is the case for any incrementally launched bridge, the section dimensions were kept constant along the length of the bridge.
The construction yard of the bridge was chosen to be behind the eastern abutment as this side had a higher elevation than the western side hence the launching process would be easier if done downgrade. Consequently, the friction beneath the bridge deck was counter-effected by the downslope motion. The construction yard was 75 m long and 25 m wide that included two areas, a storage area for reinforcing and post-tensioning steel and a runway having a tower crane and a concrete batch plant. Each increment was about 19 m long and constructed in three stages. Initially, the bottom slab was constructed. Secondly, the webs were cast and succeeded with the deck slab. Hence, the bottom slab was capable of carrying the inner formwork and the concrete top slab weight as by the time the top slab was constructed the bottom slab was one week old. Special consideration had to be set to the precision of the shuttering as it was important to place the shuttering with a precision of 0.1 mm which was a very difficult task but it was necessary in order to not accumulate errors along the bridge length. The central post-tensioning consisted of tendons having an ultimate capacity of 828 kN; eight cables were placed in the bottom slab and eighteen in the webs and upper slab. The use of temporary mid-span supports helped to reduce the bending moments during launching and keep the central pre-tension small. Concerning continuity cables connecting different spans, within each web six cables were placed such that above the supports cables from two adjacent spans overlap. Consequently, above each pier six cables were anchored in block-outs at the top of the webs. The cables were tensioned into the ducts only after the launching is complete and then fully tensioned (VSL Inc., 1977).
The launching nose in front of the structure was a 15 m long steel truss weighing 20 tonnes. Two jacks were fit to steel girders located in front of the eastern abutment. Each jack pulled a cable anchored to two steel girders specially placed at the end of every increment. The launching process over the segment length (about 19 m) took around six hours. During the construction stage all permanent and temporary piers had concrete bearings having a compressive strength of 60 MPa covered with a stressed sheet of chrome steel. In order to minimize friction, plates made of steel/neoprene/teflon were placed between the launched box girder and these bearings. The friction was monitored at each jacking process, it was initially high at the beginning but it reached only 5 % of the value assumed at the design phase (VSL Inc., 1977).
4.6.1.2 Construction Method Evaluation
The decision of using a conventional method would have been wrong as constructing the false work for a height of 25 m would have been costly and time consuming. On the other hand, installing precast segments would have been extremely difficult and hence expensive as transporting such large segments to the site would have been extremely difficult and needs extremely large cranes and trucks to place the sections in their locations. Hence, the only alternative left was to use a segmental erection method. As transporting precast segments in the middle of the valley is really difficult, using the span-by-span would have been really difficult. Also, as time was of the essence, and according to the selection criteria presented in section 5, the incremental launching method was the best choice as it was the fastest method of all the segmental erection methods.
4.6.2 Case 2: King Fahd Causeway, Saudi Arabia – Bahrain
This four-lane road is 25 km in length and had a width of approximately 23 m, and constructed of 350,000 m3 of concrete and 47,000 tonnes of reinforcing steel. The project cost was approximately US$ 800 million. The causeway was constructed in three segments. The first segment was from Al-Aziziyyah, south of Khobar, to the Border Station on Passport Island. The second segment was from the Border Station to Nasan Island in Bahrain. The third segment was from Nasan island to the Al-Jasra, on the main island of Bahrain. The causeway was composed of seven embankments (12570 m long) and five bridges (12430 m long) crossing the strait between Saudi Arabia and Bahrain in the Arabian Gulf. This project started in 1981 and the time was considered to be of the essence finishing this megaproject by 1986 (KFCA, 2013).
4.6.2.1 Applied Method
Two of the five bridges are long-spanned (which are not within the scope of this paper) to allow for the passage of ships beneath the causeway. The other three bridges where composed of a series of short spans. These short spans where composed of prefabricated concrete box sections. Each span included two box sections (one for each traffic direction) located side by side. Each boxed span was fabricated as one segment in a casting plant on the shore, lifted by cranes and placed over barges. The barges transport each segment to its location where two cranes resting on boats carry each segment and place it in position. After that, the post-tensioning of the continuity cables connecting the different spans took place and a common slab was poured above the two box girders. This process was repeated for all of the spans for the three short-spanned bridges (KFCA, 2013).
4.6.2.2 Construction Method Evaluation
Due to the difficulty of using false work in the middle of the Arabian Gulf, using conventional cast-in-place construction would have been nearly impossible. The significantly large vertical curvature of several spans within the bridges crossing the strait negated the ability to use the incremental launching method (which is the fastest available method) as it couldn’t be applied in cases of large vertical curvatures. As the project time was of the essence, the two cantilever methods would be time consuming in comparison to the span-by-span construction that would install smaller prefabricated segments and connect them together or by simply installing the prefabricated span in one piece. On the other hand, it was possible to construct these spans using the span-by-span method. If this option was used, smaller segments would have needed smaller barges and smaller cranes to install and hence the cost would have been lower. However, installing the larger prefabricated box girder in one piece would need large barges and large cranes which would incur a high cost but the rate of installation of each span would be faster as the time of connecting smaller segments together would be saved. Accordingly, and as the owners had high preference to finish the project on time and were willing to pay for the additional costs, the method used in this project was the most appropriate in such a case.
4.7 Conclusions and Recommendations
When examining the methods applied in the two cases discussed this chapter against the developed selection criteria, the selection criteria proved that it covered the different aspects governing the selection of the most suitable methods for different short-span bridge construction cases. The most governing factors of choice are the bridge length and location. The need for special design considerations, temporary mid-span supports, level of risk, time frame, resources (especially equipment), costs and constructability also affect the method selection. Hence, it is highly recommended when using the selection criteria matrix to take all the factors governing the method selection into account as neglecting some of them could cause serious problems that are difficult in fixing.
4.8 Acknowledgements
The author would like to acknowledge the Department of Construction Engineering in the American University in Cairo for its continuous support. The author would also like to acknowledge the efforts of his dear students: Tariq Almahallawi, Nour Akroush, Mohamed Kasbar, Laila Amin and Noorhan Helmy as this chapter would have not come to existence without their efforts.
5 Long-span Bridges
Summary:
Long-span bridges crossing water ways and varying topographies are necessary for transportation all over the world. Construction of such structures involves utilizing unique construction methods due to various characteristics like structural system, cost, constructability, resources and time. This chapter covers different methods of long-span bridge construction by concentrating on different construction methods of every type of long-span bridges. Moreover, a comparative analysis is provided to show when to use every method of construction according to the conditions available. Two projects involving long-span bridges with different sizes and project conditions were studied and examined against the developed selection criteria in order to evaluate the validity of the applied construction methods in each case. A previous version of this chapter was published as a conference paper by (Darwish, et al., 2015) titled “Selection Criteria of Long-span Bridges Construction Methods”.
5.1 Introduction
Designs of bridges vary depending on the function of the bridge, the nature of the terrain where the bridge is constructed, and the material used to make it. All bridges have the same purpose of transporting people, vehicles and trains from one point to another, yet there are several types of bridges to choose from when you build one. Long span bridges have several types which differ from the structural point of view, the span it can cover and practicality of construction. From a structural perspective, long span bridges are either arched, cable stayed, suspended or truss bridges.
In an arch bridge we mainly have compression forces within the arch with a minimal moment depending on the design as the arch effect minimizes the mid-span moment. Of course, those compression forces are transferred to thrust force at the foundation of the structure, so the foundation of the arch bridge should be designed to withstand these large thrust forces, acting as if they want to open the arch. The bridge deck could be directly supported on the arch or a series of columns or truss members could be used to transfer the load from the deck to the arch (Au, Wang, & Liu, 2003).
On the other hand, a suspended bridge mainly consists of a deck, cable suspender, and a tower backstay. The idea of the suspension bridge is that the main cable carrier hangers that support the bridge deck and these hangers are in tension as they are carrying the bridge deck, and so the hangers also pull the main cable creating a tension force in the main cable. Hence, the main cable transfers the load mainly to the bridge towers (pylons) and the anchorage zone. However, these types of bridges need to be carefully designed as they are of very low lateral stiffness making them very sensitive to lateral loads like wind and seismic loads, and this case is obviously noticed after the disaster of the old Tacoma Bridge which collapsed due to the lack of consideration of lateral loads in its design (Arco & Aparicio, 2001).
A cable stayed bridge mainly consists of a pylon (tower), and cables that connect the pylon to the deck, as the deck is loaded the cables are in tension, and this tension force is transferred to the pylon, and the idea of the pylon is to have an equal weight to the left and the right of pylon, and to balance the weight, and avoid extra moment, and that is why when some engineers decided to make a pylon with the weight from the left and the right of the pylon not balanced, they did the pylon in a inclined position in order to account for this unbalance (Reddy, Ghaboussi, & Hawkins, 1999).
On the other hand, within a truss bridge, the truss members carry either compression or tension forces but the difference is that trusses are less bulky or lighter in weight in comparison to other structural systems. This difference between the truss and beam bridges made truss bridges more economical as they use less material efficiently. The idea of truss bridges is very old and it has been used in other types of bridges such as arched bridges. Truss bridges can be used in some site condition or in constructions that need balancing between labors, equipment, and costs of materials used (Durkee, 2003).
From a construction methods perspective, the methods used to construct long-span bridge decks could be all classified as segmental methods in which the bridges are made of repetitive structural elements that are repeatedly joined together to form the complete bridge structure. This method is the most traditional bridge construction method, as it was used in history in many bridges. Builders have always found it easier and more efficient to create a larger durable bridge structure from smaller segments. This approach could be used to construct bridges out of steel or concrete (whether cast-in-situ or precast). It could also be used to construct bridges involving any of the bridge structural systems described above however the detailed construction steps may change from one structural system to another (Barker, 1981).
5.2 Construction Methods
Bridges in general could be either constructed using the conventional construction methods or using segmental construction methods. Segmental construction is the most traditional long-span bridge construction alternative as constructing a long-spanned deck in one piece is practically impossible. Builders have always found it easier and more efficient to create a larger durable bridge structure from smaller segments. Segmental bridges today are used in several applications, such as the construction of highway projects in areas of already existing streets and urban density, or the construction of bridges across sites that are environmentally fragile and require specific care (Barker, 1981).
5.2.1 Conventional Method
This is the traditional way of constructing a bridge, if the bridge is made of reinforced concrete the formwork is supported on the false work and temporary supports, and the construction process takes place conventionally. If the bridge is made of precast concrete or structural steel the segments are installed using cranes and rested on the temporary supports then connected to each other to form the bridge body. However, if this method is used to construct decks of suspended bridges or cable-stayed bridges the cables must be connected and post-tensioned before removal of the temporary supports (Dunn, 1996) (BBR, 2014).
This method is cost-saving as it doesn’t involve designing the structure for special load cases related to the construction method and most of contractors could implement it due to the conventionality of its activities. However, due to the use of false work and temporary supports, bridges constructed using such a method are of a limited height, since if the bridge is high it would require a great deal of formwork, and bracings that is not practical to use. Additionally, it is nearly impossible to place temporary supports and false work in the middle of waterways (seas, oceans or rivers) or valleys to apply such a method. Hence, this method is rarely used in long-span bridge construction as most of long-span bridges are either crossing waterways or valleys. Even when doing such activities is possible, the false work will create an obstruction for any type of traffic beneath the bridge and the installation of the temporary supports, the false work and formwork will require a great deal of time and effort, and also its removal will take a great deal of time making this method the slowest of all methods. In addition to all of that the false work stability is an issue, since the false work will require a complicated design for the bracing system in order to be able to resist lateral loads (Dunn, 1996).
One alternative used to reduce the use of dense false work for arched bridges is using vertical rotation which is basically that each half of the arch is constructed on ground using traditional methods. After that the each half is lifted vertically to its position. However, doing so requires a hinge at each end of the bridge, and this hinge is then sealed using concrete or any other mechanism after the bridge is vertically rotated. Again, within this alternative there is a need for space in order to construct the arch on ground, since the arch would need a place until it is constructed using any of the traditional methods. Also, this alternative creates additional design requirements as there will be different cases of loading, and design checks should be made in order to insure that the design is still safe in the vertical rotation positions (Xu, Zhou, & Wu, 2010 ).
On the other hand, horizontal rotation is conceptually very similar to vertical rotation but instead of the bridge being built in its vertical position, and then rotated horizontally to its position. Of course, in order to do so, a complicated rotating mechanism should be done. This alternative could be used to construct arched, cable-stayed and truss bridges and its major merit is that it transfers the working location from the permanent location that is crossing valley or a waterway to a perpendicular location that could be more suitable to place false work and temporary supports on. However, and as the vertical rotation alternative, this alternative creates additional design requirements as there will be different cases of loading, and design checks should be made in order to insure that the design is still safe in the horizontal rotation positions. In addition to that, this alternative involves using a complicated rotating mechanism, which would require a special mechanical design that creating an additional cost (Sun, Guo, Zhang, Guan, & Zheng, 2011).
5.2.2 Balanced Cantilever Method
Within this method of construction the deck segments are placed and attached as cantilevers supported on the piers of the bridge, after constructing the bridge piers. The pre-cast concrete (or steel) segments are placed equally at both sides of the pier to ensure stability of the structure. The additional moment progressively increasing within the deck as more segments are added to the cantilever from the pier is resisted by post-tensioning the deck segments near and on top of the pier, and extending this post-tensioning to the body of the pier itself, in order to stabilize the structure such that the connection between the deck and pier will be a moment-resisting connection. The segments added to the cantilever are most commonly placed using cranes. A launching crane is very useful in situations where the land below the superstructure of the bridge is not accessible as the case shown in Figure 15 (VSL Inc., 2013).
illustration not visible in this excerpt
Figure 15: Construction of the İstanbul - Golden Horn Metro Bridge using the balanced cantilever method, photo taken and authorized for reuse by (VikiPicture, 2013).
If cast-in-place concrete is poured instead of pre-cast segments then there will be a need to use two traveler forms (one from each side of the pier). However, careful care should be taken as the traveler forms are advanced due to the fact that the full strength of the concrete is not achieved yet (Dunn, 1996). Hence, unless early strength concrete mixtures and curing procedures are used, striking and advancing the forms should take at least three days (as 50% of the strength would be achieved by that time). The major merit of this method is that there is minimal disturbance for the area beneath the bridge deck hence it could be used when the bridge is crossing major roads, water ways, forests or difficult topographies (Blank, Blank, & Luberas, 2003).
This method could be used in its classical form to construct multi-spanned arched bridges however it is not that common to find it used for arched bridges as typically such bridges are not symmetric over the pylon. On the other hand, on using this method in constructing a cable-stayed bridge, the process starts after constructing the cables tower and suspending the cables from the towers, as after constructing each deck segment this segment is connected to the cables and the cables are post-tensioned. The following segment will not be installed (if prefabricated) or constructed (if cast-in-place) unless the cables connected to the preceding segment are post-tensioned as shown in Figure 15. The process is very similar if this method is used to construct a suspended bridge however the cables are hanged from a main cable hanged from the tower (pylon). Whether used to construct suspended or cable-stayed bridges each segment installed is considered as a load case by itself and the structural soundness of the pylons, deck and the cables should be checked under each of these different load cases (Reddy, Ghaboussi, & Hawkins, 1999). Additionally, this method could be problematic from the perspective of guaranteeing the proper vertical position of the bridge deck due to the deflections when the deck is cantilevered. Hence, proper monitoring using accurate surveying methods is a must and reducing such deflections could be performed by increasing the post-tension forces in the cables (whether stay cables or suspension cables) in order to achieve the proper vertical position (Liang, Zhai, Fan, & Shi, 2015).
5.2.3 Unidirectional Cantilever Method
This method (also called progressive placing construction method) is similar to the balanced cantilever method but instead of moving in both directions from a pier with cantilevering segments, the segments are instead added to the pier in a unidirectional manner (in one direction). In this method since the casting is done in one direction only, the overturning moment is significantly high on the segment at the pier which should be taken into consideration on designing the deck, the pier and the pier-deck connection. Additionally, a temporary support system is used to reduce this moment (Barker, 1981).
This construction process is less complicated than the balanced cantilever method since work is done in one direction only as shown in Figure 16. Also, completing one span of the bridge gives better accessibility to construct subsequent spans; this is not possible when the construction is done in both directions from the pier. Accordingly, this method needs temporary supports; it is slower and could be applied for shorter spans when compared to the balanced cantilever method (Barker, 1981).
In both cantilever construction methods the cantilevering segments from each pier will reach to a point where they meet at mid-span between the two piers and these segments need to be joined. Joining the segments is either done using a hinged connection which is a simple connection but could lower the load-bearing of the bridge structure or the segments could be kept suspended and allowed to rest on bearings between the cantilevers. This might be more structurally complex, but is more structurally sound. Due to all of that, both cantilever methods could be used for various lengths of bridge spans ranging from short spans to long spans although the balanced cantilever method is capable for constructing longer spans than the unidirectional cantilever method (BBR, 2014).
illustration not visible in this excerpt
Figure 16: The construction of the Hoover Dam Bypass Bridge using the unidirectional cantilever construction method, photo taken and authorized for reuse by (Wikimedia, 2010).
The unidirectional cantilever method is more common in the construction of arched bridges than other structural systems. This is due to the fact that most of long-spanned arched bridges are not structurally symmetric about their pylons/columns as the spans to the left and to the right of the main arched spans are typically abutments or short-spanned as this type of bridges is most commonly used to cross a river or a valley. There are two alternatives by which this method could be used to construct an arched bridge. The first alternative is called the “Pylon method” where an arch rib is suspended with cables (acting as temporary supports) from a pylon. It is very common to utilize such cables to connect the arch, the pylon and the point of fixation (anchorage) on the land where the forces are transferred as shown in Figure 16. The second alternative is called the “truss method” where a bridge is constructed while truss structure is formed with arch ribs, vertical columns, stiffening beams and diagonal members. So, simply the difference between the two methods is simply that in the Pylon method the Arch is fully constructed first, and then the other components of the bridge like the hangers and the bridge deck, while in the truss method both the hangers, deck, and the Arch are constructed together. It should be noted that in both types the Arch is mostly being built using a traveler formwork or a slip form depending on the situation. Also as any staged construction alternative the different structural components should be designed to withstand the different load cases associated with the different construction stages (Au, Wang, & Liu, 2003).
5.2.4 Mid-span Suspension Bridge Construction
The construction of suspension bridge depends, and varies upon the project itself, but mainly the construction sequence of the suspension bridge begins with the construction of the anchorage zone, which is a very huge structure that is used to anchor and support the suspension cables, and sometimes, the anchorage zone is simply a rock or a huge concrete structure, if it is able to withstand the pressure of the cables. Then the pylons are constructed, the saddles (side cables), and the main cables are pulled to position, and then tensioned to reach the desired design profile. Then, the hangers are tied to the main cable. Finally the deck is constructed most either using the balanced cantilever method described above or starting from the mid-span. The presence of the main suspension cables spanning between the two pylons before the deck construction enables the construction of the deck to start from the mid-span. Hence, suspension bridges are the only type of long-spanned bridges in which the deck construction could start from the mid-span as a winch lifted on a locomotive rests on the main suspension cables and it lifts each prefabricated (steel or RC) deck segment from the barge (if constructed over a waterway) to its vertical position then the hanger cables are connected to the new segment and now the locomotive is free to move leftwards or rightwards to lift the following segment which will be connected to the hangers and the previous segment after located in position. Two locomotives could be used to perform a faster construction involving the lifting of a rightward and a leftward segment at the same time as shown in Figure 17. This method causes less moments in the deck when compared to the cantilevered construction methods however it still needs to be designed as each construction stage is a load case by itself (Adanur, Günaydin, Altunisik, & Sevim, 2012). In addition to that the deck is susceptible to lateral loads (whether seismic or wind loads) if constructed from the middle to the left and right directions as the bridge deck will be oscillating in a mode similar to that of a pendulum. This problem could be solved if the erection sequence is altered to be non-symmetric as this will reduce the pendulum-like motion of the deck under-construction (Arco & Aparicio, 2001).
illustration not visible in this excerpt
Figure 17: Assembly of the deck segments of the first Severn Bridge, UK, photo taken and authorized for reuse by (Spicer, 2011).
5.2.5 Incremental Launch Method
This method involves the casting of continuous segments at a specific location of the site, then pushing this continuous chain using hydraulic rams to be placed in position. Casting beds in this method have formwork that is adjustable and movable. After constructing the piers the segments (which are usually pre-stressed concrete) are cast in continuous chains on site. Typically, on constructing bridges using this method, three types of pre-stressing are usually utilized: the central, the eccentric and the transverse pre-stressing each increasing the section strength in a certain direction. After that, the chains are pushed into position using hydraulic jacks that act in both vertical and horizontal directions, these lift and push the segments into place. The segments are supported with temporary supports as they advance from the casting yard to the pier (if the chains of segments are of long spans). The first segment is attached to a launching nose (usually steel). This nose will rest on the temporary supports and then rest on the permanent supports providing more stability which is the main difference between this method and the unidirectional cantilever method (VSL Inc., 1977).
On constructing long-spanned bridges using such a method, temporary supports are necessary. Hence it is very difficult to use this option for long-spanned bridges crossing waterways. On the other hand, it is economically sound as the transportation of the segments for long distances is avoided and the use of large amount of formwork is reduced. However, this method could only be used if the bridge has a constant cross section and a straight alignment (Barker, 1981). This limitation makes it impossible to use this method to construct the arch of an arched bridge however it could be used to construct the deck above the arch if the distance between the columns (transferring the load from the deck to the arch) is limited to be less than 60 m as due to the need to launch a significant weight using a set of jacks this method is limited to having a distance between the different supports limited to be less than 60 m (BBR, 2014).
5.3 Construction Methods Selection Criteria
Based on the discussion of the different methods presented in the previous section, a selection criteria could be developed to aid the decision making process concerning the long-span bridge construction methods. Typically, the conventional methods whether involving simple installation of steel or precast concrete girders or involving cast-in-place concrete using conventional false work carrying formwork is more economical than segmental methods however, if the bridge is planned to pass over a busy road, a waterway or a valley that could not allow false work to be placed the segmental erection methods are the only remaining alternative. Hence, and since most of long-spanned bridges are crossing waterways or valleys, the conventional methods are not applicable for most of these bridges and segmental construction methods are used in such cases. The bridge type, length and location are the most important factors governing the choice between the different methods. The need for special design considerations, temporary supports, level of risk, time frame, resources (especially equipment) and constructability also affect the method selection. A summary of the selection criteria between different segmental construction methods could be found in Table 4.
Table 4: Selection criteria for long-span segmental deck construction methods.
illustration not visible in this excerpt
5.4 Case Studies
5.4.1 Case 1: Russky Island Cable-Stayed Bridge, Russia
The Russky Island Bridge is constructed to link Vladivostok mainland and island areas. The construction started in 2008 and ended in 2012 with a total duration of 43 months. The cable-stayed bridge is 1886 m long with a center span of a length of 1104 m. The shortest stay cable was 136 m long while the longest cable has a length of 580 m, the deck height is 70 m while each pylon had a height of 320.9 m. The job was done by a consortium of contractors: USK, MOST and OJSC while the design was performed by NPO Mostovik. Due to the bridge location the design criteria involved designing the bridge to withstand a wind speed of 36 m/sec, snow thickness of 700 mm, a thermal variation load between -31 oC in winter and 37 oC in summer and a storm wave up to 6 m high in addition to the cantilevered construction load cases (SK MOST, 2014).
5.4.1.1 Applied Method
The bridge decks in the leftwards and rightwards spans were made of pre-stressed reinforced concrete girders. The concrete was cast in place as these segments were located on land and using formwork supported by false work and temporary supports at these locations was feasible. Within these spans plastic ducts were installed in addition to reinforcement bars after the formwork was placed. High tensile pre-stressing steel bundles were installed in the ducts and bundles were tensioned using pre-stressed jacks, workers filled the voids in the duct with special cement based mortar and the concrete was poured (SKMOST, 2012).
The real challenge was in the middle span that was the largest span and crossing a water way. Hence, the designer decided to make it a steel stiffening girder composed of 103 panels. Each panel was 12 m long and 26 m wide. The panels were fabricated on the land at the production facility on the Nazimov Peninsula and at Nakhodka shipyard and delivered by barges to the project location. To guarantee accurate positioning, these panels were positioned with the aid of a global navigation satellite system (GLONASS) using cranes (of a lifting capacity of 1350 tons) supported on the constructed portion of the decks. The process was done using the unidirectional cantilever method and the different panels were joined. Welded connections were used for longitudinal and transversal connections of the orthotropic plate cap sheet and the lower ribbed plate. However, for joints of vertical walls of the blocks, longitudinal ribs, transversal beams and diaphragms, the connections used were high-strength bolts. After the installation and connection of each panel, the stay cables were connected to it and tensioned before the subsequent panel was installed. Each stay cable was composed of a number of strands ranging between 13 and 85 strands. Each of these strands had a diameter of 15.7 mm and consisted of 7 galvanized steel wires. The protective sheath of each stay cable is made of high-density polyethylene (HDPE) providing protection form ultraviolet rays and thermal variations (SK MOST, 2014).
5.4.1.2 Construction Method Evaluation
The decision of using a conventional method in the outer two sides was a correct decision as there were no obstructions beneath the medium-spanned bridge deck preventing this option. Hence, this was the most cost-saving way of doing the job. However, using conventional methods was nearly impossible in the middle span as it crossed the water and using a segmental method was a necessity. In such a situation the ideal condition was to use the balanced cantilever method however as the sides on land were medium-spanned and the mid-span was significantly longer it was more economical to use the unidirectional cantilever method as the overturning moments would be resisted by the system of stay cables, bridge girder and columns from the sides on the land.
5.4.2 Case 2: Humber Suspension Bridge, UK
This Bridge in England was the longest suspension bridge in the world when opened in 1981, as it has a single suspended span of 1410 m and a bridge overall length of 2220 m. It remained the longest for 17 years however nowadays it is the seventh-longest suspension bridge in the world. Each of its two towers is made of a two hollow vertical concrete columns, each of them has a height of 155.5 m a squared base of 6 m x 6 m that tapers to reach 4.5 m × 4.75 m at the top. The bridge design criteria included tolerating a wind speed of 129 km/hr. The total length of the suspension cables strands is 71,000 km. The north tower is on the bank while the southern one is in the water. The middle span crosses the Humber (the river mouth formed by two rivers) between Barton-upon-Humber on the south side and Hessle on the north side. The project consultant was Freeman Fox & Partners (now named Hyder Consulting) while the main contractor constructing the superstructure was British Bridge Builders and the contractor doing the sub-structure was John Howard & Co Ltd. This project incurred a cost of £151 million upon its completion (Wikipedia, 2015).
5.4.2.1 Applied Method
After finishing the substructure and the towers construction in 130 days, the side anchorage points were constructed and the main suspension cables were placed in 670 days. These initial steps took long time due to the fact that constructing the side anchorage points involved complicated deep foundations due to the soil nature. Once the main cable was fully placed in position, the deck erection started. The deck consisted of 124 steel box girder deck segments. Each prefabricated steel segment was 18.1 m long, 4.5 m deep and 28.5 m wide. A 37 mm thick orthotropic plate constitutes the top of each section an on which asphalt cement concrete surfacing was to be laid afterwards. The main cables had a sagging of 115.5 m while the horizontal distance between the vertical cables was 22 m. The main cables were composed of 5 mm UTS wires of a tensile strength of 1.54 GPa grouped in strands. Each of the main cables had a cross-sectional area of 0.29 m2. After the cable assembly two locomotives were placed on the two main cables in the middle span, each of these locomotives (that were movable within the middle span) carried a winch that carried each deck segment and placed it in position. This process started from the mid-span. Barges were used to transfer the prefabricated deck sections from the fabrication plant on land to the bridge location. After each segment was carried and connected to the corresponding vertical cables, the connections with the neighboring deck segments took place. Simultaneously, the transportation and assembly of the deck segments took place on the two side spans. However, for the northern side which was fully on the bank the segment transportation was done using large trucks. For both side (the southern and northern), the construction started from the anchorage points towards the towers not from the mid-span of each side. This was done to avoid using locomotives at these sides and to use cranes instead which made the process faster and more conventional. The same procedures of deck segment assembly and connections took place on the sides as the sequence done at the middle span. The assembly of the bridge decks on the sides started shortly after the beginning of the assembly of the decks located in the middle span. However, the side deck sections assembly was finished before the middle span deck assembly due to the shorter lengths of the northern and southern decks when compared to the middle span length. The whole deck assembly staged construction process was divided into 39 stages with each stage taking approximately 10 days hence the bridge deck was assembled in 390 days. Each of these stages was considered as a load case by itself during the design phase (Adanur, Günaydin, Altunisik, & Sevim, 2012).
5.4.2.2 Construction Method Evaluation
Due to the difficulty of using false work in the middle of the water, using conventional construction would have been nearly impossible for the deck construction within the middle span and northern side however it was possible to use the conventional erection method on the southern side which would have saved the cost and hassle of transporting and lifting large deck segments at that side. On the other hand starting the construction on the outer sides from the anchorage points was a correct decision as it saved the cost and time of installing locomotives supported on the main cables at these locations. On the other hand it was possible to assemble the deck in the middle span using the balanced cantilever method however this would have exerted additional moments on the towers and unbalanced tensile forces in the cables reflected to additional forces at the anchorage points as the middle span was 1410 m long while one of the outer spans was 280 m and the other was 530 m hence the load would have been eventually unbalanced in the later stages of deck assembly due to the large differences in spans causing additional stresses in the towers, the main cables and the anchorage points. Consequently, and according to the developed selection criteria, the choice of starting the deck assembly from the mid-span of the main bridge span was the most cost-saving option as it saved the cost of additionally stiffening the towers, cables and anchorage points.
5.5 Conclusions and Recommendations
When examining the methods applied in the two cases discussed in this chapter against the developed selection criteria, the selection criteria proved that it covered the different aspects governing the selection of the most suitable methods for different long-span bridge construction cases. The most governing factors of choice are the bridge type, length and location. The need for special design considerations, temporary supports, level of risk, time frame, resources (especially equipment), costs and constructability also affect the method selection. Hence, it is highly recommended when using the selection criteria matrix to take all the factors governing the method selection into account as neglecting some of them could cause serious problems that are difficult in fixing.
5.6 Acknowledgements
The author would like to acknowledge the Department of Construction Engineering in the American University in Cairo for its continuous support. The author would also like to acknowledge the efforts of his dear students: Ramy Ghowiba, Mohamed Afifi, Mahmoud Elhosary, Monira Yazeed, Ahmed Abdelaziz, Omar Ghaly, Ahmed Elmahdy, Asmaa Mohamed as this chapter would have not come to existence without their efforts.
6 Tunnels
Summary:
Tunnels are necessary for mining, transportation and sanitary purposes all over the world. Construction of tunnels involves utilizing unique construction methods due to various characteristics like cost, constructability, resources and time. This chapter covers different methods of tunnel construction by concentrating on different construction methods of every type of tunnels. Moreover, a comparative analysis is provided to show when to use every method of construction according to the conditions available. Two projects involving tunnels with different sizes and project conditions were studied and examined against the developed selection criteria in order to evaluate the validity of the applied construction methods in each case. A previous version of this chapter was published as a conference paper by (Darwish, et al., 2015) titled “Selection Criteria for Tunnel Construction Methods”.
6.1 Introduction
Tunnels are underground passages or shafts that pass through a mountain or under a road or city or under water. Pedestrians and vehicles or trains can use such facilities. Some tunnels are used only for carrying water to other areas and some are used for cables in communication between cities. Also secret tunnels are built for military usage. The tunnels could be in rock layer, under sea or river and could be in soil filled with ground water. Each one of those cases has its own machines, safety precautions and type of labor. There are many shapes for tunnels; they are mainly circular tunnels, rectangular tunnels or Horseshoe (D-shaped) or oval (egg shaped). The main factors governing the shape choice are the construction method and soil condition, (FHWA, 2009). Until the early nineteenth century, tunnel construction in municipal areas was conceivable by applying one of two methods; either the cut-and-cover (trenched) excavation or by trenchless tunnel excavation using timber frames inside an advancing cavity and immediately lining with masonry. Those excavation methods were successfully applied in both cohesive and cohessionless soils, however they were limited to cases in which limited amount of water seepage occurs (Geodata S.p.A., 2008).
Bored tunnels are long tunnels that require selection of certain and specific excavation equipment to deal with different types of soil and rock. The process it usually performed using a tunnel boring machines (TBMs). These machines can be used for the boring in any material, from hard rock to sand, as well as conditions underneath the water table. Consequently, different types of TBMs exist. Hard rock TBMs can be open-shield or closed, depending on the rock support being installed in the tunnel. TBMs used in softer soils can be either an earth-pressure balance (EPB), a slurry shield (SS), or an open face TBM. Hence the main factor determining the type of TBM to be used in a project is the ground conditions (Mathy & Kahl, 2003) (Geodata S.p.A., 2008).
The first idea of tunneling under a water table was in reality suggested in 1806 by the Marc Isambard Brunel, for the realization of a tunnel under the river Neva in St. Petersburg. It was only in 1818 when he patented for the first time his invention: the shielded excavating machine. This first attempt of trenchless tunneling technology was applied first in 1825, in the excavation of the River Thames tunnel underpass. This first excavation attempt was done between 1825 and 1828 using a shield which was found unsuitable and so removed and substituted by a cast iron rectangular shield. Despite this accomplishment by Brunel, the dilemma of water control was not satisfactorily solved until the use of compressed air technology. The first successful applications of this face support technique were in Antwerp Dock tunnel, UK and in the Hudson river tunnel, New York (in 1879 and 1880 respectively). This significant advance made achievable to successfully drive 1130 m of tunnel and many other following tunnels. However, the associated worker health problems and method inefficiency (due to pressure non-uniformity) hindered the wide use of such methods until the innovative solution was found eight decades after which was based on using a highly dense medium to provide face support, initiating the development of the modern Slurry and earth pressure balance (EPB) machines (Geodata S.p.A., 2008).
On the other hand in unpopulated areas the usage of the drill-and-blast tunneling technique to construct tunnels through rocks was the most common practice since the invention of dynamite. Although this method is still used till today, the introduction of rock TBMs and their continuous advancements and the introduction and advancement of road-header machinery has created other alternatives to the drill-and-blast technique (Girmscheid & Schexnayder, 2002) (Kwietnewski, Henn, & Brierly, 2011). However, the continuous advancements in the drill-and-blast techniques solve a lot of its occupational health and safety issues and keep it a good competitor to other methods (Girmscheid & Schexnayder, 2002) (Rafie, 2013).
While crossing waterways is usually done by TBMs boring the grounds beneath the waterways, in some cases it could be done using the immersed tunnel technique. Although it needs some conditions to be satisfied, this technique has been utilized for years and it has been increasingly proving itself as a sound technique in under-water tunnel construction in the past years (Lo & Tsang, 2008).
Another trenchless alternative that has been increasingly used is box jacking that involves utilizing hydraulic jacks to push prefabricated tunnel sections through the soils while performing simultaneous excavation within the jacked tunnel sections during jacking (Jacked Structures, 2011). Each of these tunneling techniques will be discussed within the next section of this chapter and the selection criteria governing the choice of each of them will be developed.
6.2 Construction Methods
6.2.1 Trenched Methods
The trenched cut and cover tunnels are usually built through excavations and then covered in backfill material when it is done. It is usually used for tunnels that are needed in a shallow (within 10 to 12 m) place where excavation is easier and possible as it can be also economical. It is designed in a form of a rigid box and the quality and finishes is according to the area whether it is open urban areas or space limited areas. This tunneling method is economical, practical and easier in construction than most tunneling technologies. However, if the tunnel is underneath a city street it will cause traffic problems, dust and noise and if it is deeper than 12 meters it will not be economical any more. There are two types of construction methods, which are the bottom-up and top-down methods. The main difference is that the bottom-up technique is structurally independent of the support walls while the top-down technique is used when the side support walls are a main contributor in the tunnel structural system (FHWA, 2009).
In the bottom-up construction method the trench is excavated and then the tunneling takes place then the backfill is added. There are two methods to excavate the trench; using open cut or support system through excavation. This method is mainly used when there is no need for restoration for the ground surface, if there is enough space in the construction process, if it will not affect traffic and if there is no need to emphasis on the sidewall deflection. While on using the top-down method, the tunnel walls must be added before the excavation process takes place, because it acts as a support. The roof is then constructed, after that the excavation starts; when the excavation is done the floor is constructed and connected to the wall. In some cases piles are added to support the walls. The conditions in which this method is used is when the risk of the wall falling is not in the direction of the road, if there is a high ground water table then it is difficult to construct the retaining walls for long tunnels (FHWA, 2009).
Within the bottom-up method the excavation should be easy without obstacles as it is shallow, the waterproof is easily applied on the inside and outside of the tunnel walls and the drainage systems are outside of the structure. All these merits makes it the most commonly used method of construction. However, this method needs a sound temporary support system for the structure, the dewatering may affect the infrastructure and it needs large space for construction. On the other hand, on using the top-down method the walls of the excavation are the tunnel’s permanent walls not just temporarily, less need for large construction area, the roof is constructed easily as it is precast (in most of cases), the cost is lower and the duration is shorter than the bottom-up method. However, within this method no waterproofing for the outer side of the walls, the construction may be complicated as everything is connected, the excavation areas are limited and the connections between the walls and the slabs may not be as good as in the case of the bottom-up method and may cause leakage (FHWA, 2009).
6.2.2 Immersed Tunneling
Constructing a tunnel crossing a waterway is a task that could consume a lot of time and resources if done by boring or jacking technologies, a more feasible and efficient technique is to immerse the tunnel and let it rest on the seabed/riverbed. First, large marine excavators are used to excavate part of the riverbed/seabed to form the tunnel trench (and replace part of the soil if necessary). Second, the tunnel sections (steel or prefabricated concrete) are shipped from the construction basin. These sections should be designed to float on the water surface containing empty compartments that are then flooded by water to sink the section after reaching the required horizontal position. The section is hanged by four cables (mooring lines) to marine boats that would then lower the section into position. Once the section has been placed, stabilizing it starts by placing the foundations and the locking fill. When these are in position, the ballast exchange process can begin. When the element is first placed, negative buoyancy is provided by the internal or roof-based water tanks, external ballast boxes, or water cylinders.
Another advancement in this field is the use of EPS (external positioning system) units that are clamped to the tunnel element and the lowering winches attached to lugs on the top of the EPS frame. When the tunnel element is immersed, the feet of the EPS land on the gravel bed at the same time as the tunnel element. Then the legs of the EPS frames are advanced to slightly lift the tunnel element and horizontal jacks are used to precisely position the element horizontally. This can be performed with an accuracy of 10 mm. Once the element is correctly positioned, the EPS units are then released from the tunnel element and lifted away by the lowering winches (Lunniss & Baber, 2013).
On deeper tunnels, it is preferable to minimize diver operations due to the greater risk at depth. In some cases diving bells are used, in other cases robotics could be used. Of course the application of such method is function of having good weather conditions, reasonable water currents and a riverbed/seabed of a sufficient bearing capacity. If one or more of these factors is absent it may force the use of other trenchless methods (Lo & Tsang, 2008).
6.2.3 Tunnel Boring
The tunnel boring process is usually done by using a tunnel boring machine (TBM). A typical TBM can excavate an average of 5-10 m/day depending on its size, type and site conditions. TBM’s are divided according to the excavated soil into two main categories: Hard Rock, and Soft Ground TBM’s. Hard rock TBM’s are divided into two sub-categories: shielded and unshielded types. While soft ground TBM’s are divided into four sub-categories: mechanically supported closed shield type, earth pressure balance (EPB) type, slurry shield (SS), and compressed air shield type (Geodata S.p.A., 2008). A TBM length ranges between 100-150 m depending on the manufacturer and its diameter. It is produced in different diameters with a minimum diameter of 1 m. The diameters of tunnels that a TBM could construct typically range from 2.5 m to 14 m (Girmscheid & Schexnayder, 2003).
The tunneling process starts by assembling the TBM in place, in order to do that a shaft must be excavated in the ground and the TBM is lowered in it. When the TBM starts excavation the precast concrete is placed to hold the soil up, it is done either automatically (the TBM pours it through arms) or manually where labor have to place the precast concrete segments. Another trench is excavated at the other end of the tunnel to lift the TBM up after finishing the tunnel excavation. The TBM then is lifted or disassembled after the excavation and the two shafts are closed. However, the process details change depending on the TBM type which is mainly a function of the soil type and project conditions. This method does not cause traffic disturbance, requires less labor and is safe in construction (if used properly). However, it is capital intensive, and as the TBM type varies with the soil condition, the TBM may not continue excavation if any surprises occur or if the soil properties change significantly and due to its shape and technique, the tunnels done by the TBM method could only be circular (Bilgin, Copur, & Balci, 2014).
6.2.3.1 Soft Ground Tunnel Boring
All soft ground TBM’s are shielded as the soil may collapse as the machine proceeds boring. However, the shielding technique varies from one machine type to the other. When it comes to excavating soft grounds with TBM, the machine cutter head will require balancing pressure from the side of the machine, so the boring process is well-controlled. Concerning the earth pressure balance (EPB) type, it utilizes the excavated soil by mixing it with water, foaming agents and polymers to create muck in the working chamber behind the cutter head. The pressure of the muck is controlled by the pressure wall. A screw conveyor takes the mud out of the machine as the machine moves forward to carry out the extra mud from the working chamber. The rotational speed of the screw conveyor and the opening of its discharging gate are adjustable in order to control the pressure within the excavation chamber. The muck ejection rate and rotational speed of the screw conveyor must be equal to the machine excavation rate. This rate is controlled by thrust cylinders for appropriate face pressure control without dangerous stability problems. The amount of excavated material is controlled by either a weighing or a laser scanning system. These machines are usually used for excavation of fine sand, silt, and clay having low permeability. They are not very effective in soils having a percentage of fine material less than 10% and water heads over 4 bars (Bilgin, Copur, & Balci, 2014).
The slurry shield (SS) TBM works with the same concept of the EPB type however, the cutter head is balanced by bentonite slurry. Moreover, the screw conveyor is replaced by two pipes that are the slurry feed and return to pump the slurry in and out of the working chamber. The slurry system works in a closed circuit as the slurry is reused after reprocessing. On the other hand, in stable ground and rock conditions, SS TBMs can be used in open mode without giving any face pressure (provided the cutters are changed). They are normally used to excavate gravel, coarse-medium sized sands, and silty and/or clayey sands of a hydraulic permeability between 10−8 and 10−2 m/s (Bilgin, Copur, & Balci, 2014).
In compressed air TBMs, the rotating cutter-heads are the means of excavation whereas face support is ensured by compressed air at an adequate level to balance the hydrostatic pressure of the ground water. The excavated soil is extracted from the pressurized excavation chamber using a rotary hopper and then conveyed to the main mucking system (Geodata S.p.A., 2008). These machines are normally used in soils having permeability lower than 10−4 m/s as any increase in soil permeability above this value would cause the air to escape. The air pressure in the cutter-head chamber should be only be set to be equal to the water pressure in the invert of tunnel, earth pressure has to be balanced additionally by natural or mechanical support. Hence, if underground water is absent, the system can be used in an opened mode (without face pressure). The air pressure is typically limited to a maximum pressure of 4 bar (3 bar above the atmospheric pressure) due to the danger of Caisson’s disease, this increases work time due to compression and decompression of staff, and increases the risk of fire and smoke. This technology also requires a huge compressed air generation system on the surface. Due to all of these reasons, the use of compressed air shields is decreasing (Bilgin, Copur, & Balci, 2014).
On the other hand, mechanically supported, open face shielded TBMs, equipped with full round protective shields immediately behind the tunnel face could be used in some special cases. The cutter-head performs its role as a cutter-head and also performs another role of supporting the tunnel face through using movable plates and thrust against the face via special hydraulic jacks. The fragments are extracted through adjustable openings or buckets and transferred to the primary mucking system. This method could be used to excavate tunnels through self-supporting ground as weak rock and fully or partially cohesive soils in which groundwater is minimal (Geodata S.p.A., 2008).
The concept of designing convertible multi-mode machines was first initiated in the early 1980s setting the starting point leading to the development of what is now called the “Mixshield”. The basic concept is to have a machine that is mechanically capable of switching between the two of the main three modes of EPB, SS and open single shield TBM’s. The past three decades experienced developments of machines that could change their mode of operation between open face single shield and closed EPB shield, and other machines that could change their mode of operation between closed slurry shield and open face single shield and a third family of machines that could change their mode of operation between EPB and SS modes. These developments were mainly done through altering the mechanical components of the machines and/or combining components of two types within the same machine. Such costly developments broaden the type of soil that could be bored within a single project reducing the risks of stopping the excavation due to soil type change (Burger, 2014) (Kondo, Iihara, & Kishimoto, 2006).
6.2.3.2 Hard Rock Tunnel Boring
TBMs are appropriate for cutting hard rock of compressive strength ranging between 50–300 MPa. However, and as abrasiveness relates to the intensity of wear sustained by the cutting tools, the rock should not be too highly abrasive. Minerals, having a high degree of hardness like quartz are highly abrasive. Hence, rock formations of compressive strengths exceeding 300 MPa, high toughness or high tensile strength, or having a high proportion of minerals with an abrasive effect represent the economic limits for using such machines (Girmscheid & Schexnayder, 2003).
The unshielded open type (also called “gripper” or “main beam”) TBM has no cover on its components as it depends on the arching effect created in the excavated rock. The cutter-head of the TBM has disks and is pushed against the excavated tunnel with hydraulic thrust cylinders. A system of grippers pushes on the sidewalls of the tunnel locking the TBM in place while the thrust cylinders extend, allowing the cutter-head to go forward. After completing a boring stroke, the boring process is paused and the machine is moved ahead, with the TBM being stabilized by an additional support system. The conveyor belt transfers the muck along the TBM length till reaching the backup area. The arching effect in most soils cannot be ensured permanently without reinforcement, so as the machine bores, fixing rings of reinforced concrete along the tunnel starts in order to create the new tunnel body. Each ring is divided to a number of shells. The shells are pre-cast and ready to be fixed together and to the soil with bolts (Bilgin, Copur, & Balci, 2014). For this type of machines, the rock compressive strength should be between 100 and 300 MPa. A rock formation of a compressive strength less than 100 MPa can limit the holding capacity of the grippers and reduce the maximum axial thrusting force of the TBM (Girmscheid & Schexnayder, 2003).
The single-shielded type TBM is also a hard rock type machine. It applies nearly the same cutting technique as the opened type however the TBM is shielded, so that the bored rock does not collapse on the machine. The shielded TBM has arms that fix the rings to the rock as it moves. Therefore as the TBM moves forward it fixes directly the ring segments without an aid of an external crew, but the crew on the machine itself. Another type of shielded TBM’s has a double-shield as the telescopic shield extends on advancing the machine hence shielding the TBM from the surrounding ground while the gripper shield remains motionless during boring (Bilgin, Copur, & Balci, 2014). This type of TBM’s is longer in length and less susceptible to rock collapses. The merit of the shielded TBMs is that even if the rock has a relatively low compressive strength of approximately 50 MPa and a low rock-splitting strength of 5 MPa, the shielded TBM can do the job with minimal risks. In the case of grounds having a tendency to collapse, shielded TBMs characterize a suitable operational solution (Girmscheid & Schexnayder, 2003).
6.2.4 Jacked Box Tunneling
Within this trenchless method of construction, tunnel sections are prefabricated and then are pushed one after the other by hydraulic jacks. In this method, the tunnel concrete section is completely constructed on one end of the tunnel and placed in the jacking pit that is excavated at one end of the tunnel. Then, excavation equipment is used to excavate the soil in front of the tunnel section. However, as the clear height of the tunnel is high, temporary slab is constructed in between for excavating equipment to be able to completely dig soil in front of the tunnel section. After the loose soil is transported out of the section, hydraulic jacks are used to push the tunnel forward. The same procedures before are done continuously until the tunnel is in its final position (Jacked Structures, 2011).
Within this method, the jacked tunnel could progress at a rate between 1 – 2 m/day, the maximum rate recorded ever was 4 m/day. Taking into consideration the need for mobilization time to construct and prepare the jacking pit which is comparable with the mobilization time in the tunnel boring methods and the advancement rate that is lower than that of most of TBM’s, this method is not a competitor to TBM’s in long tunnels. However, its merit over TBM’s is the significantly lower levels of vibration and disturbance to the surrounding soils and structures. Hence, it is most commonly used to cross tunnels beneath railways, underground structures and underground tunnels as it nearly guarantees that these important facilities will not be affected by high levels of vibrations (Kruger & Pty, 2013).
6.2.5 Drill-and-Blast Method
This tunneling method involves the use of explosives. Drilling rigs are used to bore blast holes on the proposed tunnel surface to a designated depth for blasting. In the drill-and-blast method, a drilling jumbo is used to drill a predetermined pattern of holes to a selected depth in the rock face of the proposed tunnel’s path. The drilled holes are then filled with explosives such as dynamite. The charges are then detonated, causing the rock break. The loosened debris or muck is then dislodged and hauled away. Other tools such as a pneumatic drill or hand tools are then used in smoothing out the surface of the blasted rock. The most important principle associated with the drill-and-blast method is that the energy generated from the explosives must be allowed to be directed in the correct alignment. To carry this out properly, the geological condition of the rock bed, the angle, size, and spacing of the drill holes, and the energy factor have to be taken into consideration and precisely calculated (FHWA, 2009).
The advancement of long tunnels through hard rocks before inventing TBMs relied on the drill-and-blast method. Today, the drill-and-blast method is still widely used in building shorter tunnels through hard rock where the use of tunnel boring machines is not justified and too expensive. In smaller tunnels, drills are individually mounted on bars or columns with an adjustable clamp that permits movement. In a larger tunnel, drills are mounted onto a drilling jumbo, a type of portable carriage with one or multiple platforms that are outfitted with bars, columns, and/or booms to support simultaneous drilling in any number of patterns. The jumbo moves through the tunnel as excavation proceeds. The environmental impacts in terms of noise and dust are high however localized in the area near the tunnel portal. This method is much faster than excavating rocks using the cut and cover method however on comparing it to hard rock TBM’s it takes less time in terms of mobilization which makes it much faster and cost effective to drill-and-blast short tunnels and use the TBM’s in longer ones as the TBM excavation cycle takes less time. In addition to that, blasting would significantly reduce the duration of vibration, though the vibration level would be higher compared with bored tunneling (Rafie, 2013) (Girmscheid & Schexnayder, 2002).
6.2.6 Sequential Excavation Method (SEM)
This method is also referred to as the New Austrian Tunneling Method (NATM) as it was first initiated in Austria in the early 1960’s. The concept is based on utilizing the self-supporting capability of the ground hence achieving an economically sound ground support. Hence, it is mainly used with dry soil where road headers and/or backhoes are used for the excavation. A typical cross section for a tunnel constructed using this method involves usually an ovoid shape to endorse smooth stress distribution in the ground around the new opening. By adjusting the construction sequence represented mainly in round length, support installation timing and support type, this method could be used for rock and cohesive soils.
The major difference in using this method in rock tunneling than soft ground tunneling is the properties of the liner and its connection to the soil on which it is attached. Within this method, the most commonly used support element is shotcreting because it’s capable of providing interlocking and continuous support to the ground. The SEM has a dual lining technique in which a waterproof membrane (mostly PVC) is inserted in between the shotcrete layer (100-400 mm thick) and another final layer of cast in place concrete lining (about 300 mm thick). SEM is generally slower than TBM’s when it comes to constructing long tunnels as the production (advancement) rate of a TBM is typically faster than the SEM. However, as the mobilization time of a TBM is much longer, the SEM is more suitable for construction of short tunnels, large openings such as stations, special cases involving unusual or complex shapes such as intersections and enlargements (FHWA, 2009).
6.3 Construction Methods Selection Criteria
Based on the discussion of the different methods presented in the previous section, a selection criteria could be developed to aid the decision making process concerning the tunnel construction methods. Typically, the trenched method is more economical than trenchless methods however, if the tunnel is planned to be underneath a city street or crossing water ways or if it is deeper than 12 meters it will not be economical to use the trenched method. The soil type, tunnel dimensions and location are the most important factors governing the choice between the different trenchless methods. The time frame, resources (especially equipment), cost, level of risk and constructability also affect the method selection.
On the other hand, on using TBM’s the main factors governing the choice between different TBM’s is the soil type, conditions and the ground water table. Each TBM type could only bore in certain type(s) of soil which could be problematic in case of considerable soil type change along the tunnel length. However, the advancements achieved in designing and using multi-mode TBM’s solved a great portion of this problem but this is on the account of the higher level of mechanization reflected in an increase in the price of the TBM itself. A summary of the selection criteria between different TBM’s could be found in Table 5.
Table 5: Selection criteria for TBM’s.
illustration not visible in this excerpt
The high level of vibrations caused by a TBM during boring could negatively affect neighboring structures or facilities (especially if underground), in such cases the use of the jacked box tunneling technique is more appropriate as its effect on neighboring structures is minimal although its productivity is less than that of TBM’s while its mobilization time is shorter than that of TBM’s, that makes it more suitable in shorter tunneling projects. On rock tunneling, and similar to the jacked box method, when comparing the drill-and-blast method to hard rock TBM’s it takes less time in terms of mobilization while the method productivity is lower making it much faster and cost effective to drill-and-blast short tunnels and use the TBM’s in longer ones. Typically, the drill-and-blast method is the least safe however with modern advancements in the mechanization of the process and the use of robotics this issue could be solved. Again the same productivity issue comes into the picture when comparing the SEM to TBM’s as SEM is generally slower than TBM’s when it comes to constructing long tunnels as the production (advancement) rate of a TBM is typically faster than the SEM while the SEM takes less time in terms of mobilization. Hence, the SEM is more suitable for construction of short tunnels, large openings such as stations, special cases involving unusual or complex shapes such as intersections and enlargements. Also, and as this method principally depends on the soil arching effect to carry itself, special attention should be taken on using it in areas with high seismic activity or ground water table or vibrational loads.
Due to its own nature, the immersed tunneling method is only used in cases of water crossings and as it mainly depends on floating the tunnel sections in water and resting it on the seabed/riverbed (replacing the first 1-2 m is a common practice), the method is highly dependent on the weather conditions, water currents and the bearing capacity of the soil(s) on which the tunnel sections will rest. If the proper conditions are present, this method is more efficient than other trenchless methods as the fastest of all trenchless methods. A summary of the selection criteria for trenchless methods is presented in Table 6.
Table 6: Selection criteria for trenchless tunnel construction methods.
illustration not visible in this excerpt
6.4 Case Studies
6.4.1 Case 1: The Boston Big Dig, Boston, USA
The aim of this megaproject was to reroute the central downtown highway Central Artery (Interstate 93) into a 5.6-km tunnel. The project also included the construction of the Ted Williams Tunnel (extending Interstate 90 to Logan International Airport), the Leonard P. Zakim Bunker Hill Memorial Bridge over the Charles River, and the Rose Kennedy Greenway in the space vacated by the previous I-93 elevated roadway. This project is the most expensive highway constructed in the United States with a cost of $14.6 billion dollars and was completed after 20 years of construction (MassDOT, 2014).
6.4.1.1 Applied Method
The Ted Williams Tunnel consisted of two main sections: the coast section and the under-water section. The coastal section was constructed with a bottom-up open cut trench tunneling technique. The under-water part contained two main sections: steel sections shipped from Baltimore on the east coast and cast-in-place concrete sections on the west coast. The under-water section was constructed using the immersed tunneling method as large marine excavators excavated a part of the Charles river bed to form the tunnel trench. Second, similar to the east coast section, the underwater sections were steel and were shipped from Baltimore. These sections were designed to float on the water surface and contained empty compartments that were then flooded by water to sink the section after reaching the position of the section floating. The section was hanged by four cables to a marine boat that would then lower the section into position exactly. After connecting the sections the water was sucked out (MassDOT, 2014).
The construction of this I-90 highway included constructing two tunnels with different construction methods. The Fort Point Tunnel was one of the most challenging parts in the project as it was positioned few meters above a metro line. In order to rest this immersed tunnel on the riverbed, the tunnel load had to be transferred to a strong soil layer without affecting the metro line. As a result, piles were driven at the two sides of the metro to load the tunnel on the lower bed rocks instead of loading the tunnel on the soil above the metro. Moreover, this tunnel was constructed to cross the Fort Point channel, which is very small in terms of width causing limited space for construction. As a result, the builders took advantage of an empty space on one side of the channel to be the construction site of the tunnel. Then floating, sinking and connecting of the three immersed tunnel section was performed in a manner similar to that applied in constructing the under-water Ted Williams section. The second (smaller) section of this tunnel passes under the railway network of the city. As a result, the tunneling should cause minimal disturbances under the rail to avoid derailment of the trains. The main problem was that Boston is mainly constructed over landfill composed of blue clay. To solve this problem, ground freezing was applied to solidify the soil and make it hold itself during the digging process. Moreover, the box jacking method of construction was used to ensure the trains safety. In this method, the tunnel concrete section was completely constructed on one end of the tunnel. Then, equipment were used to excavate the soil in front of the tunnel section. However, as the clear height of the tunnel was high, a temporary slab was constructed in between for excavating equipment to be able to completely dig soil in front of the tunnel section. After the loose soil was transported out of the section, hydraulic jacks were used to push the tunnel forward. The same procedures were done continuously until the tunnel was in its final position (MassDOT, 2014).
6.4.1.2 Construction Method Evaluation
The decision of using a cut-and-cover decision in the first section was appropriate and the most economic choice as using a trenchless technique in a location in which the trenched method could be used would have been a waste of money. The two under-water sections had a situation in which the usage of the immersed tunneling technique was the optimum solution as the weather and water currents were suitable for the pre-dredging, floating and sinking operations to take safely place and the soil layer beneath was capable of bearing the tunnel load, so using TBM’s in such case would have been a waste of time and money. Finally the section that was tunneled using the box jacking technique had to be done using that method as using a TBM would have induced vibrations that could have harmed the railway above.
6.4.2 Case 2: The Channel Tunnel, France – UK
The channel tunnel also known as the Chunnel, is a tunnel built between Britain and France across the English Channel to connect the two countries, and furthermore connect Britain to the rest of Europe. The channel tunnel, to this day is the tunnel with the longest underwater section in the world of 37.9 km and was twice as long as any previous tunnel underwater, with its lowest point at 75m deep. It consists of two main rail tunnels and one-service tunnels, with 245 cross passages across its route from the main tunnels to the service/escape tunnels. The digging was done by TBM’s at both ends (British and French) and met in the mid-point of the channel to complete the entire length (National Geographic, 2004).
6.4.2.1 Applied Method
Before construction, twelve boreholes were drilled across the channel. The layer of rock that was being investigated was blue chalk as this layer is impervious providing protection from water, which could flood the tunnel or make it collapse. Consequently the course for the tunnel route was established and excavation of drilled shafts at took place at both ends. Five TBM’s were used in the project each designed for the geology of a specific length of the project. The French side was expecting to encounter fractured rock, which would allow water through causing flooding, and therefore EPBM’s were used to withstand high water pressures while boring. The British team was provided with two double shielded TBM’s as less water inflows were predicted. The longest TBM in this project was 200 m long. The TBM’s were lowered into the drilled shafts at both ends then the TBM boring started. While the machine rotates under the sea, the spoil of the tunnel is taken from the back as it digs, and the earth is loaded into railway wagons and carried to the surface for disposal. As it rotates, prefabricated concrete tunnel sections (transported to the front of the tunnel using temporary railways) are placed continuously using hydraulic arms to make a support around which as acts as a permanent lining. The installed segments are then connected to the previously installed ones and grouted together to form the tunnel lining. After the installation of the slab segment the TBM uses it as a stationary unit for its advancement. A laser guide was used to direct the TBM excavation, to make sure it’s on course, however, because it’s underground, they looked back to show where they should have been, rather than forward to where they should go. Laser beams hits back to the tunnels starting point to compare it with the TBM location. Computers then check this data with the surveyor’s course coordinates. This process was continued until both TBMs reach each other and the last segment was demolished with a jackhammer to connect the two tunnels. Ventilation in the tunnel was important to keep the air fresh. A huge ventilation system was installed at the tunnel face to achieve adequate ventilation throughout the tunnel. When water logged earth was encountered steel sections were installed to stop the leakage and flooding of the tunnel. Finally, the British TBM dove beneath the French side of the tunnel and was disposed in this fashion while the French TBM it was pulled out of the British side of the channel and disposed of on the surface (National Geographic, 2004).
6.4.2.2 Construction Method Evaluation
The channel between the UK and France is well known for unstable weather conditions and extreme currents. Hence, using the immersed tunneling technique would have been difficult and of very high risks. On the other hand, the box jacking method was unsuitable for usage in case of such a long tunnel. Hence, using TBM’s in such case was the only possible option. However, the type of TBM’s could have been altered to use multi-mode TBM’s to take into account the possible variation in ground conditions.
6.5 Conclusions and Recommendations
When examining the methods applied in the two cases discussed in this chapter against the developed selection criteria, the selection criteria proved that it covered the different aspects governing the selection of the most suitable methods for different tunnel construction cases. The most governing factor of choice is the soil conditions and following that comes safety, level of risk, constructability, speed and cost. Hence, it is highly recommended when using the selection criteria matrix to take all the factors governing the method selection into account as neglecting some of them could cause serious problems that are difficult in fixing.
6.6 Acknowledgements
The author would like to acknowledge the Department of Construction Engineering in the American University in Cairo for its continuous support. The author would also like to acknowledge the efforts of his dear students: Reem Abo-Ali, Osama Hashem, Shady Girgis, Menna Assal, Amira Saied Youssef, Mohamed Auf, Aya Diab, Mireille Kirolos, Mohamed Seif and Yousef Shehata as this chapter would have not come to existence without their efforts.
7 Pipelines
Summary:
Pipelines are necessary for trade, sanitary and communication purposes all over the world. Construction of pipelines involves utilizing unique construction methods due to various characteristics like cost, constructability, resources and time. This chapter covers different methods of pipelines construction by concentrating on different construction methods of every type of pipelines. Moreover, a comparative analysis is provided to show when to use every method of construction according to the conditions available. Two projects involving pipelines with different sizes and project conditions were studied and examined against the developed selection criteria in order to evaluate the validity of the applied construction methods in each case. A previous version of this chapter was published as a conference paper by (Darwish, Attia, Yossef, Yossif, & Khalil, 2016) titled “Selection Criteria for Pipeline Construction”.
7.1 Introduction
A pipeline is considered the modern way of transferring different liquids and gases through long distances, such as water, oil, natural gas, waste, etc. They transfer these fluids quickly without a need for much energy and in the same time; they are efficient and economically cheaper. They consist of cylindrical pipes attached to each other. Moreover, they can be bended to pass the environment obstacles, such as rivers or mountains. They are produced in different materials and different sizes. Ductile Cast Iron, UPVC, Stainless steel, FRP, Concrete, Aluminum, and ceramic are considered the most famous materials used to produce these pipes.
The construction of any pipeline is divided into three main phases: the pre-construction phase, the construction phase, and the post construction phase. In the pre-construction phase, a surveying of the site is done beside the cleaning and the grading. Stripping, stringing, bending and welding are done also in this phase. Then comes the construction phase with include either a trenched or trenchless method depending of the site constraints and conditions. Finally, the post construction phase which includes as built surveying, hydrostatic test, and cleaning and restoring the site (CEPA, 2014).
Until the 1980’s, pipeline construction was only conceivable by applying the open-cut (trenched) excavation. This excavation method was successfully applied in both cohesive and cohessionless soils, however the trenching process and its side effects initiated the need to have trenchless methods in which pipelines could be constructed without the need to close the streets above or cross streets and waterways without the need to construct a bridge for this purpose (Najafi, 2010).
Trenchless technologies incorporate all the methods of installing new pipelines or utility systems below ground surface without direct installation into an open-cut trench. Trenchless technologies could be classified into three families: pipe jacking, utility tunneling and horizontal earth boring. The difference between each of these families and the variation within each method within each family is what determines which method is to be used to construct which type of pipelines and within which type(s) of soils and/or ground conditions. However, another way of classifying these methods is by categorizing them according to the association of labor within the excavated/bored pipeline into two broad categories of worker-entry and non-worker-entry techniques. Conventional pipe jacking (CPJ) and utility tunneling (UT) methods need workers within the pipeline during the pipeline construction process. However, horizontal earth boring methods include methods in which the excavation process is performed mechanically without having workers inside the pipeline itself (Najafi, 2010).
In general, the terms micro-tunneling and pipe-jacking are commonly used in North America to describe any pipeline construction trenchless technology that is remotely controlled, steerable and continuous in all diameters whether worker-entry or non-worker-entry. On the other hand the European terminology is more specific as in Europe only worker-entry trenchless methods are defined as pipe jacking with a minimum diameter of 1–1.2 m, while smaller diameter trenchless operations are defined as micro-tunneling (ISTT, 2014). Another method in classifying trenchless methods is to classify them into unguided and guided methods. According to this classification, auger boring, conventional pipe jacking and pipe ramming are classified as unguided methods while micro-tunneling, horizontal directional drilling and pilot-tube micro-tunneling are considered as guided methods, typically guided methods are of higher accuracy and could be used for longer pipe drives (Gottipati, 2011). Also trenchless new pipeline construction methods can be classified according to the excavation method into four general groups: face excavation (involving muck haulage), ground displacement (without muck haulage), horizontal directional drilling (HDD) and combination methods (face excavation + ground displacement + HDD) (Bilgin, Copur, & Balci, 2014). Each of these tunneling techniques will be discussed within the next section of this chapter and selection criteria governing the choice of each of them will be developed.
7.2 Construction Methods
7.2.1 Trenched Method
The trenched cut and cover method is the simplest of all methods, as it is easy and doable. This method starts by excavating the trench then positioning the pipeline, installing the valves and finally backfilling the trench. Connecting the pipes together could take place out of trench (before lowering them) or inside the trench (after lowering them), this arrangement depends on the availability of the needed space and equipment as connecting the pipes up requires more space and lowering a line off connected pipes requires several mobile cranes to work simultaneously however connecting the pipes upwards guarantees a higher level of quality during this step (CEPA, 2014).
Within the open-cut method, the construction effort is focused on activities not related to the pipeline itself such activities as detouring roads away from the site, trenching, shoring, shielding or sloping, and sometimes dewatering, backfilling and compaction operations, and reinstatement of the surface. This leads to a minor part of the construction work actually being concentrated on the most important element, which is the pipe installation itself. Sometimes, the double handling of the soil, including trenching, stockpiling, hauling, backfilling, compaction, and ground reinstatement and pavement alone may amount to 70 percent of the total cost of the project. In addition to that blocking streets, causing noise and dust within urban areas are very common side effects when using this method. In addition to all of that, excavating and backfilling within the open-cut method causes the loads above the soil to be transferred to the pipeline as the arching effect within the soil surrounding the pipeline is not as prominent as that present in the case of a pipeline constructed using trenchless methods. This is mainly attributed to the disturbance caused to the soil due to the excavation and backfill. Hence, the trenchless methods have been continuously developing and increasingly used within the last three decades (Najafi, 2010).
7.2.2 Pipe Jacking
The general term of pipe jacking is used to describe any trenchless method in which a micro-tunnel is being drilled whether manually or using jack hammers or a tunneling machine attached to the first segment pipe with the pipe segments being jacked one by one through a pipe jacking machine. The main difference between the different pipe jacking alternatives is the excavating/boring technique used at the tip of the first pipe segment. Other than that, there are main common components and procedures that are present in all pipe jacking alternatives. This method is done in 6 steps which start by first drilling the shafts to place the pipe jacking machine (jacking pit) and another one at the end to be the reception shaft. Secondly, the pipe jacking machine is being placed inside the shaft in order to start the process of pipe jacking. Then if a tunneling machine is used, it is connected to the control and the slurry container through the slurry discharging unit and the segment pipe is being fixed to the tunneling machine to start the installation process. The first pipe is being installed through creating a tunnel or a path for it then the other pipe is being jacked and connected to the first pipe. Then welding or connecting (depending on the pipe type) the first pipe with the second pipe takes place and the process continues and the pipes being jacked one by one after each other and welded/connected. It is preferred to have jacking equipment with capacity slightly higher than the maximum allowable jacking force, The jacking system ought to distribute the jacking loads equally on the pipe. The extension rate of the hydraulic cylinders should be matched to the excavation rate. A pipe lubrication system can be utilized to decrease the friction between the outer surface of pipe and the surrounding ground. Usually bentonite slurry is used as lubricant, which can be injected through lubrication ports on pipes (Young, Ball, Natsuhara, Philips, & Wong, 2013).
7.2.2.1 Conventional Pipe Jacking (CPJ)
Conventional pipe jacking is mainly a worker-entry method in which a pipeline with a minimum diameter of 1.2 m is constructed in order to allow the workers to be able to enter it. Within this alternative, excavation is either done manually or mechanically. Recently, most excavations are done mechanically (Bilgin, Copur, & Balci, 2014). This method is applied mainly in conditions allowing open shield technologies to be used to excavate through self-supporting ground as weak rock and fully or partially cohesive soils in which groundwater is minimal (Geodata S.p.A., 2008). Open shield wheel tunnel boring machine is a shield with a rotating cutting head. Typically, a bulkhead separates the face from the rest of the shield. A variety of cutting heads are available to suit a broad range of ground conditions. Due to the minimal diameter requirements, this method is mainly used in cases of constructing precast concrete, GFRP or steel gravity pipelines (mostly sewers) (Najafi, 2010). However, due to this method depending mainly on jacking forces and due to this method being an unguided method, it is limited to pipelines with a maximum length of 90 m made of strong materials as reinforced concrete (RC) , fiber reinforced concrete (FRC) , fiber glass (GFRP) and steel (Najafi, 2010) (ODOT, 2011).
7.2.2.2 Micro-Tunnel Boring
This process is usually done by using a micro-tunnel boring machine (MTBM). Shielded closed-face soft ground MTBM’s are either earth pressure balance (EPB) type, slurry shield (SS) or compressed air shield type. The third type is rarely used due to health and safety reasons (Geodata S.p.A., 2008). Hence, the most two common MTBM’s used are the earth pressure balance (EPB) type and the slurry shield (SS) type as both are closed face machinery. Typically these machines are guided via laser beams and controlled remotely hence permitting accurate monitoring and adjustment of the alignment and achievement of the required grade as the work proceeds. This alternative is mainly used in cases with significant ground water and/or soils that could not support itself. The diameters of these pipes could start from 300 mm as these machines could operate automatically without the need of workers to enter inside the pipeline (Najafi, 2010). Hence, for smaller pipelines these systems are non-worker-entry however for pipelines exceeding 1.2 m in diameter these systems could allow for worker entry (Bilgin, Copur, & Balci, 2014). Also, as MTBM’s are guided technologies they are more accurate than conventional pipe jacking and therefore they could bore longer pipelines of lengths exceeding 300 m (ODOT, 2011). In addition to that, as is the case for large TBM’s the mobilization phase for MTBM’s takes longer times than other methods due to the MTBM assembly and attachment which consumes a lot of time while the productivity of the MTBM itself is high once it starts working. Hence, this method becomes a waste of time and money if used for short pipelines and is more efficient and cost-effective if used in cases of long pipelines (Gelinas, et al., 2010).
The tunneling process starts by assembling the MTBM in the entry shaft and attaching it to the tip of the first pipe section. When the MTBM starts excavation the pipe is jacked holding the soil up. The process of excavating differs depending on the MTBM type. After the excavation, the MTBM is lifted from the end shaft. However, the process details change depending on the MTBM type which is mainly a function of the soil type and soil conditions. However, as the MTBM type varies with the soil condition, the TBM may not continue excavation if any surprises occur or if the type of soil changes (Bilgin, Copur, & Balci, 2014).
All soft ground MTBM’s are shielded as the soil may collapse as the machine proceeds boring. However, the shielding technique varies from one machine type to the other. When it comes to excavating soft grounds with MTBM, the machine cutter head will require balancing pressure from the side of the machine, so the boring process is well-controlled. Concerning the earth pressure balance (EPB) type, it utilizes the excavated soil by mixing it with water, foaming agents and polymers to create muck in the working chamber behind the cutter head. The pressure of the muck is controlled by the pressure wall. A screw conveyor takes the mud out of the machine as the machine moves forward to carry out the extra mud from the working chamber. The rotational speed of the screw conveyor and the opening of its discharging gate are adjustable in order to control the pressure within the excavation chamber. The muck ejection rate and rotational speed of the screw conveyor must be equal to the machine excavation rate. This rate is controlled by thrust cylinders for appropriate face pressure control without dangerous stability problems. The amount of excavated material is controlled by either a weighing or a laser scanning system. These machines are usually used for excavation of fine sand, silt, and clay having low permeability. They are not very effective in soils having a percentage of fine material less than 10% and water heads over 4 bars (Bilgin, Copur, & Balci, 2014).
The slurry shield (SS) MTBM works with the same concept of the EPB type however, the cutter head is balanced by bentonite slurry. Moreover, the screw conveyor is replaced by two pipes that are the slurry feed and return to pump the slurry in and out of the working chamber. The slurry system works in a closed circuit as the slurry is reused after reprocessing. On the other hand, in stable ground and hard rock conditions, SS MTBMs can be used in open mode without giving any face pressure. They are normally used to excavate gravel, coarse-medium sized sands, and silty and/or clayey sands of a hydraulic permeability between 10−8 and 10−2 m/s (Young, Ball, Natsuhara, Philips, & Wong, 2013).
7.2.3 Utility Tunneling (UT)
This technique is very similar in terms of process to pipe jacking. However, here a liner (a temporary support structure) is concurrently constructed as the tunnel excavation advances. Usually, this liner is composed of traditional steel or concrete liner plates or wooden boxes or steel ribs with wooden lagging. After completing the utility tunnel, the pipe sections are inserted inside in their positions. The space between the liner and the pipe is usually grouted. It could be obviously seen that this method is a two-phase operation as the phases of liner and pipe installations are separate while pipe jacking is considered as a one-step operation. Typically, workers are required inside the pipeline under construction to carry out the tunneling and soil removal activities. The utility tunneling technique main components are the same as pipe jacking, except that in the utility tunneling, the jacking frame, intermediate jacking stations, thrust block, lubrication equipment and pumping equipment are not required as the pipe sections are not jacked in this method. Consequently, the pipes are designed and manufactured to take only permanent loads which could save a lot in terms of pipe thickness (which reflects in lower costs). Also similar to pipe jacking, depending on the soil condition the excavation technique is determined and if an MTBM is used the type of this machine and its shielding system is determined. Hence, and as this method is a worker-entry methods it could only be used for pipes that are of large diameters (ODOT, 2011).
7.2.4 Horizontal Earth Boring Methods
Within this family of methods, workers may work in the shaft or pit, but they do not enter inside the installed pipe. Therefore, these methods can be used for small diameter pipes (as small as 100 mm). These technologies envelope several methods including: horizontal auger boring, horizontal directional drilling, micro-tunneling (for small diameters), pilot-tube micro-tunneling and pipe ramming (Najafi, 2010).
7.2.4.1 Horizontal Auger Boring (HAB)
Within this method, a steel casing is jacked from a drive pit under a road or railway while the spoil is being removed through the steel pipe using a rotating continuous flight auger (CFA). This auger is a tube with couplings at each end transmitting torque to a cutting head from the auger-boring machine located in the bore pit and transferring spoil back to the drive pit. The casing supports the soil around it during spoil removal. Typically, after fully installing the casing, the product pipe is installed using spacers and the annular space is grouted. The conventional equipment used in this method provides a water hose for grade control with no steering capability for alignment. Within the recent years more sophisticated versions of these equipment have emerged with the line and grade control available but not all contractors have such equipment (Najafi, 2010).
The work starts by excavating a large hole or trench in the ground to make a pipeline starting station from which the pipeline will start and in which the boring machine will be placed. Then a rail track is being placed inside the excavated trench. After that the boring machine is being placed and fixed on the rail track facing the wall in which boring will start and the pipeline will be installed. Each of the pipe casings that are being installed has an auger boring tool inside it to be fixed in the boring machine and bore in the facing wall which is the boring target point. The first pipe casing is being fixed through the boring auger inside it to the boring machine while having the cutting head of the auger outside the pipe pointed to the boring point then the auger starts boring while the soil is being removed at the same time throughout the pipe that is being installed. Then after the first pipe is inserted, the second pipe is placed right behind the first pipe and the front head of the boring tool of the second pipe is being fixed to the tail of the boring tool of the first pipe while the tail of the boring tool of the second pipe is being fixed to the boring machine then the two pipes are being welded together and the boring process starts again. The process is repeated until the pipeline is completely constructed. Due to the limitation of the auger size, this method is typically used for pipes of diameters ranging between 300 mm to 900 mm and a length ranging between 30 m and 90 m. However, the maximum recorded dimensions for a pipeline constructed using this method was a diameter of 1.5 m and a length of 240 m using exceptionally large augers. This method could be used to construct pipelines in various types of soils as the auger could bore into soils with a maximum boulder size equal to one third of the casing diameter. Depending on the soil type, the productivity varies from 1 m/hr to 12 m/hr. Due to the boring process the minimum depth at which this method could be used is 600 mm (ODOT, 2011). In addition to all of that, this method is an open-faced method with no shield at its face, hence it is not recommended to use this method if significant amount of ground water is encountered (Gelinas, et al., 2010).
7.2.4.2 Pipe Ramming (PR)
This is a trenchless method in which a casing is being installed through hammering the casing into the target point using a percussion hammer connected to high pressurizing air compressors. Firstly, a large hole or trench is excavated in the ground to make a pipeline starting station from which the pipeline will start in which the pneumatic hammer is placed. Then a rail track is being placed inside the excavated trench. After that the pneumatic hammer is being placed on the rail track facing the wall in which ramming will start and the steel casing will be installed. Then the hammer is being connected to the compressor and the first steel casing section is being rammed through the pneumatic hammer. Similar to pile driving, this first section has a cutting shoe in the front to displace the surrounding soil. Then the second casing section is placed right behind the first one and welded together then the ramming process starts again. This process is repeated until reaching the exit pit. Then the pipe sections are installed and welded together one after the other, installed inside the casing with grout filling the thickness between them. However, this method could also be used in cases where the casing is the pipe itself however this needs special design considerations for this pipe in terms of material and thickness. Typically this ramming procedure is unguided, due to that and due to limitations in the capacity of the machinery the length of the pipe line that could be constructed using this method is 90 m. However, some recent more powerful hammers have been developed that could ram up to 150 m. On the other hand, the main advantages of this method is that if the proper equipment is used, this process could take place in any soil (except rocks) as boulders in the ground could be broken through hammering, in addition to that, the fact that the this method could be used with a wide range of pipe diameters gives it a competitive advantage in various cases over other methods (ODOT, 2011).
7.2.4.3 Horizontal Directional Drilling (HDD)
This trenchless method allows the use of a grundodrill technique to drill from the access point then reach the reception point then pull the pipe case through fixing a back reamer to it to the access point again. The process starts by the grundodrill being adjusted to an angle of 10 to 15 degrees then drilling starts while having bentonite injection system to ease the process of drilling and it keeps drilling till it reaches the other side. The track of the drilling is being followed through sensors and detection system to make sure that drilling is following the right path. Then a back reamer is being fixed in the grundodrill machine and starts reaming till it reaches the other side from which the drilling started. After that, the casing pipe is fixed to a reamer to prevent any obstacles and is pulled to reach the side from where drilling started (PPI, 2014).
The terminology used within the industry differentiates between mini-HDD and conventional HDD (sometimes referred to as maxi-HDD). Mini-HDD rigs can classically handle pipes with diameters up to 25 – 30 mm and are used primarily for urban utility construction. On the other hand, HDD rigs are typically capable of handling pipes as large as 1.2 m diameter having larger pullback forces reaching up to several hundred Kilo-Newtons. In order to increase the accuracy of this method and minimize the probabilities of its failure it is highly recommended to select the shortest possible crossing route in which the pipeline can be constructed in a single continuous length. Although compound curves have been done in previous projects, it is recommended to use a drill path which is as straight as possible. In order to avoid any emergence of ground water out of the entry or exit pits it is highly recommended to avoid having a difference in elevation between the entry and exit points exceeding few meters as it is recommended to have these points at nearly the same elevation. Also, as this method is used in urban areas for utility lines, it is very important to acquire as-built drawings and investigate all structures and substructures that are within the vicinity of the pipeline under-construction (PPI, 2014). The high level of flexibility of this method and the fact that it is a guided method enables it to be capable of achieving long drive lengths that could reach up to 1800 m and this is one of the reasons for the increase in its use within the last years (Najafi, 2010) (Gottipati, 2011).
7.2.4.4 Pilot-Tube Micro-Tunneling (PTMT)
This method is a combination of micro-tunneling, horizontal directional drilling (HDD) and auger boring. The installation process in this method is very similar to that of HDD through the use of pilot boring followed by reaming and product pipe installation. This method utilizes a slant faced steering head for directional control similar to that used in HDD. However, this method adopts its accurate guidance system from micro-tunneling (with some differences). On the other hand, this method is similar to auger boring as both methods use jacking systems and auger flights for spoils removal. This method is applied through three different alternatives which are: Two-Step Method; Three-Step Method; and the Modified Three-Step Method. There are some differences in the site preparation and equipment setup among the three alternatives (Gottipati, 2011).
The first step in all the pilot tube installation alternatives is to precisely install the pilot tube on line and grade in order to display the head position and steering orientation hence establishing the center line of the new installation on which the coming steps will rely on. The second step (in the Three-Step and the modified Three-Step methods) is to follow the path of the pilot tube with a reaming head. That reaming head is larger in diameter than the product pipe and its front is fastened to the last pilot tube installed in the same manner in which each two successive pilot tubes were fastened together. This reaming head has behind it the auger casings equal to it in diameter. These auger casings transport the spoil to the jacking pit for disposal. This step is complete when the reamer and auger casings reach the reception shaft and all spoil is removed. The third step (final step in the Three-Step method) is installing the product pipe just after the arrival of the reaming head in the reception shaft. The reaming head and auger casings are pushed into the reception shaft and removed as the product pipe is installed. However, the modified version of the Three-step method involves installing a powered cutter head behind the auger casings which is advanced by the product pipe. This powered cutter head increases the bore size hence matching a larger product pipe diameter. However, here there is an extra spoil that is excavated around the previously installed auger casings. The discharge of this spoil takes place in the reception shaft through reversing the auger direction. This process continues until the powered cutter head reaches the reception shaft (Boschert, 2008).
The difference between the Two-Step and Three-Step methods is that in the second step within the Two-step method, the installation of the product pipe sections is performed simultaneously while the reamer is advanced through the ground replacing the pilot tubes installed in the first step hence combining the second and third steps (in the Three-step alternative) into one step. The major merit of using the two-step alternative over the three-step alternative is that the multiple pipe diameters could be installed using the same set of auger casings. However, as the diameter of the product pipe increases, using smaller auger casings to transport large quantities of spoil becomes more difficult (Gottipati, 2011).
This technology can be used to install pipes of diameters reaching 1.2 m with drive lengths that are typically within the order of 120 m. However, installations as long as 177 m have been reported. Accuracy in line and grade of 6 mm is achievable on installing up to 90 m in length. Recent advancements in optical guidance systems and power hydraulics in the jacking frames have made larger diameters and drive lengths possible. This technique could drill in a variety of ground conditions except cobbles and boulders might cause some difficulties especially if these gravels and cobbles of larger than 100 mm. However, recent innovations in the fields of using lubricants for loose sands, water control reaming heads for wet sands, and air hammers for solid rock have improved the capability of using this method for various soil conditions (Gottipati, 2011).
7.3 Construction Methods Selection Criteria
Based on the discussion of the different methods presented in the previous section, a selection criteria could be developed to aid the decision making process concerning the pipeline construction methods. Typically, the trenched method is more economical than trenchless methods however, if the pipeline is planned to be underneath a city street or crossing water ways or if it is deep to the extent that trench side protection is expensive it will not be economical to use the trenched method. The pipe diameter, material, pipeline length, pipeline route, ground water and soil type are the most important factors governing the choice between the different trenchless methods. The time frame, resources (especially equipment), cost, level of risk and constructability also affect the method selection. On the other hand, on using MTBM’s the main factors governing the choice between different MTBM’s is the soil type, conditions and the ground water table. Each MTBM type could only bore in certain type(s) of soil which could be problematic in case of considerable soil type change along the pipeline length.
The major factor governing the diameter range for pipes/caissons that could be constructed using a certain method is the size of the equipment used in a certain method. The level of mechanization and whether the face of the excavation is shielded or not are the main factors governing the cost per unit length of a pipeline of a certain specific diameter (ODOT, 2011). On the other hand, the maximum drive length depends on whether the method is guided or not and on the accuracy of the method itself which increases as the level of sophistication and technological advancement within the equipment used increases. Whether the method is using a shielded excavation face or not is the main issue governing its suitability to work in ground waters. On the other hand, methods depending solely on jacking, hammering or driving have significant difficulties when working in grounds containing rocks or boulders although modern advancements in the HDD and PTMT equipment made these methods more capable of facing such conditions if the proper equipment is used. Also, only large diameter pipes could be constructed using a worker-entry method. In addition to all of that, the pipe materials that could be used within certain methods are limited with the level of flexibility/ductility of the pipe material and the level of strength of this material as several methods will include additional loads that need high strength materials and some other methods could only install flexible pipelines. A summary of the selection criteria for trenchless methods is presented in Table 7.
Table 7: Selection criteria for trenchless pipeline construction methods.
illustration not visible in this excerpt
7.4 Case Studies
7.4.1 Case 1: PEPSI Bottling Plant, Newport News, VA, USA
The purpose of this project was to install a new reverse osmosis water filtration system involving a 203 mm diameter drain pipeline instead of the existing 152 mm diameter pipeline to meet the additional flow rate combined with the flow from the existing equipment that would have overwhelmed the old pipeline resulting in the flooding in the water treatment room. The waste water in the facility has changeable pH levels that could cause rapid pipe deterioration requiring the use of a chemically sound pipeline. Hence, 1 m sections of 8” (203 mm) Vitrified Clay Pipe (VCP) was used in this job because of its highly resistive chemical properties (Boschert, 2008).
7.4.1.1 Applied Method
The PTMT technique was used. A crew of four man crew prepared the site by constructing two pits through the RC floor of the bottling plant that were approximately 26.25 m apart (which is the length of the new pipeline). The entry pit was 2.4 m wide, 2.4 m long and 2.4 m deep while the exit pit was 2.4 m wide, 1.8 m long and 2.1 m deep. The depth of the pits was mainly determined by the depth of the RC footings and the existing drainage system as the new pipeline had to cross under these two. It was also important that the pits should not be too deep in order to permit the connection between the new pipeline and the existing building drainage system. Hence, the installation process of this pipeline had to be very precise with a maximum allowable error of 50 mm in the targeted grade. Based on a previous pipe bursting job in this facility, the soil was known to be dense clay, which was ideal for the pilot tubing process (Boschert, 2008).
After the pits were constructed, the pilot tubes (with a diameter of 108 mm and a segment length of 750 mm) were installed on line and grade. The dual-walled pilot tube used utilized an illuminated LED target directed by the guidance system and prepared the route for the larger diameter casing. After installing all of the pilot tubes, the 279 mm casings and augers were driven along the same route that was previously taken by the pilot tubes. With the addition of each section of casings and augers in the entry pit, a section of pilot tube is removed in the exit pit. Finally, each section of the VCP advances a section of casings and augers into the exit pit until the process is complete. The entire job took two weeks to excavate and shore the pits, launch the pipe and restore the warehouse floor. The guided boring machine pilot tubing process and the pipeline installation was done in three days (Boschert, 2008).
7.4.1.2 Construction Method Evaluation
It would have been more economic to use a trenched technique to construct this pipeline if the work was in an opened area with no obstructions. However, using the trenched method in an industrial facility like the one in this case would have caused this facility to be totally closed for several days which consequently would have caused significant financial losses to the owner. Hence, using a trenchless method was the right choice in such a case.
On the other hand, according to the selection criteria, only three trenchless methods could be used to construct a pipeline with a diameter of 203 mm. These three methods are, pipe ramming, HDD and PTMT. Also according to the presented selection criteria HDD could not be used as the VCP is not flexible enough while the HDD could only be used when installing flexible pipes. Also, pipe ramming could not be used in such a facility as it involves hammering activities that could harm the structure and the substructure of the facility itself in addition to needing entry and exit pits that are larger in size due to using larger equipment. Hence, the only choice left was the PTMT technique that was used in this project.
7.4.2 Case 2: The Santa Ana River Interceptor Relocation Project, Yorba Linda, CA, USA
This project (also known as SARI project), involves relocating 1433 m of sewer pipes in five segments including two siphon crossings and two curved segments. One of the main challenges within the project was the ground conditions that included a mixture of cobbles and boulders within a weak sandy soil in addition to the presence of groundwater at a level significantly above the pipeline elevation. Another challenge was the S-shaped curvature (double curvature) of one of the segments in addition to the depth of the crossings that forced the excavation to be significantly deep (Young, Ball, Natsuhara, Philips, & Wong, 2013).
7.4.2.1 Applied Method
Before construction, an entry and exit shaft for each of the five segments had to be excavated. However, for the 477.6 m long S-shaped segment and intermediate shaft was constructed at the inflection point (nearly midway) of the S-curve in order to perform the job in two drives (each with a curve having a constant radius). Due to the fact that the pipeline crossing two siphons, it had to have an elevation which was 19 m below the ground. Hence, the shafts were 21 m deep which created a challenge during constructing these shafts as soldier piles and secant pile were used to construct the shafts. The method chosen was micro-tunneling in which a casing of a 2578 mm diameter was installed in four of the segments while the fifth segment had a casing that was 1956 mm in diameter. Due to the soil type slurry shield MTBM’s were used in the project each designed for the geology of a specific length of the project. The MTBM’s were lowered into the drilled shafts at both ends then the MTBM boring started. While the machine rotates, the spoil of the micro-tunnel is taken through the slurry circulation were then the slurry is refined in its bentonite slurry unit and returned again. As it rotates the casings were jacked continuously using hydraulic jacks. RC casings were used in three of the five segments while steel casings were used in the other two segments. The installed sections were then connected to the previously installed ones and connected together (grouted if concrete and welded if steel) to form the micro-tunnel lining. After the completion of each micro-tunnel the PVC sewer pipes were installed and grout was injected between the inner surface of the casing and the outer surface of the pipes (Young, Ball, Natsuhara, Philips, & Wong, 2013).
7.4.2.2 Construction Method Evaluation
The fact that the pipeline was crossing two siphons and was 19 to 20 m deep made it impossible to construct any of its segments using the trenched method. According to the selection criteria; of the trenchless methods, CPJ, MTBM’s, UT and PR are the only methods that could construct a pipeline with the diameters specified for this project. Of these four methods only the micro-tunneling method was capable of constructing single drives within the order of 300 m that is needed in each of the project drives. Hence, choosing this technique was the only option available.
On the other hand, choosing a slurry shield MTBM was dictated by the soil conditions due to the presence of high ground water pressure and due to the soil type as using an unshielded open face MTBM would have been catastrophic and using an EPB shielded MTBM would have been inefficient due to the cohessionless nature of the soil.
7.5 Conclusions and Recommendations
When examining the methods applied in the two cases discussed in this chapter against the developed selection criteria, the selection criteria proved that it covered the different aspects governing the selection of the most suitable methods for different pipeline construction cases. The most governing factors of choice are the pipe diameter, length and material. After that the soil conditions come into the picture and following that comes the risk, project conditions, equipment and cost. Hence, it is highly recommended when using the selection criteria matrix to take all the factors governing the method selection into account as neglecting some of them could cause serious problems that are difficult in fixing.
7.6 Acknowledgements
The authors would like to acknowledge the Department of Construction Engineering in the American University in Cairo for its continuous support. The author would also like acknowledge the efforts of his dear students Aly Attia, Mohamed Yossef, Kirilos Yossif and Ihab Khalil for their extensive help in producing this chapter.
8 Multi-Storey Underground Buildings
Summary:
Multi-storey underground buildings are commonly constructed for commercial or service purposes. Construction of such structures involves unique construction methods due to various characteristics like soil condition, cost, constructability, resources and time. This chapter covers different methods of construction of multi-storey underground buildings and provides a comparative analysis to show when to use every method of construction according to the conditions available. Two projects in which multi-storey underground buildings were constructed with different sizes, from two different countries and with different project conditions were studied and examined against the developed selection criteria in order to evaluate the validity of the applied construction methods in each case. A previous version of this chapter was published as a conference paper by (Darwish, et al., 2015) titled “Selection Criteria for Construction Methods of Multi-Storey Underground Buildings”.
8.1 Introduction
Multi-story underground structures are several floors under the Earth’s surface, which enable extra accommodation to the structure, in addition to protecting environmental and space limitation factors. These underground structures have become increasingly common in developed and developing countries, especially since space is becoming a progressively demanded resource in the 21st century. Therefore, the greater surface area of a structure the more economical it is considered to be. Underground structures are demanded for nearly every type of industry. Power plants use basement structures as shelters from destructive weather or environmental conditions in general, where the vulnerable electronic equipment is often kept. There are also commercial uses, for instance, underground car parking and even cities. Underground malls and commercial buildings provide better insulation against the cold, and are cheaper to heat.
Multi-story underground buildings incorporate several aspects of construction, where the main ones are the dewatering and/or soil stabilization of the site, pre-construction process and the choice of construction method. First, the dewatering and soil stabilization phase is highly dependent on the level of the ground water table at the site and the type of soil, which leads us to the preconstruction phase of understanding the site soil conditions, permeability, type, size, as well as the topography. Next, the depth of the foundation and structure purpose must be determined, in order to pick the most appropriate construction method. Finally, the construction of underground buildings is basically using one of the three approaches: open-cut, top-down or bottom up. The processes within the construction methods revolve around ground water control, wall installation, lateral bracing and excavation (ASUC plus, 2013).
The construction methods for these multi-storey substructures could be also classified according to the side support system into three main categories. The first category is the open excavations with no side supports, the second option is to have temporary side supporting systems while the third system depends on constructing permanent walls to act as side supports prior to the excavation. Several factors determine the level of difficulty of the multi-storey underground buildings. These factors include the neighbors’ legal rights, location, ground conditions, proposed depth of the substructure under construction, the proposed design and the optimal usage of the available site volume (SCI, 2001). This paper illustrates the various construction methods used in the process of constructing multi-story underground structures. It will weigh the pros and cons of each method in order to develop a set of election criteria and apply these criteria in two case studies to evaluate the methods applied within each case.
8.2 Construction Methods
8.2.1 Open-Cut Construction
This is the simplest of all the multi-storey basement construction methods. As simply the excavation takes place before constructing the walls. This method entails a slope full open cut method that doesn’t entail using retaining walls or struts while within cantilever methods (described later), the retaining walls stiffness is the source of stability with no temporary struts that would obstruct excavation activities. The slope method excavates the site with sloped sides, where the costs are very low due to no excavation obstruction by struts. However, if the excavation depth is deep, or the slopes need significant additional space, the amount of soil needed for backfilling would be large, therefore cost might not be that low. The cantilever method, on the other hand, requires the construction of side support walls, therefore making backfilling unnecessary, hence more economic than the slope method for some cases. This method is ideal when space is available as it is the most economical way to build a permanent basement. This requires sufficient right of way to guarantee safe slopes and access to excavation, dewatering, and backfill construction expertise. Hence, on applying such method it should be applied far away from the building footprint. It also may have restricted crane access due to the high area usage and could need dewatering that could be associated with detrimental settlements of surrounding properties. As the excavations go deeper, the costs associated with large volumes of earth located outside the building footprint significantly increase (Pearlman, Walker, & Boscardin, 2004).
8.2.2 Bottom-Up Construction
Within this method temporary or permanent walls and/or piles are constructed before the excavation should start (if any underground water is found dewatering should be done before the construction of the temporary walls). After that the site is excavated with temporary bracing members (if needed) installed as the excavation goes deeper. Then the construction of the structure starts from down to up and at the end of the construction the waterproofing should be done. After that, the ground level is restored (SCI, 2001).
Usually side shoring is temporary and is removed once the slabs/beams are capable of functioning however it may be left at times and it becomes permanent part of the building’s structure this is usually done when it’s too cost consuming to pull shoring out or if it’s too close to the neighboring property line and there is no practical way of pulling it out without major disruption. The need of bracing members is mainly determined by the excavation depth and the stiffness of the walls (whether temporary or permanent). One type of bracing is the cross-lot bracing that utilizes temporary horizontal steel members spanning the site at one or more elevation. As shown in Figure 18a, temporary steel columns could be used to reduce the free unsupported length of these horizontal members to increase its critical buckling capacity. Another option is to use inclined bracings (also called rakers), as shown in Figure 18b, they are used when the excavation is too wide for cross-lot bracing, sloping rakers are used instead, bearing against heel blocks or other temporary footings. It is also common to see these two methods applied together. Another alternative to bracings is tiebacks that could be installed through the walls as shown in Figure 18c if the soil conditions permit its use. Tiebacks could be used with braces to reduce the number and/or size of braces. However, tiebacks are permanent and hence more costly than bracings (Santarelli & Ratay, 1996).
illustration not visible in this excerpt
Figure 18: Different lateral protection methods applied within the bottom-up technique.
The bottom-up method is well known for the contractors, as it is most conventional. Within this method the construction equipment easily accesses the site. If underground water is found, drainage system could be constructed all over the site. On using such alternative the structure could be waterproofed from the outside. However, this method requires large construction area, the original ground surface level could only be restored at the end of the work. This method may require constructing temporary supports and change the locations of utilities. Dewatering should be done if underground water is found (SCI, 2001).
8.2.3 Top-Down Construction
This method involves the construction of succeeding basement levels from the ground downwards to the lowermost level. Like the bottom-up method, the construction starts by constructing the retaining walls and/or the piles (depending on the side support type). Interior piles are driven or bored to act as the interior columns until reaching the bearing strata. After that, the ground-floor slab is cast either on grade over unexcavated soil or on drop-down forms attached to the columns. This newly constructed slab will also act as a lateral brace against the perimeter walls negating the need for temporary bracing systems that could be needed in the bottom-up method. Then the soil beneath the slab is excavated and the slab construction process is repeated for the lower floors until reaching the lowermost level. Within this method and unlike the bottom-up method, the ground surface could be restored to its early stage before the end of the construction of the structure itself. It is useful in fast track projects as activities could start together in addition to saving time of constructing temporary walls and bracing members as they are not needed within this method. In addition to that small construction area is needed and the roof is easily constructed. However, waterproofing could not be applied to the outside of the structure and connecting the different floor slabs to the columns is not an easy task. Also, the accesses of the site need to be planned ahead due to the construction of different slab levels. Due to the construction of different slab levels, as the floor level goes deeper, its construction becomes more complicated with the lowermost slab being the most difficult to construct it in place (Basarkar, Kumar, Mohapatro, & Mutgi, 2013).
8.3 Side Support Systems
8.3.1 Sheet Piles
This system consists of interlocking vertical steel sheet driven into the soil prior to excavation. Within this system the construction of the walls is significantly faster than that of reinforced concrete walls or secant piles as the driving process of sheet pile sections is significantly faster than all other side support systems in addition to the fact that it could immediately carry the loads after installation. It is suitable for almost all soils causing no ground disturbance as bored methods. In addition to all of that its components are of factory quality opposed to the site quality achieved within other methods. In addition to all of that it could be temporary as removing the sections after finishing the construction process is possible which makes it a cost-saving alternative. However, driving these sections causes significant noise which makes it not preferred in occupied areas. Sheet piles can’t be driven for more than 15 – 20 meters therefore it can’t be used for deep excavations in addition to the high possibility of water leakage between the different wall sections which necessitates the use of dewatering techniques on using this alternative. Another limitation is that this alternative can’t be driven into rocky soil strata or the sheets will bend and deform (SCI, 2001).
8.3.2 Soldier Piles (Berlin Walls)
Within this system steel I-sections are driven vertically into the earth at small intervals around an excavation site prior to excavation. As earth is being removed wooden planks (or steel or RC panels) are placed against the flanges of the columns to retain the soil outside the excavation as shown in Figure 19. It is very similar to sheet piling in terms of being fast, of good quality and causing noise while driving the steel piles and possibility of water leakage. However, this system is stiffer enabling it to reach deeper depths that could reach up to 20 – 25 m, anything deeper requires further side support. The larger member size, use of panels and the lower possibility of dismantling the system components after constructing the substructure makes it a relatively expensive system that is mostly used in large projects (Woolworth, 1996).
illustration not visible in this excerpt
Figure 19: The Soldier piles utilizing wooden planks between steel piles, photo taken and authorized for reuse by (Mondayis, 2007).
8.3.3 Bored Pile Walls
Bored pile retaining walls (also called column piles) are rows of bored concrete piles. These piles cause less noise and vibrations when compared to the installation of solider piles or sheet piles in addition to being stiffer. These systems include less excavation when compared to diaphragm walls and hence less ground movements. Continuous Flight Augers (CFA) are usually used to construct such piles with pile diameters ranging from 0.3 m to 1 m. CFA’s can be used to bore in all soils except soft clays, weak organic soils and hard rocks. There are three different bored pile wall options: contiguous piles, secant piles and tangent piles. In general, bored pile walls are more economical than diaphragm walls when considering small to medium scale depths of excavations as these piles save cost and time of site operations (Godavarthi, Mallavalli, Peddi, Katragadda, & Mulpuru, 2011).
8.3.3.1 Contiguous Piles
Contiguous piles are bored piles with small gaps between them as shown in Figure 20a. The first step in the pile construction is to drill into the ground with a CFA. Then, concrete is injected under pressure through the auger’s hollow stem during its withdrawal. The concrete pressure is maintained during the auger withdrawal in order to assist the auger extraction and exert a lateral pressure on the surrounding soils. Once the auger was fully removed and the pit is full of fresh concrete, a reinforcing cage is placed into the freshly poured concrete. Then capping beams are constructed at the top to distribute pressure equally on the piles. The diameter and spacing of the piles are decided based on soil type, ground water level and depth, as the gap size could increase with the increase in soil cohesiveness and should decrease as the depth increases. They are suitable in packed urban areas, where conventional retaining methods would affect neighboring structures as these piles have less vibrations and less ground motions. This system can only be used in scarcity of ground water or where grouting or dewatering techniques could be used to prevent leakage between the piles and it could be used for maximum excavation depths reaching 12 m however it is significantly cost-saving when compared to almost all other side support methods (except for sheet piling) (Godavarthi, Mallavalli, Peddi, Katragadda, & Mulpuru, 2011).
illustration not visible in this excerpt
Figure 20: Bored pile wall systems.
8.3.3.2 Secant Piles
Secant piles are basically bored piles intersecting with each other with significant over laps as shown in Figure 20b. This alternative is used to construct cut-off walls for the control of groundwater inflow and to reduce ground motions in weak and wet soils. This alternative is similar to the contiguous bored pile wall but the gap between piles is filled with other piles made of unreinforced cement/bentonite mix or weak concrete. The primary plain concrete piles are constructed first and then the secondary RC piles are constructed, cutting into the primary piles. The CFA is used in a manner similar to the manner applied in constructing contiguous piles except for the fact that the secondary piles are cut overlapping into the primary piles via heavy duty piling rigs fitted with special cutting heads. Although this alternative is more expensive than contiguous piles, the major limitation of contiguous piles which is the lack of water tightness could be solved by the interlocking nature of secant piles. Tangent piles are very similar to secant piles however the piles do not overlap and they are just touching each other which gives them lower permeability than secant piles however they don’t need special equipment attachments as these used in secant pile wall construction (Godavarthi, Mallavalli, Peddi, Katragadda, & Mulpuru, 2011).
8.3.4 Diaphragm Walls
Within this system, a vertical concrete guide wall is being constructed by excavating through the ground and using bentonite slurry to retain the excavated pit sides from failing. The excavation process is done either through using specially fabricated rectangular clamshell buckets or through the use of a boring machine specially designed for this purpose called the hydrofraise. After the excavation is finished and the bentonite slurry is filling the excavated pit, tremie tubes are used to pour concrete. After that, a steel cage is bored into the concrete acting as reinforcement (in some cases the steel cage is placed into the bentonite slurry pit before pouring the concrete). This method is usually done when there is a high groundwater table and deep basements (up to 40 m) as the constructed walls are of significantly higher stiffness and higher permeability when compared to all other methods. However, this process is more expensive and more time consuming than other alternatives due to the use of bentonite slurry and the need to have a slurry refining unit on site (Pearlman, Walker, & Boscardin, 2004).
8.4 Controlling Water Level
The presence of ground water within the excavation site could cause migration of fine particles through the side supports, loss of soil bearing capacity and significant changes in the soil properties. While removing water via pumping as it accumulates in the pit or shaft is an alternative however this process does not solve the ground stability problems as the fines will still come in through the side supports and the soil in the site will still be saturated and its bearing capacity will be reduced, hence this option isn’t valid for deep underground structures. Seepage cut-off and/or dewatering methods are typically needed if the groundwater table is high and the walls are constructed using a technique that could not prevent water and fines from seeping into the site (ASUC plus, 2013). Hence, seepage cut-off and/or dewatering are needed mainly when using sheet piles, soldier piles or contiguous piles as side supporting systems.
8.4.1 Dewatering Techniques
Wellpoints are one of the most commonly used dewatering techniques. Within this system a number of vertical tubes (50 mm – 100 mm in diameter) with screening openings at the bottom are placed into the ground outside the site to suck the water out even before entering into the excavated location. This system also keeps the soil particles out. This water suction process is done via pumps. As the pumps depress the water table, the excavation can take place in dry condition. For excavations deeper than 6 m this process isn’t sufficient and an additional two ring of well points may be required. However, this conventional form of wellpoints is not that successful in sucking water within soils of permeability that is less than 0.01 mm/s (silts and silty sands). For suction within such soils the use of more sophisticated vacuum wellpoint systems which are basically conventional well systems with partial vacuum maintained within the sand filter surrounding the wellpoint and its riser pipe. On the other hand, developments within well point systems facilitated the addition of an eductor hence creating a jet-eductor wellpoint system. This system consists of an eductor installed within a small diameter wellpoint screen that is attached to a jet-eductor fitted at the end of double riser pipes, one of them is a pressure pipe to supply the jet-eductor and the other pipe is to discharge from the eductor pump. This development enables the suction of waters from elevations as deep as 10 m (US Army Corps of Engineers, 2004).
On the other hand, deep wells are very similar in concept to wellpoints however larger in scale (150 mm – 600 mm in diameter). They are principally designed for to dewater large excavations that need high pumping rates. These deep wells could dewater excavations and shafts as deep as 90 m. Such large dewatering tasks are performed by pumping from deep wells with turbines or submersible pumps. Like wellpoints they are fitted around the borders of an excavation leaving the construction space free of dewatering equipment (US Army Corps of Engineers, 2004).
In the presence of certain soil conditions, vertical sand drains could be an ideal solution as they are used when a stratified semi-pervious layer that is nearly impermeable in the vertical direction is above a permeable layer and the groundwater table has to be lowered in the two layers. Vertical sand drains could be used to lower the water table in the upper layer as these sand drains will intercept seepage in the upper layer and transfer the water to the lower layer that could be dewatered using wells or wellpoints. These sand drains are columns of pervious sand allocated in a drilled pit. Additionally, installing a slotted 50 mm pipe inside the sand drain could increase its capacity and make it more efficient in conducting the water down to the more pervious layer (US Army Corps of Engineers, 2004).
Certain types of soils, such as silts, clayey silts, and clayey/silty sands, are very difficult to dewater using wellpoints or wells. These soils can be dewatered using wells or wellpoints in combination with a flow of direct electric current passing through the soil towards the wells, this system is called “Electra-osmosis”. Pumping from the wells or wellpoints creates a hydraulic gradient that together with the passage of direct electrical current through the soil forcing the water trapped within the soil voids to move from the positive electrode (anode) to the negative electrode (cathode). By making the cathode a wellpoint, the water that is moved to it could be sucked using vacuum or eductor pumping (US Army Corps of Engineers, 2004).
8.4.2 Seepage Cut-Off
Ground stabilization is usually done to stabilize and decrease the permeability of weak or highly permeable soils. It is done through, either, injecting a chemical or cementiscious based material into the sub-base. Basically, such material goes through the process of hydration inside the soil and makes the weak sub-soil much stiffer. The chemical injection operates by shrinking the voids in the soil thus making the soil much denser and less permeable. On the other hand, the cementiscious based material consists of Portland Cement mixed as a slurry similar to bentonite, it acts as filler by filling the voids in the soil, however it has pretty much the same output of the chemical material. The benefit of the cementiscious slurry is that additives such as fine aggregates; expansion, polymers, fibers and accelerators can be placed to increase consistency and reduce waste produced by washout of the grout. The stabilized impermeable soil will act as a barrier that prevents ground water from seeping in the site. A major difference between the cementiscious and chemical method of grouting is the duration, strength yielded and the difficulty in construction. For instance a typical compressive strength for cement grouts range from 20-35 MPa. On the other hand, good quality chemical grouts yield 3 to 4 times the strength of cement grouts. Both methods are done in a period of hours or few days and the strength of the grout is gained over time after injection. However the problem with the chemical grout is that it is injected by a pump since it tends to be more viscous than the cement slurry, problems tend to arise due to inconsistency in flow creating harder workmanship on site (US Army Corps of Engineers, 2004).
Conceptually, soil freezing performs the same function performed by soil stabilization techniques which is creating a barrier that prevents ground water from seeping into the excavation site however the major difference is that this technique has a temporary effect while the effect of soil stabilization is permanent. Within this method a line of vertical piles similar to well points are immersed into the ground and continuously circulate a coolant at a very low temperature, low enough to freeze the soil around an excavation area. Of course the higher is the temperature in the site more number of freezing piles will be needed and the process will be more expensive. Hence, this method is rarely used in hot countries and it is more common in cold countries (US Army Corps of Engineers, 2004).
8.5 Construction Methods Selection Criteria
Based on the discussion of the different construction methods presented previously, a selection criteria could be developed to aid the decision making process concerning the construction methods. The excavation size, time frame, cost, level of risk, and constructability are the main factors governing the method choice. The open-cut method is the simplest, fastest and most economic when used in shallow excavations in neighboring conditions that allow the soil to slope. From a project schedule perspective, due to its ability to house several simultaneous activities and due to the fact that it doesn’t need temporary bracings, the top-down alternative is the fastest and most economic method especially when it comes to constructing large projects. However, this type needs experienced contractors hiring skilled labors who are able to excavate below the slabs in narrow, damp and dark areas and have the experience of how to construct strong slab-column and slab-wall connections. The bottom-up method is more conventional and a lot of contractors have the expertise to apply it however the use for bracing members or tiebacks increases the project duration and the project cost and makes this method not that suitable for wide excavations as bracing such excavations would be significantly uneconomic due to the use of significantly large bracing members. A summary of the selection criteria could be found in Table 8.
Table 8: Selection criteria for Multi-storey underground building construction alternatives.
illustration not visible in this excerpt
Based on the discussion of the different side support alternatives presented previously, a selection criteria could be developed to aid the decision making process concerning these alternatives. The excavation depth, water-tightness, neighbor rights and soil type are the main factors affecting the choice of the alternative to be used for a certain specific case. Additionally, the construction time frame, cost, level of risk and constructability are significantly important factors that should be considered when choosing between the different alternatives. Sheet piling is the simplest, fastest and most economic (as it could be removed after construction) when used in shallow excavations, with scarce ground water and in unpopulated areas to avoid noise pollution and avoid harming neighboring structures due to vibrations. Soldier piles are also not preferred in the presence of ground waters and populated areas but they could go deeper than sheet piles as they are stiffer however they are more expensive due to the difficulty of its removal after construction. Contiguous and secant piles produce negligible vibrations and minimal noise during construction which makes them good options within populated areas however they are slower than driven piles in construction and not suitable within all soils. However, the structural difference between contiguous and secant piles makes the first more permeable and unsuitable in ground waters while secant piles are stiffer and less permeable which makes them more suitable in the presence of ground water and in larger depths. These merits of secant piles are on the account of cost and speed which limits their use only when the need for them emerges. The stiffest, least permeable, slowest and most expensive alternative is the diaphragm wall system. However, it has high risk of the pit failure during the presence of the slurry in it or improper concrete pouring and its boring process could cause soil disturbance that could harm near substructures and foundations which needs high care from geotechnical engineers responsible for the design and monitoring processes. A summary of the selection criteria could be found in Table 9. On the other hand, sheet piles, soldier piles and contiguous piles could be utilized in ground water presence if one of the techniques used to control the water level presented previously is applied. In general, dewatering techniques are more economic than seepage cut-off techniques if the amount of ground water is within the capabilities of the dewatering methods and the depths of excavation are within the capabilities of the dewatering techniques. Additionally, proper hydrological and geotechnical analyses should be performed in case any of the dewatering or cut-off techniques are used.
Table 9: Selection criteria for side support construction alternatives.
illustration not visible in this excerpt
8.6 Case Studies
8.6.1 Case 1: Tahrir Square Garage, Cairo, Egypt
Tahrir Square is located in the heart of Cairo, the capital of Egypt. It is a busy area, leading to downtown which serves as a connection to all the areas of Cairo. It is a crowded square with constant traffic during the weekdays. The consultant was the Arab Consulting Engineers and the contractor was the “Arab Contactors”. The project consists of two underground four-storey car parking garages, one located facing Omar Makram Mosque that could house 600 cars with an area of 5000 m2 and another larger one facing the National Egyptian Museum that could house 1700 cars and 24 buses with an area of 76337 m2. The construction of the both garages started in 1998, the smaller one was finished in 2002 (Abdel-rahman, 2007). However, political unrest and protests near the construction site have delayed the work in the larger garage that was only finished by the summer of 2014.
8.6.1.1 Applied Method
The site is located only 400 m away from the river Nile which creates a high groundwater table that is only 3 m deep while the depth of the excavation was 13.6 m. The project is only 6.5 m away from a major underground station connecting two perpendicular metro lines (at different depths). The first 4.5 to 6 m of soil was fill followed by a 48 m layer of dense sand that includes some intermediate layers of hard clays. Hence, a 27 m deep diaphragm wall with a thickness of 0.8 m was constructed in order to prevent water seepage. Before construction, a grout plug of about 2.5 m thick was injected around the garage circumference (outside the diaphragm walls) to assist the diaphragm walls in preventing the inflow of water towards the excavation site and to minimize the soil disturbance caused by the boring activities and the metro lines vibrations in the locations between the diaphragm wall and the neighboring structures minimizing the risk of any effect of the construction process on the soil between the project and the neighboring substructures. The top-down method was applied where the diaphragm walls were first constructed using the hydrofraise and the piles (columns) were constructed using bucket excavators and continuous flight augers. After that, the slabs were constructed and connected to the diaphragm walls and the piles (who act now as columns) in a process that went simultaneously with the excavation towards the foundation level to provide lateral supports to the diaphragm wall (Abdel-rahman, 2007).
8.6.1.2 Construction Method Evaluation
Concerning the consultant decision of using a 27 m deep diaphragm wall in this project, it was a correct decision. On referring to the selection criteria developed in section 5, using a non-water-tight alternative would have needed a very large number of dewatering wells that would have worked continuously due to the high water flow at this location near the river Nile. That leaves only diaphragm walls and secant piles to be used in such a project however, the designer preferred diaphragm walls as they would be stiffer than secant piles.
Also concerning the decision of using the top-down method, according to the developed selection criteria, it is the most suitable method. The depth of the excavation and the presence of the ground water would make it impossible to use the open-cut method. On the other hand if the bottom-up method was used it would have been extremely expensive to place temporary bracing in this project as the two building sites were significantly wide and bracing such wide sites would have been a time-consuming process in addition to the need for large bracing members that would have been expensive, difficult to fabricate, difficult to transport to the site and also difficult to install. Hence, the only feasible option left was to use the top-down method.
8.6.2 Case 2: Basement Car Park, Staines, UK
This project involved constructing a two-storey underground car park in an area where few buildings surround the project. The consultants were Andrews, Kent and Stone while the contractor was Kvaerner. The basement was 8 m deep, the soil was clay and the ground water table was only 2 m deep. The area of the site was approximately 3650 m2 and the project was finished within the months of November and December of 1998 (SCI, 2001).
8.6.2.1 Applied Method
The consultant decided to drive 403 LX32 sheet piles with a depth of 14 m all over the perimeter of the site within two weeks using hydraulic pressing rigs. Well points were used to suck water just out of the site during the excavation. The bottom-up technique was used to construct the basement. This method was used with the aid of 80 tons of steel temporary bracing was installed to support the sides from failing during the excavation process. After the excavation process was finished, all the joints between sheet piles were welded to adjacent angle sections using continuous joint penetration welds and the voids were filled with a bituminous sealing material to permanently prevent water from seeping in the basement after the dewatering process is stopped. Then the raft foundation was constructed followed by the erection of steel columns and the two slabs were constructed before dismantling the temporary bracing members (SCI, 2001).
8.6.2.2 Construction Method Evaluation
According to the selection criteria developed in section 5 and due to the basement having a depth of 8 m which could be achieved by almost any side support construction alternative, this project is considered to be of that type of projects were nearly all construction alternatives could be used from a technical point of view however what would make one option more suitable than the others would be the construction speed and cost. Using secant piles or diaphragm walls would have saved the cost and effort of the dewatering and welding. However, these types of walls are significantly more expensive and slower than sheet piling taking into account that the additional cost of dewatering and welding the sheet pile sections is less than the difference in the cost of constructing such impermeable reinforced concrete walls and installing sheet piles. Hence, and as sheet piling is the fastest and least expensive alternative, choosing this alternative was the best choice available.
Also according to the developed selection criteria, the choice of the bottom-up construction method was valid. Excluding the open-cut method was a correct decision as although the depth was not considered significantly deep, the high ground water table would have caused side failures during excavations. On the other hand, the top-down method is more commonly used in larger projects were the space of the activities would not be over-congested and sufficient space to allow the entry and maneuvering of moderately sized excavation equipment would be available. If the top-down method was used in this project the construction areas would have been very limited to enter excavation equipment below the upper slab in addition to the fact that an additional set of activities of driving the middle steel columns before the excavation. Hence, the bottom-up method was a more practical method for a project of that size.
8.7 Conclusions and Recommendations
When examining the methods applied in the two cases discussed in this chapter against the developed selection criteria, the selection criteria proved that it covered the different aspects governing the selection of the most suitable multi-storey underground building construction methods and the different side support construction alternatives for different cases. The most governing factors of choice are the soil conditions, ground water table, excavation depth and neighboring site conditions and following that, comes the level of risk, constructability, speed and cost. Hence, it is highly recommended when using the selection criteria matrix to take all the factors governing the method selection into account as neglecting some of them could cause serious problems that are difficult in fixing.
8.8 Acknowledgements
The author would like to acknowledge the Department of Construction Engineering in the American University in Cairo for its continuous support. The author would also like to acknowledge the efforts of his dear students Sherifa Ismail, Zeina El Tohamy, Mohamed Shaheen, Mohamed Hamed, Hazem El Essawy and Mohamed Afifi for their efforts.
9 Elevated RC Tanks
Summary:
Elevated tanks are necessary to supply potable water in most of the countries all over the world. Construction of elevated reinforced concrete tanks involves utilizing unique construction methods due to various characteristics like cost, constructability, resources and time. This paper covers different methods of construction of reinforced concrete elevated tanks by concentrating on different construction methods of every tank component. Moreover, a comparative analysis is provided to show when to use every method of construction according to the conditions available. Two tanks with different sizes and project conditions were studied and examined against the developed selection criteria in order to evaluate the validity of the applied construction methods in each case. A previous version of this chapter was published as a conference paper by (Darwish, et al., 2015) titled “Selection Criteria for Elevated RC Tanks Construction”.
9.1 Introduction
Elevated water tanks could be constructed of several materials like reinforced concrete, steel, and composite materials. Each type of elevated tanks has its advantages and disadvantages. The main advantages of steel tanks are the high quality assurance and faster construction duration. While the main advantages of the concrete tanks is the low cost of maintenance over time, low cost of construction, not requiring skilled labors, and the multipurpose use the of tank as it can store most liquids. Hence in developing countries, the most common material used to construct elevated tanks is concrete due to lower cost of materials and labor. However, in industrial countries the most common form of elevated tanks is the steel or the composite while the concrete tanks are considered rare.
Reinforced concrete tanks vary depending on the population capacity demand and the sufficient head needed in the system. These tanks are composed of three parts. The first (and uppermost) part is the tank body itself (also called “the vessel”). The second part (the middle) is the tank supporting structure. While the third part is the foundation (whether deep or shallow) this is not within the scope of this paper. The tank body could be spherical, conical, rectangular or cylindrical; however the most common types are the conical and cylindrical designs mainly due to design considerations. On the other hand, there are four types of tank supporting structures. The first type is masonry (sometimes reinforced masonry) walls carrying the tank body, however this type is rarely used as it has limitations in terms of its strength and it could be used for mainly small tanks and rarely for medium tanks. The second alternative is having a steel supporting structure which could support larger tanks than the previously mentioned option however it is beyond the scope of this paper that is only limited to RC tanks. The third alternative is the reinforced concrete frame support (Multi-column supported) that is very similar to the reinforced concrete skeleton of a typical building. The fourth alternative is having an RC cylindrical shaft supporting the tank body, this structural system is the most commonly used now as it has high capability to resist both vertical loads (tank and fluid weights) and lateral loads (mainly earthquakes) (ACI Committee 371, 2008).
On the other hand, the concrete used could be typical reinforced concrete or it could be post-stressed through post-tensioning high strength steel cables. The tank size is the most important factor governing the use of post-stressed concrete. The increase in tank size reflects an increase in the tank capacity which means an increase in the hydrostatic and gravitational loads. Accordingly, post-stressing is not utilized in cases of small tanks. However, moderately sized tanks could be constructed of either typical reinforced concrete or it could be post-stressed reinforced concrete. The post-stressing is mostly utilized in cases of large tanks as using typical reinforced concrete in such cases could be really difficult due to needing very thick walls with very dense reinforcements (ACI Committee 371, 2008).
Concerning elevated RC tanks construction methods, the methods covered within this paper are those concerning the construction of the tank supporting structure, the different methods of tank body construction while covering also the different alternatives concerning the sequence of operations between the two parts of the superstructure and their connection.
9.2 Supporting System Construction Methods
9.2.1 Conventional Formwork
Although it is not the most common option, conventional formwork is still used in some cases during constructing the tank supporting structure. It is used mostly in case of constructing a reinforced concrete multi-column skeleton that will latterly carry the elevated tank. It is used in such cases because the jump forms (with its different types) and slip forms will not save time and/or cost in these types of structures. However, conventional formworks could waste time and cost if used to construct RC shafts (Peurifoy, Schexneydar, & Shapira, 2006) (Gregory, 1996).
9.2.2 Jump (Climbing) Formwork
Jump forms, described also as climbing forms, are used for constructing vertical concrete elements such as high rise buildings, core shafts, water tower shafts, shear walls and bridge pylons. The system of form-working basically passes through assembling and fixing the formwork and the working platform, steel fixing and concreting. This system can be adjusted to suit different construction geometries depending on the project being a shaft or shear walls for example and it requires special concrete characteristics, equipment, and labor as discussed later (Gregory, 1996).
9.2.2.1 Types of Jump Forms
There are three types of jump forms; the three types have exactly the same function and method but with little deviations in the set up and the equipment used. The first is the normal jump/climbing form in which the formwork units are dismantled (as shown in Figure 21), lifted upwards by a crane, and assembled at the next level of construction where reinforcement and concrete pouring takes place and the process is repeated for several levels (Gregory, 1996) (Peurifoy & Oberlender, 2011).
The second type is the guided-climbing jump formwork where the form is also lifted by the crane but the units of the formwork remain fixed to and guided by the structure. This type is faster than the normal jump formwork and commonly used (Peurifoy & Oberlender, 2011).
The third type is the Self-climbing jump formwork where unlike the two other types, the formwork units in this type are lifted by means of hydraulic jacks rather than using a crane. The formwork does not need dismantling and reassembling as it climbs on the hydraulic jacks to the next level of construction which makes this type faster and safer but yet more expensive than the normal and guided jump forms. Sometimes, two formwork units at different levels are being anchored to the jacking system and lifted upwards at the same time which makes the construction of two successive levels at the same time possible. Some newer versions of these forms are designed in a specific manner in order to maintain that the climbing process is continuous instead of intermittent, and is usually only interrupted for a very short time, in order to fix the mounting mechanisms to new anchoring points (Peurifoy & Oberlender, 2011).
illustration not visible in this excerpt
Figure 21: Lifting a jump form (photo taken and authorized for reuse by (Destil, 2008))
9.2.2.2 Method Sequence and Components
The work sequence starts by the forms assembly and fixation on the ground as well as the working platform for the workers being fixed to the formwork. Then the whole units of the formwork are carried by a crane and fixed to the positions where the concrete will be poured "cast-in" position. Except for the normal climbing formwork type, the formwork and access platform are anchored to the structure element below by what is called "climbing brackets" for the formwork to climb on to. The formwork is anchored using bolts to these brackets. Steel reinforcements are then prepared and placed in their positions. The concrete is poured with secondary activities like vibration proper compaction to avoid segregation take place. The concrete is left to cure and harden enough so that it could carry the formwork at the above level of construction. Surface finishing of the poured concrete is done. For the first two types of jump forms, a crane is used to carry the combined formwork and working platforms to the next level and the cycle begins again while for the self-climbing a system of hydraulic jacks is used instead of the crane, which taking less time. In addition to producing a fare faced concrete surface, these forms do the job in significantly less time compared to the conventional formwork, however, slower than slip form system. On the other hand, and due to its sequence of operations, using such forms will still create joints between the different concrete lifts and it may require crane for inter-lift movement in case the first two types of the jump forms are used (Peurifoy & Oberlender, 2011).
9.2.3 Slip-forms
The slipform is similar to the jump forms in the usage and application and the major advantages, but this type of formwork is faster than the jump formwork as the concrete is being continuously poured into the formwork panels until the whole operation is finished. Thus it needs continuous supply of reinforcement bars. The system of form-working basically passes through assembling and fixing the formwork and the working platform, continuous steel assembly and concreting and finally dismantling and removing the formwork by a crane. So, mainly the crane time is needed for supplying the materials up at the level of construction and during the formwork removal unlike the normal/guided climbing formwork. Another major difference between slipform and jump form is that the slipform does not wait for the poured concrete to harden and support the formwork above it, but the slipform supports itself on the hydraulic jacks. The jacking system is composed of a number of jacks that are held to jacking tubes, which are long steel tubes placed within the steel reinforcement of the structure. All the hydraulic jacks should be operated at the same rate so that the formwork is leveled during lifting (Peurifoy & Oberlender, 2011) (Camellerie, 1996).
illustration not visible in this excerpt
Figure 22: Slipform system (Figure drawn and authorized for reuse by (Kim, Kim, Chin, & Yoon, 2013))
As shown in Figure 22, the slip form system consists of three platforms. The upper platform is mainly for storing and handling materials and acts as a distribution area. The middle platform is the main working area at the top of the poured level of concrete area for reinforcement and concreting activities. While the lower hanging platform is for concrete finishing activities. The construction sequence starts by fixing the jacks and the jack stands are together on the ground by bolts. After that, the jacks and the jack stands are erected vertically on the circumference of the foundation and then connected together by horizontal connection straps; one on the inner and one to the outer legs as shown in. Third, the inner and outer consoles, on which the working platform will be fixed, are anchored to the jack stands. Then the internal and external panels used for the concrete forming are bolted to the connection straps. The slip forms most important components are the hydraulic jack screws and climbing bars. When connected to the main hydraulic unit they ensure that the formwork can be lifted continuously achieving around 2.5 – 4 meters of concrete pour height per day. The jackscrews are connected between the jacks to the connection points. Cavity pipes are then positioned under the jackscrews in order to accurately guide the climbing bars and to provide cavities for the removal of the climbing bars. The large platform elements such as steel mesh floor elements and safety boards are then attached. In addition, handrails are connected through the banister uprights and all assembly points are controlled prior to commencing slip forming. After the formwork has been assembled and operated to around the first level, the lower scaffolding console is then attached. Steel mesh walking platforms are then positioned against the lower console elements. Handrails and kicker boards are then connected. To control the structural rising of the slipform and the accurate operational workings, optical measuring equipment is used. This advanced formwork system performs the job in the shortest construction time due to its continuous mode of operation creating no structural joints and a fare-faced concrete surface with a minimal need of cranes. However, it needs continuous supply of material, highly skilled labor and it involves high capital cost due to its automated equipment setting (Peurifoy & Oberlender, 2011) (Camellerie, 1996).
9.3 Tank Vessel Construction Methods
The main step in the RC tank vessel construction is the formwork, these formworks will be used for the tank floors and the walls. For the tank walls, either climbing forms or slip-forms and both types were described in detail in the previous section. However, the major difference between the two options is the fact that the slip-forms will produce joint-free concrete which is much more suitable when constructing the tank walls. The fact that the tank is elevated could raise another complicated issue which is the false work temporarily supporting the tank floor formwork and transferring its load to the ground during the reinforcement placement and concreting activities. This issue is also coupled with another issue concerning the sequence of operations between the tank vessel and its supporting shafts as the different false work options governing the tank body construction will vary depending on which is constructed first, the supporting shaft or the tank body itself.
9.3.1 Conventional Massive Structured False Work
The method requires erection of a massive structure of conventional false work starting from the ground level till reaching the level of the bottom slab. As shown in Figure 23a, this process is done after the construction of the tank supporting structure is finished. The major advantage of using this alternative is the fact that no high-technology equipment needed is to build the scaffold, hence there is no need for highly skilled labor and any subcontractor could have the technical qualifications do this job with minimal equipment and labor costs. However, the cost of the false work for higher heights is large. It is even more unfavorable due to risky working conditions and the fact that assembling and dismantling such a massive structure is time consuming (Bennett & D'Alessio, 1996).
illustration not visible in this excerpt
Figure 23: Summary of the four tank body construction methods.
9.3.2 Suspended False Work Method
This method shows another approach using false work only. As shown in Figure 23b, the false work is suspended from the top of the supporting shaft and anchored to the ground to prevent the movement of the false work. The formwork rests at the inner edge against the shaft and is then suspended at its outer edge by a large number of suspension rods from the top of the shaft and additionally connected to the foundation using steel members or pre-tensioned guy tendons. This process is done after the construction of the tank supporting shaft is finished. The merits of this system when compared to the previous one is that it saves the time consumed in assembling and dismantling the massive structured false work however, it involves a higher level of sophistication when designing the falsework, its connections to the shaft, the suspension tendons and the steel members or the pre-tensioned guys. This is also considered an additional cost as the cost of these tendons and the pre-tensioned guys is higher than that of the massive structure if used at low heights however it is cost saving for higher heights. The risk issue again comes into the picture as the workers will perform all the formwork, reinforcement and concreting activities at a high elevation and they will need fall-arrest training and equipment (VSL International LTD., 1983).
9.3.3 False Work Lift (Pushed) Method
This method is based on the idea that the false work is placed close to the ground, then the tank is pushed upwards then the shaft is constructed beneath. After the foundation slab is built, HEA beams are assembled in an upright position together with a jack of lifting stroke. Then, and as shown in Figure 23c, the tank is built and upon completion it is raised by the jacks while the shaft wall is constructed simultaneously. At each step of construction, prefabricated concrete cylinders are placed beneath the jacks. This method is most suitable when the diameter of the shaft is relatively large; however its disadvantage is that stability issues might occur during the lifting process. It solves a huge safety issue of working at a high elevation as most of the activities happen on the ground which also saves the time of the shoring activities. However, this alternative could slow down the supporting shaft construction (VSL International LTD., 1983).
9.3.4 Liftslab Method
This method is similar to the false work lift method in the fact that the tank body construction is done on the ground then lifted. However, and as shown in Figure 23d, the tank body is constructed and lifted after the supporting shaft is fully constructed. Within this method, surrounding the shaft at the ground level, the tank bottom slab and walls are constructed. Then the constructed tank is attached with cables to the hydraulic jacks that are attached on the top of the shaft. Throughout the lifting process, all jacks should be modified to function on the same speed in order to keep the firmness of the structure and avoid any critical deformations. After the tank being lifted into its final position, a ring beam should then be constructed beneath the connection between the tank bottom slab and the shaft. This ring beam needs to fully cover the connection between the shaft and the tank and must be well connected to each of the two. This system involves high use of heavy rigging systems involving jacks and cables that could constitute a high equipment cost. Hence, it is not cost-effective if used at low heights as for such cases assembling massive false work would be more cost saving. It is for sure the fastest method as it involves constructing the tank without slowing down the shaft construction as in the false work lift method and it is less risky than the first two methods involving working at elevated heights (VSL International LTD., 1983). Another drawback of such method is the fact that the joint between the tank body and its supporting shaft is a point of weakness from a structural perspective and it needs to be analyzed dynamically within its design phase to guarantee that the shaft, tank body and the connection between them are stiff enough to withstand gravity and lateral loads (Masih & Hambertsumian, 1999) (Zallen & Grossf, 2002).
9.4 Construction Methods Selection Criteria
Based on the discussion of the different supporting system construction methods presented previously, a selection criteria could be developed to aid the decision making process concerning the supporting system construction methods. The project size, time frame, resources (whether material, labor or equipment), cost and site conditions are the main factors governing the method choice. From a project schedule perspective the slipform technique is the fastest (especially for large-scale projects) followed by the self-climbing forms, guided jump forms and normal jump forms respectively, while the conventional formwork are the most time consuming. However, this speed could be on the account of something else as the level of skill required for the labor working on non-conventional forms is much higher than that of the conventional forms, as on the increase of sophistication of the method and its associated equipment, the required level of labor skill increases and consequently the cost will be higher. Hence, the more advanced/sophisticated methods are more suitable for larger scale projects where repetitive systems are applied and saving time would mean directly and indirectly saving money. From a site layout perspective, the more advanced techniques (slip-forms and self-climbing forms) save more space as the need for external equipment is only for the purposes of material supply, which means that if a concrete pump with a suitable boom size is available there will be no need for a permanent crane on site. A summary of the selection criteria could be found in Table 10.
Table 10: Selection criteria for supporting system construction methods.
illustration not visible in this excerpt
Table 11: Selection criteria for tank body construction methods.
illustration not visible in this excerpt
Also, based on the discussion of the different tank body construction methods presented previously, a selection criteria could be developed to aid the decision making process concerning the tank body system construction methods. The project size, time frame, resources (whether material, labor or equipment), cost, level of risk and design considerations are the main factors governing the method choice. From a project schedule perspective the liftslab technique is the fastest (especially for large-scale projects) followed by the false work lift method and the suspended falsework method respectively, while the conventional method is the most time consuming. However, this speed could be on the account of something else as the level of skill required for the labor working on non-conventional methods is much higher than that of the conventional methods, as on the increase of sophistication of the method and its associated equipment, the required level of labor skill increases and consequently the cost will be higher. Hence, the more advanced/sophisticated methods are more suitable for larger scale projects where the additional equipment and labor cost is less than the additional cost that would have been faced if the project duration would have significantly increased in case of using conventional methods in a large project. From risk and design perspectives, the more advanced techniques (Falsework lift method and liftslab method) need special attention before, during and after construction due to the sensitivity of the connections between the tank body and the supporting shaft in these cases. A summary of the selection criteria could be found in Table 11.
9.5 Case Studies
9.5.1 Case 1: Frankfort – Kentucky Elevated Water Storage Tank
This elevated water tank was built in Frankfort, Kentucky, USA to provide adequate storage for water demands. This 7570 m3 conical tank, owned by the Frankfort Electric and Water Plant Board had a total height of 40 m and a diameter of 35 m. The tank is located on Woolbright main road and can be accessed directly from the main road. The foundation system is a matt foundation with a dimension 14 m by 4 m by 1.8 m depth. The concrete shaft carrying the tank has a diameter of 9.75 m with a height of 27.5 m. The transition attached to the top of the shaft is a cylindrical heavy concrete layer connecting the tank body to the shafts and its thickness varies from 0.6 m to 1.2 m. In addition to the transition acting as a support for the vessel shaft, it also acts as a floor for the vessel. The vessel is composed of a cone with a height of 13 m and its main purpose forming the body of the tank and an upper 2 m deep ring beam and its purpose is to resist both outward forces transmitted from the dome above and also to resist the outward pressure from the tank. Finally, the dome spanning a diameter of 35 m and its main role is to act as a covering for the tank (Copley, Ward, & Bannister, 2007).
After constructing the foundations, the concrete shaft was constructed using jump formwork in 1.2 m lifts. The transition section was constructed using conventional formwork and was poured in two separate castings. The suspended formwork for the tank vessel was complicated as it was a system of steel frame formwork without any wall ties, which was possible due to the conical shape of the tank. The formwork of the vessel is consisted of outer and inner forms which were independent of each other. The outer form consisted of vertical beams that were tied together with a tension member. The tension members were added to withstand concrete pressure and form a tight grid to maintain the shape of the outer wall surface. The interior form consisted of vertical beams that were tied together with a compression member. These compression members were added to withstand concrete pressure and form a tight grid to maintain the shape of the inner wall surface. The exterior formwork panels were installed first then the two layers of horizontal and vertical steel reinforcements were placed. After that, the interior formwork panels were installed. Concrete was poured by a separable placing boom which was mounted on the transition section where concrete was pumped from a stationary pump at the base of the tank through pipes. After pouring each concrete lift, a water stop was placed at the interface between every layer then the succeeding climbing formworks were attached to the previous form to maintain the shape of the vessel. The ring beam was casted by the same formwork system as used in the vessel which doesn’t need any wall ties. However, the sequence of doing the formwork was reversed where the inner forms were assembled first. After preparing the steel reinforcement, the outer forms were assembled and concrete was poured. Then the dome was constructed using a conventional formwork system (Copley, Ward, & Bannister, 2007).
9.5.2 Case 2: Disney Road Elevated Water Storage Tank
This elevated water tank was built in Disney road to provide adequate storage for water demands in the county of Anne Arundel, Maryland, USA. This 7570 m3 tank, owned by the Anne Arundel county department of public works had a total height of 59.1 m and a bowl diameter of 30.5 m. The storage of the tank is divided into 3 capacities each one is used whenever needed and that was considered in the tank’s design. The first (Equalization Storage) volume provides the difference between treatment plant’s capacity & hourly demands. The second (Fire Storage) provides water for the fire-fighting beyond the capacity of the treatment plant already existing there. These first two sections of the tank have a bowl shape with a depth of 8 m. The third (Emergency Storage) provides water during power outages and system shutdown, since this is one of the major problems facing County in Maryland. This upper section has a cylindrical shape as its walls are perfectly vertical with a height of 6 m (Anne Arundel County Department of Public Works, 2011).
After constructing the foundation, the first 3.9 m (from level -2.0 to level +1.9) of the concrete shaft was constructed using conventional formwork. Then the slipform method was used to construct the remaining 33.1 m (up to level +35.0) of the concrete shaft. Then the inner columns (inside the tank body) were constructed. Then, the construction of the upper slabs containing openings (to lift the tank body) took place. After that the tank body was constructed on the ground. After that, the lift slab technique was utilized where the lifting of the tank body using hydraulic jacks was performed. The ring beam supporting the tank body and connecting it to the shaft was constructed followed by the tank roof slab which was constructed using conventional formworks.
9.5.3 Construction Method Evaluation
On using the selection criteria developed previously to evaluate the validity of the construction methods utilized in the two projects described in the two previous subsections, one could see that these methods are in compliance with the developed selection criteria. The Frankfort – Kentucky tank was 19 m shorter than the Disney Road tank. Hence, it was expected to see a difference in the concrete shaft construction method as it would have been extremely time consuming to construct a 59 m high shaft using jump forms and the use of slip-forms in such a case would be much more efficient and time saving and this reduction in duration would also save costs as the rental costs of the forms and the wages of the labors are both function of time and will both be reduced when saving time. Hence, the additional cost accrued by the use of slip-forms is counteracted by the cost savings due to time savings. The significantly higher height of the Disney road tank, together with the tank shape are the major reasons giving preference to the lift slab method over any construction method to construct the tank vessel as the walls of the tank body were vertical (not slanted as the case for the conical Frankfurt – Kentucky tank). This shape made the construction using the suspended formwork much more difficult than constructing it on the ground then lifting it using the lift slab technique. In addition to that, creating a supporting structure to transfer the suspended formwork load from a height of 59 m above the ground would be an extremely time-consuming and cost-consuming process and using a lift slab would save significant time and cost. Hence, and according to what has been applied in the two projects studied, the selection criteria developed in section 4 is sound and applicable.
9.6 Conclusions and Recommendations
When examining the methods applied in the two cases discussed in this chapter against the developed selection criteria, the selection criteria proved that it covered the different aspects governing the selection of the most suitable methods for different elevated reinforced concrete tanks construction cases. However, it is highly recommended when using the selection criteria matrices to take all the factors governing the method selection into account as neglecting some of them could cause real problems.
9.7 Acknowledgements
The author would like to acknowledge the Department of Construction Engineering in the American University in Cairo for its continuous support. The author would also like to acknowledge the efforts of his dear students Karim Kamel, Omar Balbaa, Ahmed El-feel, Jwanda Elsarag, Mohamed Tawfeek, Ahmed El-Embaby, Ghadir El-Shaer, Omar Montasser and Reem Ahmed.
10 Conclusions
10.1 Introduction
The construction of infrastructures is typically different than typical building construction in the irregularity of its activities in terms of involving heavy construction activities that may require special construction techniques that involve special construction equipment. Such techniques and their corresponding equipment need to be chosen with special care according to specific factors that could be general factors or factors related to that specific type of structures or related to that specific case. Some of these factors are detrimental as they will prevent a certain method or a certain family of methods from being used in certain circumstances. Other factors are non-detrimental as although they are of high importance but the taking them into account or not is a decision that is left for the various project parties to take as per the contract provisions and various project circumstances.
illustration not visible in this excerpt
Figure 24: Summary of the factors affecting heavy construction method choice.
The detrimental factors are mostly out of the hands of the design, construction and project management teams. As shown in Figure 24, these factors could be related to the site conditions (such as geotechnical, locality or geometric conditions), size, structural systems, legal factors (such as building codes, standards and laws) or contractual factors (related to time, cost or risks). It could be noticed that these factors all have something in common which is the fact that they are all non-avoidable and must be strictly respected by the decision makers when it comes to selecting the construction method for a specific infrastructure project. Most of these factors control the construction decision making process by excluding certain construction methods from the list of methods that could be used to construct that type of infrastructures.
On the other hand, non-detrimental factors are mostly within the hands of the design, construction and project management teams. As shown in Figure 24, these factors could be related to time, cost, risks (within certain limits) and ease of construction. However, if the contract conditions state special provisions concerning one or more of these factors, that factor(s) would be moved from the category of being non-detrimental to being detrimental. It could be noticed that in most of the cases these factors affect the construction method selection process through giving some preference to one method over the others not by excluding certain construction methods from the list of methods that could be used to construct that type of infrastructures as the case for detrimental factors.
10.2 DETRIMENTAL FACTORS
10.2.1 Site Conditions
10.2.1.1 Subsurface Conditions
The most detrimental factor of all is the site conditions as the site conditions are totally beyond the hands of any of the project delivery parties. One of the most significant of those conditions is the subsurface conditions. These include the soil type, bearing capacity, cohesiveness, chemical reactivity and the ground water level. This family of factors is most detrimental when the project involves the major parts of its activities below the ground or highly dependent on the soil bearing capacity such as in tunneling, pipeline construction, caisson construction, dam construction and multi-story underground building construction and underground tank construction.
When examining tunneling and pipeline construction projects all of the subsurface geotechnical factors come into the picture as all of the tunneling and micro-tunneling methods are highly dependent on the soil type, bearing capacity, cohesiveness, chemical reactivity and the ground water level. Each of these factors could simply exclude one or more of the construction methods that could be used to construct a tunnel (Federal Highway Administrtion, 2013). The subsurface conditions surely dictate the type of tunnel boring machines to be used in cases of using the tunnel boring techniques in terms of whether the machine should be shielded or not, its mode of operation and its cutting head (Girmscheid & Schexnayder, Tunnel Boring Machines, 2003) (Bilgin, Copur, & Balci, 2014). Also other methods could be totally excluded in some cases as the sequential excavation method for example could never be used in cases of cohessionless soils and in cases of high ground water tables as it highly depends on the cohesiveness and strength of the soil during excavation. On the other hand the drill-and-blast method is only applicable in rocky soil and couldn’t be used in other cases (Darwish, et al., 2015). The issue is even more sensitive when it comes to some kinds of pipeline construction methods that depend on jacking, ramming or hammering as the cutting head used in such methods could structurally fail if jacked, hammered or rammed in stiff clays or rock formations and other methods should be used in such cases (Najafi, 2010). This is very similar to the case of using the jacked box tunneling method that could be only used in soft grounds and the process could totally stop if the jacked box met stiff clay or rock formations that the structure couldn’t be jacked through (Darwish, et al., 2015).
The subsoil conditions are also of clear direct effect on the choice of the type of caisson to be constructed in cases of caisson construction. This is also an example of how deterministic factors govern through excluding some methods due to the subsurface conditions. This is apparent in the case of boxed caissons that are highly dependent on resting on a soil that has a significantly high bearing capacity and hence this type of caissons will be excluded in cases of soils with low bearing capacities (Gerwick B. C., 2007). It is also apparent in the case of opened caissons as these caissons cut into the soil through a cutting shoe along its perimeter at the bottom and this mechanism will totally stop in case of cutting through cohesive soils (Darwish, et al., Selection Criteria for Large Caissons, 2015).
The bearing capacity comes into the picture with most significant effect on constructing massive and heavy structures of heavy weights like dams. On constructing in-the-wet dams the installation of deep foundations like piles becomes an extremely difficult task in the middle of the water hence, such in-the-wet construction alternative like float-in dams depends on founding the dam on a soil with a significantly high bearing capacity (Gerwick B. C., 2007). This is not the only soil-related issue that could be raised when exploring dam construction methods as the construction of roller compacted concrete (RCC) dams is limited to cases where soils are of low chemical reactivity as the mix design of RCC involves the use of mineral admixtures that could react with chemically reactive soils and cause cracks within the tank body itself (Darwish, et al., Selection Criteria for Dam Construction Methods, 2015). Also the construction of cellular sheet pile cofferdam method could be hindered if the soil is stiff clay as driving sheet piles in stiff or hard clays could carry risks of failure of the sheet piles during hammering or driving activities hence, such type of soils would exclude that construction alternative when deciding which dam construction method is to be used (Gerwick B. C., 1996).
The effect of subsoil conditions is the most detrimental factor when it comes to choosing between the different construction alternatives used in the construction of multi-story underground structures and underground tanks. The level of ground water in the location dictates whether a water-tight side support system will be used or not and whether a dewatering technique is to be used or not (US Army Corps of Engineers, 2004). The type of soil also determines whether certain construction methods could be used or not as sheet piling is totally excluded in cases of stiff/hard clays. Additionally, the depth of the bearing strata governs the decision of which wall construction alternative could be used as only limited types of side wall construction alternatives like diaphragm walls could reach deeper location of bearing strata exceeding 25 m deep while other methods like sheet piles, secant piles and soldier piles couldn’t reach bearing strata that are that deep (ASUC plus, 2013) (Santarelli & Ratay, 1996).
10.2.1.2 Crossings
When an infrastructure such as a bridge, tunnel or pipeline is crossing a highway, water way or a valley, that limits the construction method that could be used to construct that infrastructure as the basic conventional construction methods are highly dependent on the work space availability which becomes scarce when having such crossings. It is also clear that the wider is the crossing the lower is the possibility of using conventional methods to construct the portion of the infrastructure passing above or below the crossing.
On constructing tunnels and pipelines that are crossing highways and water ways the application of regular trenched methods becomes impossible and using trenchless technologies becomes a must. That is not the only case in which trenchless technologies is used however it is the case at which there is no other solution other than trenchless technologies (Najafi, 2010) (Darwish, et al., 2015). This is another case at which such detrimental factors affect the construction method choice process by excluding simple conventional methods and force the construction team to use more sophisticated methods to construct the infrastructure.
The construction of bridges crossing wide highways, water ways or valleys forces the construction team to exclude non-conventional methods as the erection of the falsework to conventionally construct the bridge deck becomes extremely difficult. In some cases where the crossings are not allowing construction of piers the designers are forced to change the structural system and use a long-span bridge instead of a short-span one (Darwish, et al., 2015).
10.2.1.3 Neighboring Structures
When a structure is constructed beside neighboring structures the rights of these neighbors should be taken into consideration when constructing the new structure. The issue becomes more critical when excavating beside the existing structures and as the depth of the new excavation increases the risks that the existing neighboring structure faces increase. This excludes the use of the conventional open-cut excavation method that shall constitute a major risk on the foundation system of the neighboring structure (Darwish, et al., 2015) (Abdel-rahman, 2007). This is not the only effect as not any earth retaining method could be used beside existing foundations without harming the foundations or the supporting soils. Vibrations caused by hammering or vibrating driven piles used in sheet piling and soldier piles constitute real risks on the soil on which the existing foundations are constructed. Hence, such methods should be excluded when constituting risks of failure or differential settlements on neighboring structures (Woolworth, 1996) (Darwish, et al., 2015).
Tunneling activities could also affect neighboring foundations founded on certain types of soils that could suffer from loss of bearing capacity or volumetric changes due to vibrations caused by tunnel boring activities. Within such cases, unless the neighboring structures are properly protected and the tunnel boring process is monitored properly, the tunneling method should be changed within this locality (Bilgin, Copur, & Balci, 2014) (Darwish, et al., 2015).
10.2.2 Size and Structural Systems
10.2.2.1 Bridge Structural Systems
The major deterministic factor in bridge construction is the structural system of the bridge itself as the structural system could narrow down the list of construction methods that could be used to construct the bridge. Whether the bridge is short-span or long-span, it’s structural system, its curvature and whether the spans are equal or not will strongly affect the construction method to be used for each case as each of these factors excludes one or more of the construction methods (Blank, Blank, & Luberas, 2003).
The incremental launching technique is proven to be only used in cases where the slope of the bridge deck under construction is not significantly changing. Consequently, if a bridge is of significant curvature, such a method could not be used for such a case (VSL Inc., 1977). On the other hand curvature could come into the picture in another fashion when it comes to constructing arched bridges as most of arched bridges are single spanned, with unequal spans or with spans having different arch shapes. For all of these cases and in addition to the incremental launching being impossible, the balanced cantilever method is not balanced any more and hence for most of arched bridges the unbalanced unidirectional cantilevered method is used to construct the bridge deck which should be designed together with the piers to carry the high moments caused by the unidirectionality of that method (Barker, 1981) (Darwish, et al., 2015).
The structural system is not always excluding methods of construction, in some cases a certain structural system may include methods of construction that are not valid for other structural systems. This is apparent in the case of suspended bridge construction as it is the only type of long-span bridges that could have its deck constructed starting from its mid span. This could be done through constructing the suspension cables first and then assemble the prefabricated deck sections in position, this process should be done in a certain sequence in order to avoid the swinging of the deck under wind loads during the construction process (Adanur, Günaydin, Altunisik, & Sevim, 2012).
10.2.2.2 Underground Structural Systems
One of the most deterministic factors in the construction of multi-story underground structures and underground tanks is the size which is coupled to the structural system as the structural system narrows down the list of construction methods that could be used to construct the bridge. The depth of the underground structure and its horizontal dimensions (width and length) will strongly affect the construction method to be used for each case as each of these factors excludes one or more of the construction methods.
The depth of the structure is the most important factor when selecting the proper side support systems during as the different side support systems vary in the maximum depth that each of them could reach due to the variation in their stiffness and the construction method of each. The depth attainable by sheet piles is the least of all which is about 12 m while the diaphragm walls could reach more than triple that depth and the other types of walls could attain depths between these two extremes (Woolworth, 1996). Hence, the deeper is the depth of the underground structure, the shorter is the list of side support methods suitable for construction in such a case.
The width and length of the structure come into picture when choosing between the major three alternatives related to the construction sequence which are the open-cut, bottom-up and top-down methods. The open-cut method is the simplest, fastest and most economic when used in shallow excavations in neighboring conditions that allow the soil to slope. The bottom-up method is more conventional than the top-down however the use for bracing members or tiebacks makes this method not that suitable for wide excavations as bracing such excavations would be significantly uneconomic and time-consuming due to the use of significantly large bracing members (Darwish, et al., 2015).
10.2.2.3 Pipeline Cross-Section and Material
In pipeline design, the material and diameter is predetermined by the medium transferred and the design performed by the design engineers however such decisions have a major effect on the construction method choice. Some pipeline construction methods depend on hammering, ramming or jacking the pipeline in sections, such methods are only suitable to construct pipelines made of materials of significantly high strength like concrete, metal alloys and fiber reinforced polymers and are totally unsuitable for constructing pipelines made of low-strength materials such as PVC’s and vitrified clays (Najafi, 2010) (ODOT, 2011).
The type material is not the only design-related detrimental factor excluding the methods that are not suitable for constructing certain pipelines as the size constraints come into the picture too. Each trenchless pipeline construction method could be used to construct pipelines within certain ranges of diameters. This is attributed to the equipment size and the curvature constraints that govern some methods. Pipe-jacking, micro-tunneling and utility tunneling methods are mainly used to construct moderate to large diameter pipelines with diameters that could reach up to 3 m while small to medium diameter pipes of diameters ranging between 0.05 – 1.2 m could be constructed using the horizontal directional drilling and pilot-tube micro-tunneling. Hence, it could be seen that for pipeline construction, the pipe material and the pipe diameter are the most detrimental factors that govern the choice of the construction method to be used (Najafi, 2010) (ODOT, 2011).
10.2.3 Legal Factors
The legal aspects that could act as deterministic factors causing the exclusion of certain construction methods from the list of methods possible to be used are either related to third party rights or to assure the abidance by laws, codes and standards. The rights of third parties could be either understood in lieu of the protection of neighboring structures as explained in section 2.1.3 or in terms of the rights of the general public.
On the other hand, laws, codes and standards provide certain boundaries that are either related to quality, environmental or safety aspects when it comes to construction. One clear example for how standards could exclude some methods in some cases of caisson construction as it is well known that pneumatic caissons cause what is so-called the “Caisson disease” affecting the respiratory system and general health of labors working inside pneumatic caissons in cases of high pressures. Hence, the occupational health and safety regulations prohibit workers from working in a pressurized environment beneath 35 m below the sea level (Gerwick B. C., 2007). Hence for jobs at which the caisson will reach a depth below 35 m pneumatic caissons are excluded for legal reasons related to safety issues unless robotics are used as applied in some projects in Japan (Darwish, et al., Selection Criteria for Large Caissons, 2015). Another similar example is the exclusion of the use of pressurized air TBM’s that depends on equalizing the ground water pressure by air pressure in order to bore a tunnel using the TBM. This family of TBM’s is no longer used in several countries due to the hazards of people working within high pressure environments (Bilgin, Copur, & Balci, 2014).
Noise pollution is another type of hazards that is regulated by legislations in several countries. Due to such regulations hammering and vibrational pile driving activities associated with methods like sheet piling and soldier piling are not to be done in populated areas. This is a factor that excludes such construction alternatives from the list of alternatives that could be used in underground structure construction methods (Woolworth, 1996) (ASUC plus, 2013). This factor also comes into the picture when constructing pipelines in populated areas as methods like pipe ramming and pipe bursting that involve hammering and ramming noisy activities and hence such methods are excluded in populated areas due to the legislations controlling noise hazards (Najafi, 2010).
Disturbing traffic could also act as a deterministic factor as conventional methods of bridge construction and trenched tunneling and pipelining disturb traffic in urban areas and most of laws require permits and high level of coordination with official authorities for re-routing traffic during the construction activities. Such vast hassle forces the use of non-conventional methods to construct the bridge, tunnel or pipeline in urban areas and excludes the use of conventional construction methods.
10.2.4 Contractual Factors
The terms of any contract are binding to the parties signing it which is also the case with construction contracts that keep the different parties bound to their terms and may act as a detrimental factor on the choice of construction methods for certain cases. Factors like time, cost and level of risk may or may not be deterministic depending on the contract terms that govern such factors.
Some contracts may be very strict when it comes to the construction time-frame to the extent that some could include a clause mentioning that time is “of the essence”. For such cases, the project management team is actually forced to use the fastest method of construction that could finish the project within the specified time frame. This is even more important when such activities are on the critical path of the project which means that these activities are the ones controlling the project duration. This issue could also be connected to cost if the delay penalties are high and the contractors could pay a lot in cases like these if the chosen construction method was not as fast as needed (Oberlender, 2000).
The type of contract also controls the financial risk of such projects as lump-sum and unit price contracts create a high level of financial risk on contractors when it comes to the construction methods they could use as they are not flexible in reflecting the variation in cost due to changes in construction methods and hence such type of contracts force the contractors to use the methods that will be most-cost saving. On the other hand cost-plus-fee contracts are different in the essence that they relieve the contractors from the risks of the variation in cost due to changes in construction methods and hence such type of contracts give room for contractors to use a larger variety of methods than it is the case for the lump-sum or unit price contracts (Oberlender, 2000).
In addition to that, contracts differ in terms of covering the costs of construction risks that could cause. If the contract clauses do not secure the contractors from carrying the burdens of risks caused by using construction methods that involve high levels of risk, the contractor may be forced to use less risky methods even if it will take more time to construct the infrastructure under construction or increase the price to cover the contingencies.
10.3 Non-Detrimental Factors
As explained above, the cost, time-frame and risks could all be considered as detrimental factors only if the legal and contractual circumstances force them to be detrimental. However, if the legal and contractual pressures on the project manager are decreased such factors could be non-detrimental. In such cases the project managers will have higher flexibility in choosing the construction methods to be used. For non-detrimental factors, the decision making process becomes more in the hands of the project manager and the contractors who will decide which of the non-detrimental factors is more important than the others.
Prioritizing between the time, cost, risk and constructability is not an easy task specially that two or more of these factors may be coupled. The time and cost are coupled as the more time consumed in the project, the more labor days are counted which means more money. However, for some cases the construction method itself could be faster however more expensive either due to needing special equipment that will increase the cost or needing highly skilled labors who will be paid higher rates or both. Hence, the relation between the time and cost is not a straight forward question to be easily answered it is an issue to be thoroughly studied for each project on its own. One example for such a case is the comparison between float-in dam construction and the conventional coffer-dam method as the float-in dam construction method is much faster however it involves a higher level of skill from labors and special equipment. Consequently, the float-in method is to be used only in large scale projects where the cost savings from reducing the project duration are more than the additional costs of using special equipment and the higher rates of the higher skilled labor (Darwish, et al., 2015). It could be also seen that the simplicity of the construction method comes into the picture as it is related to the labor level of skill and the use of complex equipment which are both related to the cost.
Another factor that is coupled to cost is the level of risk associated with the construction method as the more risky is the method of construction, the higher is the estimate of contingency cost that the contractors add to their unit prices during bidding (in case it is a unit price contract). The bidders in such bids are forced to either use a risky method with higher price to cover the anticipated risks or to propose a less risky method during bidding which could be on the account of time or the method itself could be more costly than the more risky one. A good example for such a case could be seen when examining a case at which an opened caisson or a pneumatic caisson could be used as pneumatic caissons involve higher mechanization however they are proven to have lower risks of tilting during excavation due to the fact that the excavation is performed in a more controlled environment (Gerwick B. C., 2007). Hence, and although the pneumatic caissons are more capital intensive, the reduction in risk and higher productivity makes them a better option for a lot of engineers provided the depth is within the permissible limits (Darwish, et al., 2015).
10.4 The Decision Making Process
As explained before, the detrimental factors are deterministic in terms of determining the boundaries that the decision makers should not cross. These boundaries exclude the methods that are unsuitable for construction due to reasons related to site conditions, size/structural aspects, legal or contractual factors. Within these boundaries non-detrimental factors govern the decision making process through favoring one method over the other based on the priorities of the owner and project manager reflected in the contract provisions. Hence, within the decision making process each method should pass first through the filter of the detrimental factors. The methods that passed are listed and the contract terms and specifications are used to prioritize the non-detrimental factors and decide which of them will have the top priority when selecting the construction method to be used and then decide the construction method. The process is summarized in Figure 25.
10.5 Conclusions
When examining the different factors related to choosing between the various heavy construction methods used in the construction of infrastructures the different factors could be classified into detrimental and non-detrimental factors. The detrimental factors act as the filter at which the validity of all the different construction methods should be tested. The methods that fail in the detrimental factors test are excluded. The methods that pass the detrimental factors test are listed and the non-detrimental factors are prioritized. The most important of the non-detrimental factor(s) will govern the choice between the different methods in order to select the method to be used to construct the infrastructure.
10.6 Acknowledgements
The author would like to acknowledge the Department of Construction Engineering in the American University in Cairo for its continuous support. The author would also like to extend his thankfulness and gratitude for his dear student and TA Mohamed Afifi for the efforts exerted by him.
References
1. Abdel-rahman, A. H. (2007). Construction Risk Management of Deep Braced Excavations in Cairo. Australian Journal of Basic and Applied Sciences, 1 (4), 506-518.
2. Abdrabbo, F., & Gaaver, K. (2012, July). Challenges and Uncertainties Relating to Open Caissons. DFI, 6 (1), 21-32.
3. ACI 207.5R-11. (2011). Report on Roller-Compacted. Farmingto Hills, MI: American Concrete Institute.
4. ACI Committee 371. (2008). Guide for the Analysis, Design, and Construction of Elevated Concrete and Composite Steel-Concrete Water Storage Tanks. Farmington Hills: American Concrete Institute.
5. Adanur, S., Günaydin, M., Altunisik, A. C., & Sevim, B. (2012). Construction stage analysis of Humber Suspension Bridge. Applied Mathematical Modelling, 36, 5492–5505.
6. Alberta Transportation. (2013). Standard Specifications for Bridge Construction. Alberta Transportation, Bridge Engineering Section. Edmonton: Alberta Transportation.
7. Anne Arundel County Department of Public Works. (2011, December). Disney Road Elevated Water Storage Tank. Retrieved December 4, 2014, from Anne Arundel County Department of Public Works: http://www.aacounty.org/DPW/HighlightedCapProject.pdf
8. Arco, D. C., & Aparicio, A. C. (2001). Improving the Wind Stability of Suspension Bridges during Construction. ASCE Journal of Structural Engineering, 127 (8), 869-875.
9. ASUC plus. (2013). Guidlines on safe and efficient basement construction directly below or near to existing structures. Hampshire, UK: ASUC plus.
10. Au, F. T., Wang, J. J., & Liu, G. D. (2003). Construction Control of Reinforced Concrete Arch Bridges. ASCE Journal of Bridge Engineering, 8 (1), 39-45.
11. Barker, J. M. (1981). Segmental bridges: the best in the business. Retrieved January 29, 2015, from Concrete Construction: Resources for contractors and specifiers including construction methods, materials and equipment.: http://www.concreteconstruction.net/images/Segmental%20Bridges_%20the%20Best%20in%20the%20Business_tcm45-348100.pdf
12. Basarkar, S. S., Kumar, M., Mohapatro, B., & Mutgi, P. (2013). Emerging Trend in Deep Basement Construction: Top-Down Technique. Second International Conference on Emerging Trends in Engineering (pp. 1-11). Jaysingpur, India: IOSR-JMCE.
13. Basha, I. M., Gab-Allah, A. A., & Amer, M. I. (1995). Construction of Ameria Caisson in Egypt. ASCE Journal of Construction Engineering and Management, 13-19.
14. BBR. (2014). BBR | Construction Methods. Retrieved February 7, 2015, from BBR Network: http://www.bbrnetwork.com/technologies/construction-methods.html
15. Ben C. Gerwick Inc. (2013). Braddock Dam Lock #2. Retrieved November 19, 2014, from Ben C. Gerwick, Inc.: http://www.gerwick.com/menu/project/waterresourcesandwaterways/Documents/Braddock%20Dam.pdf
16. Bennett, C. P., & D'Alessio, M. S. (1996). Falsework/Shoring. In R. Ratay, Handbook of Temporary Structures in Construction (2nd ed., pp. 16.1-16.54). New York, NY, USA: McGraw-Hill.
17. Bilgin, N., Copur, H., & Balci, C. (2014). Mechanical Excavation in Mining and Civil Industries. Boca Raton: CRC Press.
18. Bittner-Shen Inc. (2013). LOCKS AND DAMS. Retrieved November 17, 2014, from Bittner-Shen Inc.: http://www.bittner-shen.com/locksdams.html
19. Blank, S. A., Blank, M. M., & Luberas, L. R. (2003). Concrete Bridge Construction. In W.-F. Chen, & L. Duan, Bridge Engineering Construction and Maintenance (pp. 2.1-2.17). Boca Raton, FL, USA: CRC Press.
20. British Dam Society. (2010). British Dam Society, About Dams, The Three Gorges Dam. Retrieved November 13, 2014, from British Dam Society: http://britishdams.org/about_dams/3gorges.htm
21. British Dam Society. (2012). Types of Dams. Retrieved November 10, 2013, from British Dam Society: http://www.britishdams.org/BDS_Leaflet_2012.pdf
22. British Dam Society. (2013). About Dams. Retrieved November 10, 2013, from British Dam Society: http://www.britishdams.org/about_dams/types.htm
23. Burger, W. (2014). Multi-mode tunnel boring machines. Geomechanics and Tunnelling, 7 (1), 18-30.
24. Butler, J. (2011, March 4). Dam Construction Alternatives. Retrieved November 23, 2013, from WORCESTER POLYTECHNIC INSTITUTE: https://www.wpi.edu/Images/CMS/CEE/Stantec_MQP.pdf
25. Camellerie, J. F. (1996). Slipforming. In R. T. Ratay, Handbook of Temporary Structures in Construction (2nd ed., pp. 18.1-18.36). New York, NY, USA: McGraw-Hill.
26. Chakrabarti, S. K., Chakrabarti, P., & Krishna, M. S. (2006, May 1). Design, Construction, and Installation of a Floating Caisson used as a Bridge Pier. ASCE Journal of Waterway, Port, Coastal, and Ocean Engineering, 132 (3), 143-156.
27. Cimino, M. (2013, May 7). "Group 067-05: Three Gorges Dam." : Construction Techniques and Materials Analysis. Retrieved November 15, 2013, from blogspot.com: http://du2103-grp067-05.blogspot.com/p/construction-techniques-and-materials.html
28. CISC. (2008). Handbook of Steel construction (9th ed.). Toronto, ON, Canada: Canadian Institute of Steel Construction.
29. Copley, J. D., Ward, J. S., & Bannister, H. (2007, June 22). 2.0-Million Gallon Prestressed Concrete Elevated Tank Frankfurt, Kentucky. Retrieved December 4, 2014, from Bentley.com: ftp://ftp2.bentley.com/dist/collateral/Web/Building/Frankfort_Paper_1.pdf
30. Darwish, M., Aboali, R., Hashem, O., Girgis, S., Assal, M., Youssef, A., et al. (2015). Selection Criteria for Tunnel Construction. Canadian Society of Civil Engineers Annual Conference: Building on Our Growth Oppurtunities (pp. GEN-014-1-GEN-014-10). Regina, SK: CSCE.
31. Darwish, M., Almahallawi, T., Akroush, N., Kasbar, M., Amin, L., & Helmy, N. (2015). Selection Criteria of Short-span Bridges Construction Methods. Canadian Society for Civil Engineering Annual General Conference: Building on our growth oppurtunities (pp. GEN060-1 - GEN060-10). Regina, SK: CSCE.
32. Darwish, M., Attia, A., Yossef, M., Yossif, K., & Khalil, I. (2016). Selecion Criteria for Pipeline Construction . Canadian Society for Civil Engineering Annual General Conference - Resilient Infrastructure (pp. GEN18-1 - GEN18-10). London, ON: CSCE.
33. Darwish, M., Ghowiba, R., Afifi, M., Elhosary, M., Yazeed, M., Abdelaziz, A., et al. (2015). Selection Criteria for Long-span Bridge Construction Methods. Canadian Society for Civil Engineers Annual General Conference: Building on Our Growth Oppurtunities (pp. GEN-015-01-GEN015-10). Regina, SK: CSCE.
34. Darwish, M., Henen, R., Saleh, S., Rostom, M., Abdelhamid, O., Taha, K., et al. (2015). Selection Criteria for Large Caissons. Canadian Society for Civil Engineering Annual Conference: Building on Our Growth Oppurtunities (pp. GEN-011-01-GEN-011-10). Regina, SK: CSCE.
35. Darwish, M., Henen, R., Saleh, S., Rostom, M., Abdelhamid, O., Taha, K., et al. (2015). Selection Criteria for Large Caissons. Canadian Society of Civil Engineers Annual Conference: Building on Our Growth Oppurtunities (pp. GEN-011-01-GEN-011-10). Regina, SK: CSCE.
36. Darwish, M., Ismail, S. M., El Tohamy, Z., Shaheen, M., Hamed, M., El Essawy, H., et al. (2015). Selection Criteria for Construction Methods of Multi-Storey Underground Buildings. Canadian Society of Civil Engineers: Building on Our Growth Oppurtunities (pp. GEN-079-01-GEN-079-10). Regina, SK: CSCE.
37. Darwish, M., Kamel, K., Balbaa, O., El-feel, A., Elsarag, J., Tawfeek, M., et al. (2015). Selection Criteria for Elevated RC Tanks Construction. Canadian Society for Civil Engineering Annual General Conference: Building on Our Growth Oppurtunities (pp. GEN-012-1-GEN-012-10). Regina, SK: CSCE.
38. Darwish, M., Thomas, M., Wadeih, K., Eldeeb, N., Assy, M., Eweida, A., et al. (2015). Selection Criteria for Dam Construction Methods. Canadian Society for Civil Engineering Annual General Conference: Building on Our Growth Oppurtunities (pp. GEN-010-01-GEN-010-10). Regina, SK: CSCE.
39. Darwish, M., Thomas, M., Wadeih, K., Eldeeb, N., Assy, M., Eweida, A., et al. (2015). Selection Criteria for Dam Construction Methods. Canadian Society of Civil Engineers Annual General Conference: Building on Our Growth Oppurtunities (pp. GEN-010-01-GEN-010-10). Regina, SK: CSCE.
40. Destil, F. (2008, April 22). Cassaforma rampante Destil. Retrieved November 27, 2014, from wikipidea: http://commons.wikimedia.org/wiki/File:Cassaforma_rampante_Destil.jpg
41. Dunn, L. E. (1996). Bridge Falsework. In R. T. Ratay, Handbook of Temporary Structures in Construction (2nd ed., pp. 20.1-20.43). New York, NY, USA: McGraw-Hill.
42. Durkee, J. (2003). Steel Bridge Construction. In W.-F. Chen, & L. Duan, Bridge Engineering Construction and Maintenance (pp. 1.1-1.63). Boca Raton, FL, USA: CRC Press.
43. Federal Highway Administrtion. (2013, June 19). Chapter 2 - Highway & Rail Transit Tunnel Maintenance & Rehabilitation Manual - Tunnel Design. Retrieved April 29, 2014, from Federal Highway Administrtion: http://www.fhwa.dot.gov/bridge/tunnel/maintman02.cfm#t01
44. FHWA. (2003). Standard Specifications for Construction of Roads and Bridges on Federal Highway Projects. Washington DC: US Department of Transportation.
45. FHWA. (2009). Technical Manual for Design and Construction of Road Tunnels - Civil Elements. Washington, DC: Federal Highway Administration.
46. Geodata S.p.A. (2008). Mechanized Tunnelling in Urban Areas: Design Methodology and Construction Control. (V. Guglielmetti, P. Grasso, A. Mahtab, & S. Xu, Eds.) London, UK: Taylor & Francis Group.
47. Gerwick, B. C. (1996). Cofferdams. In R. T. Ratay, Handbook of Temporary Structures in Construction (pp. 7.1-7.42). New York: McGraw-Hill.
48. Gerwick, B. C. (2007). Construction of Marine and Offshore Structures. Boka Raton: CRC Press.
49. Girmscheid, G., & Schexnayder, C. (2002, August 1). Drill and Blast Tunneling Practices. ASCE Practice Periodical on Structural Design and Construction, 7 (3), 125-133.
50. Girmscheid, G., & Schexnayder, C. (2003). Tunnel Boring Machines. ASCE Practice Periodical on Structural Design and Construction, 8 (3), 150-163.
51. Godavarthi, V. R., Mallavalli, D., Peddi, R., Katragadda, N., & Mulpuru, P. (2011, July). Contiguous Pile Wall as a Deep Excavation Supporting System. Leonardo Electronic Journal of Practices and Technologies (19), 144-160.
52. Gregory, K. (1996). Concrete Formwork. In R. T. Ratay, Handbook of Temporary Structures in Construction (2nd ed., pp. 7.1-7.42). New York, NY, USA: McGraw-Hill.
53. Isaacson, J. B. (2001, June 4). Design and Evaluation of a Pneumatic Caisson Shaft Alternative for a Proposed Subterranean Library at MIT. Retrieved December 9, 2014, from MIT: dspace.mit.edu/bitstream/handle/1721.1/84280/49504982.pdf
54. Jacked Structures. (2011). Box Jacking. Retrieved December 18, 2014, from Jacked Structures: http://www.jackedstructures.com/box-jacking.html
55. Katz, J. G. (2011, March 13). File:SF-Oakland Bay Bridge Replacement.jpg. Retrieved January 31, 2015, from Wikipidia: http://commons.wikimedia.org/wiki/File:SF-Oakland_Bay_Bridge_Replacement.jpg
56. KFCA. (2013). Causway Technical Information. Retrieved February 7, 2015, from King Fahd Causeway Authority: http://kfca.com.sa/en/#/kfcatec/
57. Khan, M. A. (2015). Accelerated Bridge Construction Best Practices and Techniques. Oxford, UK: Butterworth-Heinemann.
58. Kim, H. S., Kim, Y. J., Chin, W. J., & Yoon, H. (2013, August). Development of Highly Efficient Construction Technologies for Super Long Span Bridge. Engineering, 5, 629-636.
59. Kodaki, K., Nakano, M., & Maeda, S. (1997). Development of the automatic system for pneumatic caisson. Automation in Construction, 241-255.
60. Kondo, Y., Iihara, A., & Kishimoto, K. (2006). The start of a new generation of TBMs. Tunnelling and Underground Space Technology, 21, 1-6.
61. Krishna, M. S., Chakrabarti, P., Chakrabati, S. K., Mukkamala, A., & Anavekar, N. (2004). Overview of Tacoma Narrows Bridge Floating Caisson Design. 23rd International Conference on Offshore Mechanics and Arctic Engineering (pp. 1-14). Vancouver: ASME.
62. Kruger, J., & Pty, T. (2013). Jacked Box Tunnel under a Railway Embankemnet. Rapid Excavation and Tunneling Conference (pp. 686-696). Washington D.C: Society for Mining Metallurgy and Exploration.
63. Kwietnewski, D., Henn, R., & Brierly, R. (2011). Versatility of roadheaders in tunnel construction. Tunneling and Underground Construction, 17-21.
64. Leonard, G. (2007, October 13). File:Pierre Pflimlin Bridge UC Adjusted.jpg. Retrieved January 31, 2015, from Wikipidea: http://commons.wikimedia.org/wiki/File:Pierre_Pflimlin_Bridge_UC_Adjusted.jpg
65. Leung, C. F., Lee, F. H., & Khoo, E. (1997). Behavior of Gravity Caisson on Sand. ASCE JOURNAL OF GEOTECHNICAL AND GEOENVIRONMENTAL ENGINEERING, 187-196.
66. Liang, J., Zhai, K., Fan, J., & Shi, C. (2015). Research on Alignment Control of Cable-Stayed Bridge during Construction. Applied Mechanics and Materials, 717, 465-469.
67. Limburg, K. (2006). ESF. Retrieved November 10, 2013, from ESF: http://www.esf.edu/efb/limburg/watershedEcology/2006/Dams.pdf
68. Lo, J. Y., & Tsang, C. K. (2008). The State-of-Art Technology for Immersed Tube Tunnel in Hong Kong and Korea. Seminar on The State-of-the-art Technology and Experience on Geotechnical Engineering in Korea and Hong Kong (pp. 45-59). Hong Kong: The Hong Kong Institution of Engineers.
69. Lunniss, R., & Baber, J. (2013). Immersed Tunnels. Boca Raton: CRC Press.
70. Masih, R., & Hambertsumian, V. (1999, February). Dynamic Liad Effect on Lift Slab Structures. JOURNAL OF PERFORMANCE OF CONSTRUCTED FACILITIES, 34-38.
71. MassDOT. (2014). Tunnels & Bridges - The Big Dig. Retrieved December 24, 2014, from The Massachusetts Department of Transportation - Highway Division: http://www.massdot.state.ma.us/highway/TheBigDig/TunnelsBridges.aspx#i90
72. Mathy, D. C., & Kahl, R. A. (2003). TBM vs. MTBM: Geotechnical Considerations. New Pipeline Technologies, Security, and Safety (pp. 1261-1270). Baltimore: ASCE.
73. McCullough, D. (1972). The Great Bridge: The Epic Story of the Building of the Brooklyn Bridge. New York: Simon and Schuster.
74. Mondayis. (2007, January 15). File:AGF00041.JPG. Retrieved February 23, 2015, from Wikimedia Commons: http://commons.wikimedia.org/wiki/File:AGF00041.JPG
75. Murthy, V. N. (2007). Advanced Foundation Engineering. New Delhi: Satish Kumar Jain for CBS Publishers and Distributers.
76. Najafi, M. (2010). Trenchless Technology Piping Installation and Inspection. New York: McGraw-Hill.
77. Smithson, D. (Director). (2004). The Channel Tunnel Megastructures Documentary [Motion Picture].
78. Nonveiller, E. (1987). Open Caissons for Deep Foundations. ASCE Journal of Geotechnical Engineering, 424-439.
79. Oberlender, G. D. (2000). Project Mangement for Engineering and Construction (2nd ed.). New York: McGraw-Hill.
80. ODOT. (2011). ODOT HYDRAULICS MANUAL CHAPTER 16: TRENCHLESS TECHNOLOGY. Retrieved December 30, 2014, from Oregon Department of Transportation Highway Division: ftp://ftp.odot.state.or.us/techserv/Geo-Environmental/Hydraulics/Hydro/Manuals_and_Guidance/HDM%202011/Chapter_16_2011/Chapter_16.pdf
81. Panas, A., & Pantouvakis, J. P. (2014). Simulation-Based and Statistical Analysis of the Learning Effect in Floating Caisson Construction Operations. ASCE Journal of Construction Engineering and Management, 1-8.
82. Pearlman, S., Walker, M., & Boscardin, M. (2004). Deep Underground Basements for Major Urban Building Construction. ASCE Geo-Support 2004: Drilled Shafts, Micropiling, Deep Mixing, Remedial Methods and Specialty Foundations (pp. 545-560). Orlando, Florida: ASCE.
83. Peurifoy, R. L., & Oberlender, G. D. (2011). Formwork for Concrete Structures. New York: McGraw-Hill.
84. Peurifoy, R. L., Schexneydar, C. J., & Shapira, A. (2006). Construction Planning Equipment and Methods. New York: McGraw-Hill.
85. Prentzas, G. S. (2009). The Brooklyn Bridge. New York: Infobase.
86. Rafie, K. (2013). Rapid Drill-and-Blast Tunneling through the Application of Systems Engineering Methods. Rapid Excavation and Tunneling Conference (pp. 740-754). Washington, DC: Society for Mining, Metallurgy and Exploration.
87. Reddy, P., Ghaboussi, J., & Hawkins, N. M. (1999). Simulation of Construction of Cable-Stayed Bridges. ASCE Journal of Bridge Engineering, 4 (4), 249-257.
88. Ruhl, V. R. (1997). Computer-Aided Design and Manufacturing of Complex Shaped Concrete Formwork. Retrieved February 3, 2015, from Research Gate: http://www.researchgate.net/publication/30874475_Computer-Aided_Design_and_Manufacturing_of_Complex_Shaped_Concrete_Formwork
89. Santarelli, G., & Ratay, R. T. (1996). Diaphragm/Slurry Walls. In R. T. Ratay, Handbook of Temporary Structures in Construction (2nd ed., pp. 9.1 - 9.49). New York, NY, USA: McGraw-Hill.
90. Schiffler, M. (2014, July 17). Bui Dam. Retrieved November 19, 2014, from Wikipedia: http://en.wikipedia.org/wiki/Bui_Dam
91. SCI. (2001). Steel Intensive Basements. Ascot, UK: The Steel Construction Institute.
92. SK MOST. (2014). About the Project | Construction of а cable-stayed bridge to the Russky Island across the Eastern. Retrieved February 17, 2015, from Construction of а cable-stayed bridge to the Russky Island across the Eastern : http://rusbridge.net/about/
93. SKMOST (Director). (2012). Construction of cable-stayed bridge in Vladivostok – video presentation [Motion Picture].
94. Spanish National Commission on Large Dams. (2012). TECHNICAL GUIDELINES FOR DAM SAFETY 2. Madrid: Spanish National Commission on Large Dams.
95. Spicer, G. (2011, January 3). Construction of the first Severn Bridge 1965. Retrieved February 17, 2015, from Geograph Britain and Ireland: http://www.geograph.org.uk/photo/2218020
96. Storfix. (2005, July 24). File:Itztalbruecke 2005-07-24.jpg. Retrieved January 31, 2015, from Wikipidia: http://commons.wikimedia.org/wiki/File:Itztalbruecke_2005-07-24.jpg
97. Sun, Q. S., Guo, X. G., Zhang, D. P., Guan, X. K., & Zheng, Y. (2011). Research on the Application of Horizontal Rotation Construction Method with Flat Hinge in Cable-Stayed Bridge Construction. Advanced Materials Research, 255-260, 856-860.
98. Tucker, F. (2012, August 23). Kentucky Lock Addition Project . Retrieved November 15, 2014, from Flickr: https://www.flickr.com/photos/nashvillecorps/7853565842/
99. US Army Corps of Engineers. (2004). Unified Facilities Criteria: Dewatering snd Groundwater Control. Washington DC: Department of Defense USA.
100. US Army Corps of Engineers. (2013, June). Monongahela River Locks and Dams 2, 3, and 4 Project Fact Sheet. Retrieved November 19, 2014, from USACE: http://www.lrp.usace.army.mil/Portals/72/docs/HotProjects/LMPJune2013.pdf
101. VikiPicture. (2013, February 13). File:İstanbul - Haliç Metro Köprüsü inşaatı r2 Şubat 2013.JPG. Retrieved February 14, 2015, from Wikimedia: http://commons.wikimedia.org/wiki/File:%C4%B0stanbul_-_Hali%C3%A7_Metro_K%C3%B6pr%C3%BCs%C3%BC_in%C5%9Faat%C4%B1_r2_%C5%9Eubat_2013.JPG
102. VSL Inc. (1977). The Incremental Launching Method in Pre-stressed Concrete Bridge Construction. Berne: VSL INTERNATIONAL LTD.
103. VSL Inc. (2013). Bridge Construction Partner. Labege, France: VSL Inc.
104. VSL International LTD. (1983). Concrete Storage Structures - Use of the VSL Special Construction Methods. Bern, Switzerland: VSL International LTD.
105. Wikimedia. (2010, January 15). File:Hoover Dam Bypass UC.jpg. Retrieved February 14, 2015, from Wikimedia: http://commons.wikimedia.org/wiki/File:Hoover_Dam_Bypass_UC.jpg
106. Wikimedia. (2014, March 14). File:AmCyc Caisson - Caisson of East River Bridge.jpg. Retrieved December 11, 2014, from Wikimedia: http://commons.wikimedia.org/wiki/File:AmCyc_Caisson_-_Caisson_of_East_River_Bridge.jpg
107. Wikimedia Foundation, Inc. (2016, June 8). Infrastructure. Retrieved June 10, 2016, from Wikipedia, the free encyclopedia: https://en.wikipedia.org/wiki/Infrastructure
108. Wikipedia. (2015, February 15). Humber Bridge - Wikipedia, the free encyclopedia. Retrieved February 18, 2015, from Wikipedia, the free encyclopedia: http://en.wikipedia.org/wiki/Humber_Bridge
109. Woolworth, R. S. (1996). Earth-Retaining Structures. In R. T. Ratay, Handbook of Temporary Structures in Construction (2nd ed., pp. 8.1-8.44). New York, NY, USA: McGraw-Hill.
110. Wordpress. (2012, May 20). Sheetpile retaining wall design. Retrieved November 19, 2014, from wordpress.com: http://sheetpileretainingwalldesign.wordpress.com/
111. World Bank Group. (2016, January). Electric power consumption (kWh per capita) | Data | Graph. Retrieved June 10, 2016, from The World Bank Group: http://data.worldbank.org/indicator/EG.USE.ELEC.KH.PC/countries?display=graph
112. World Bank Group. (2016, January). Improved water source (% of population with access) | Data | Graph. Retrieved June 10, 2016, from The World Bank Group: http://data.worldbank.org/indicator/SH.H2O.SAFE.ZS/countries?display=graph
113. Xu, Y., Zhou, Z., & Wu, H. (2010 ). Design of Arch Bridge with Variable Steel-Concrete Composite Section Based on Vertical Erection-Rotation Method . International Conference on E-Product E-Service and E-Entertainment (pp. 1-4). Henan: ICEEE.
114. Zallen, R. M., & Grossf, B. (2002, November). Effective Length of Lift-Slab Columns. JOURNAL OF PERFORMANCE OF CONSTRUCTED FACILITIES, 141-148.
115. Zhou, P. (2014). Three Gorges Dam. Retrieved November 15, 2014, from About.com: http://geography.about.com/od/chinamaps/a/Three-Gorges-Dam.htm
- Quote paper
- Dr. Mohamed Darwish (Author), 2016, Heavy Construction of Infrastructure. How to choose the right method?, Munich, GRIN Verlag, https://www.grin.com/document/334481
Similar texts


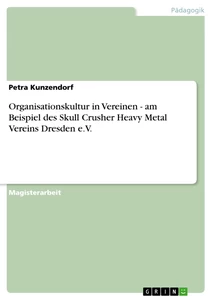
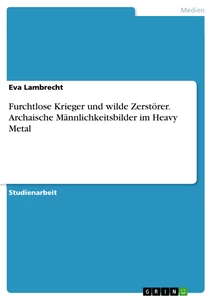
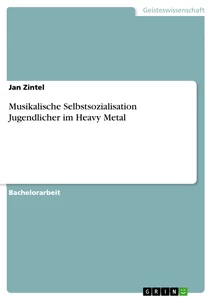
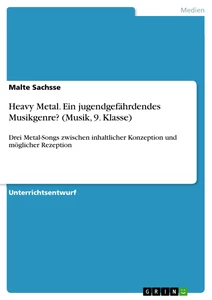


Publish now - it's free


Comments